EasyManua.ls Logo

Niigata seiki BEVEL BOX User Manual

Niigata seiki BEVEL BOX
2 pages
To Next Page IconTo Next Page
Page #1 background imageLoading...
Page #1 background image
ABS
ABS
ABS
Reference Surface
ABS
BEVEL BOX
Model No. : BB-180L
Thank you for purchasing the Bevel Box Digital Angle Meter.
Please read this manual thoroughly before use for proper operation.
Digital
Angle Meter
Precision angle measurement and working
reference for assembly of machinery, tooling,
jigs, etc.
Magnetic base.
Absolute Mode for measuring angle referenced
to true horizontal.
0-point can be set at any position in Relative
Mode.
Hold function to freeze display.
Auto Power Off feature. (approx. 5 minutes)
This is a precision measurement instrument - Handle With
Care. Do not drop or subject to shock.
Instrument accuracy is listed under Specifications section.
For applications requiring higher accuracy, please use
higher precision angle gauge.
Do not engrave or mark with electric pen.
Holding power of magnet will vary depending on workpiece.
Test for sufficient holding force before use to insure
instrument does not fall.
Keep away from precision instruments, watches, etc. and
any devices that can be damaged by magnet.
Clean measuring surface with soft cloth after use to
remove any debris or contamination.
Remove battery if gauge will not be used for a long period
of time.
Do not use or store in places subject to extreme temperate
fluctuations, direct sunlight, dusty locations, or locations
that are wet or have high humidity.
PARTS IDENTIFICATION
品   番Model
± 0.2°
0.1°
0.1°
BB-180L
±180.0°
approx. 70g
(
without battery
)
Measurement Range
Resolution
Accuracy
Repeatability
approx. 545
Operating Temperature Range
Weight
AAA Battery
(
1×
)
Power
Battery Life
Absolute
(
ABS
)
, Relative
Measurement Modes
approx.40Hr.
(
for alkaline battery
)
Accessories Storage Case
APPLICATIONS and FEATURES
SPECIFICATIONS
CAUTION
[
LCD
]
Display
Rear
Battery Cover
Bottom
Measurement Surface
[
ZERO
]
Button
[
ON/OFF
]
Button
[
HOLD
]
Button
Battery
Cover
AAA
Battery
Front
INSERTING / REPLACING the BATTERY
Push on tab of rear battery
cover to open.
Insert AAA battery as shown
in drawing. Replace cover.
【 To Turn ON Power
When power is OFF, press
[
ON/OFF
]
Button.
To Turn OFF Power
When power is ON, long press of
[
ON/OFF
]
Button.
Auto Power Off Feature
If there is no change in measured value for
approximately5 min., power will turn OFF
automatically.
Absolute Measurement Mode
(
ABS
)
When power is ON, press
[
ON/OFF
]
button to
switch gauge to Absolute Mode. “ABS” icon will
appear on the LCD display.
Relative Measurement Mode
When power is ON, press
[
ZERO
]
button to
switch gauge to Relative Mode. The “ABS” icon
will turn off and display will reset to 0.0.
LCD DISPLAY
(
POWER
)
ON / OFF
MEASUREMENT MODE
Ta b
INSTRUCTION MANUAL
1× AAA battery required
(
not included.
)
Press
[
ON/OFF
]
to turn on power.
If “ABS” icon is not displayed, press
[
ON/OFF
]
again to switch
gauge to Absolute Measurement Mode and display icon.
Place the measurement surface of the gauge onto the object to be
measured.
(
Figure
:
2
)
Direction of tilt icon will display next to measured value -
If tilt is to left,
icon will display.
If tilt is to right,
icon will display.
Absolute Measurement Mode
(
ABS
)
When Taking Measurements, Please Note
In Relative Measurement Mode, 0° can be preset at any angle.
Press
[
ON/OFF
]
to turn on power.
Place gauge on reference surface and press
[
ZERO
]
button.
Figure:3
)
Place the measurement surface of the gauge onto the object to 
be measured.
(
Figure:4
)
Direction of tilt icon will display next to measured value -
If tilt is to left,
icon will display.
If tilt is to right,
icon will display.
Press the [ON/OFF] Button again to switch back to Absolute
Measurement Mode.
Relative Measurement Mode
Tilted 10° to left
from horizontal
Tilted 10° to right
from horizontal
ABS
ABS
Tilted 5° to left from
reference surface
Tilted 5° to right from
reference surface
TAKING MEASUREMENTS
No display.
Displayed reading is in error.
Displayed value does not change as gauge is moved.
If any of the following symptoms appear, please cycle power by
removing and replacing battery, or replacing battery with a fresh one.
If problem persists, or if you have any questions, please contact distributor
or place of purchase.
Please note, manufacturer is unable to respond to inquires or provide
service
directly.
Please contact distributor or place of purchase.
TROUBLESHOOTING
Place the measurement surface of the gauge onto the object to
be measured.
(
Figure:1
)
If off-axis tilt of the gauge (toward front or back sides) exceeds
±5°, a measurement can not be taken and "Erro" will be displayed
on the LCD.
Surface to be Measured
Press
[
ZERO
]
Button
Display reading is 0.0°
(
Figure: 1
)
(
Figure: 2
)
(
Figure:3
)
(
Figure:4
)
Press
[
HOLD
]
to fix the reading on the display.
Press
[
HOLD
]
a second time to release.
HOLD FUNCTION
Niigata seiki Co., Ltd.
5-3-14, Tsukanome, Sanjo, Niigata, Japan, 955-0055
Tel. : +81-256-33-5522 Fax. : +81-256-33-5518
MAIL intl.sales@niigataseiki.co.jp
URL http://www.niigataseiki.co.jp
Question and Answer IconNeed help?

Do you have a question about the Niigata seiki BEVEL BOX and is the answer not in the manual?

Niigata seiki BEVEL BOX Specifications

General IconGeneral
BrandNiigata seiki
ModelBEVEL BOX
CategoryMeasuring Instruments
LanguageEnglish

Summary

Parts Identification

Rear Battery Cover

Compartment for the device's battery.

Front View

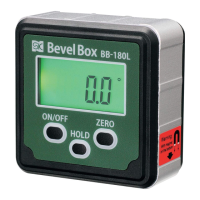
Front-facing components of the angle meter.

LCD Display

Screen showing measurement readings and icons.

ZERO Button

Used to set the zero point in Relative Mode.

HOLD Button

Freezes the current measurement reading on the display.

ON/OFF Button

Powers the device on or off.

Bottom Measurement Surface

The contact surface for taking measurements.

Applications and Features

Precision Angle Measurement

Used for machinery, tooling, and jigs assembly.

Magnetic Base

Allows attachment to magnetic surfaces for stable measurement.

Absolute Mode

Measures angle referenced to true horizontal.

Relative Mode 0-Point Setting

Allows setting a zero point at any position in Relative Mode.

Hold Function

Freezes the displayed measurement value.

Auto Power Off

Device automatically powers off after approximately 5 minutes.

Specifications

Model

Model number of the digital angle meter.

Measurement Range

The full range of angles the device can measure.

Resolution

The smallest increment of angle the device can display.

Accuracy

The precision of the angle measurements.

Repeatability

Consistency of measurements under identical conditions.

Operating Temperature Range

The temperature range for optimal device performance.

Weight

The weight of the device without batteries.

Power Source

Specifies the type of battery required.

Battery Life

Estimated operational time on a single battery charge.

Accessories

Items included with the angle meter.

Measurement Modes

Available modes: Absolute (ABS) and Relative.

Cautions and Handling

Handle With Care

This is a precision instrument; avoid dropping or shock.

Higher Accuracy Needs

Use higher precision gauges for applications requiring greater accuracy.

Avoid Marking

Do not engrave or mark the device with an electric pen.

Magnet Holding Force

Holding force varies; test for sufficient force before use.

Keep Away from Sensitive Devices

Keep away from precision instruments, watches, and magnetic devices.

Clean Measuring Surface

Clean with a soft cloth after use to remove debris.

Battery Removal for Storage

Remove battery if gauge will not be used for a long period.

Storage Environment

Avoid extreme temperatures, direct sunlight, dust, and moisture.

Battery Insertion and Replacement

Battery Requirement

Requires one AAA battery (not included).

Opening Battery Cover

Instructions on how to open the rear battery cover.

Inserting Battery

Diagram and instructions for inserting the AAA battery.

LCD Display and Power Control

Turning Power ON

Press the ON/OFF button when power is OFF.

Turning Power OFF

Long press the ON/OFF button when power is ON.

Auto Power Off Feature

The device automatically turns off if no measurement changes for 5 minutes.

Measurement Modes

Absolute Measurement Mode (ABS)

Press ON/OFF button to switch to ABS mode; 'ABS' icon appears.

Relative Measurement Mode

Press ZERO button to switch to REL mode; 'ABS' icon disappears.

Relative Measurement Mode Operation

Presetting 0-Point

Allows setting a zero point at any angle for relative measurements.

Setting Reference Surface

Place gauge on reference surface and press ZERO button.

Returning to Absolute Mode

Press the ON/OFF button again to switch back to Absolute Mode.

Hold Function

Fixing the Reading

Press the HOLD button to freeze the displayed reading.

Releasing the Reading

Press the HOLD button a second time to release the frozen reading.

Troubleshooting

Common Issues

Addresses issues like no display, incorrect readings, or static readings.

Troubleshooting Steps

Cycle power or replace battery for common problems.

Persistent Problems

Contact distributor or place of purchase if issues persist.

Usage Instructions

Measurement Precautions

Ensure correct placement of the measurement surface on the object.

Absolute Measurement Mode (ABS)

Steps to turn on and use Absolute Measurement Mode.

Relative Measurement Mode

Steps to preset a 0° point on a reference surface.

Troubleshooting and Support

Troubleshooting Steps

Reinsert or replace battery for display or reading errors.

Contacting Support

Contact the retailer or manufacturer for persistent issues.