QR7E-0V42U0 Printing: March 2006 (08)
Nissan, the Nissan Brand Symbol, “SHIFT_” tagline, Z and Nissan model names are Nissan trademarks.
©2006 Nissan North America, Inc.
Shift_
This easy-to-use Quick Reference Guide is intended to help you more fully appreciate
some of the unique features and functions of your new vehicle. However, it is not intended
to replace your Owner’s Manual. The Owner’s Manual contains more detailed information
to help you better understand the important safety warnings, features, operation, and
maintenance of your vehicle.
TIRE PRESSURE MONITORING SYSTEM (TPMS)
This system monitors tire pressure. Please remember, this system does
not detect a sudden drop in tire pressure (for example, a blowout while
driving). It also does not monitor the air pressure in the spare tire.
Tire pressure is affected by temperature. Low outside temperature
causes lower tire pressure. This may cause the low tire pressure
warning light to illuminate.
If the low tire pressure warning light comes on, check the tire pressure in all four tires.
Adjust the low tire pressure to the recommended COLD tire pressure shown on the Tire
and Loading Information label to turn the low tire pressure warning light off.
If TPMS is not functioning properly, the low tire pressure warning light will flash for
approximately 60 seconds when the key is turned on. After 60 seconds, the light will
remain on. Have the system checked by a NISSAN dealer.
AUTOMATIc clIMATE cONTROl (if so equipped)
02
01
07
08
09
03
06
AUTO BUTTON
Press the
AUTO button
01
. Turn the driver’s side temperature control dial
02
to the desired temperature. This will allow the fan speed, air flow distribution and
temperature to be automatically maintained.
Press the
DUAL
03
button to turn the passenger’s side temperature controls on
or off. This will allow the passenger’s side temperature to be adjusted
independently from driver’s side control.
When AUTO is pressed, AUTO will be displayed. When DUAL is pressed, DUAL
will be displayed.
DRIVER’S SIDE TEMPERATURE CONTROL DIAL
Turn the driver’s temperature control dial left for cold air or right for hot air.
PASSENGER’S SIDE TEMPERATURE CONTROL DIAL
Turn the passenger’s temperature control dial left for cold air or right for hot air.
AIR FLOW/MODE BUTTONS
Press to select the following air flow outlets:
Air flows from the center and side vents.
Air flows from the center, side, and foot vents.
Air flows mainly from the foot vents.
Air flows from the defroster and foot vents.
Air flows mainly from the defroster vents.
FAN SPEED CONTROL BUTTONS
Press
(slower) or
(faster) button repeatedly to manually control fan speed.
Press AUTO to automatically control fan speed. Press OFF to cancel fan speed
operation.
DEFROSTING/DEFOGGING FRONT AND SIDE WINDOWS
Press the defroster control button
to turn the system on. The A/C
automatically turns on when the defroster mode is selected.
Turn the driver’s side temperature control dial left or right to set the desired
temperature.
To set the defroster on high, press and hold
until fan speed increases.
DEFROSTING/DEFOGGING REAR WINDOW AND (if so equipped) OUTSIDE
HEATED MIRROR
Push the rear window defroster switch
on. Push the switch again to manually
turn the defroster off. This function automatically turns off in approximately 15
minutes.
A/C ON/OFF BUTTON
Press the
A/C button to manually turn the A/C on or off.
AIR RECIRCULATION BUTTON
Press the air recirculation button
to recirculate air inside the vehicle.
Press the air recirculation button
again to turn air recirculation off.
The air recirculation mode cannot be selected if the
air flow mode is selected.
05
04
09
08
07
06
03
02
01
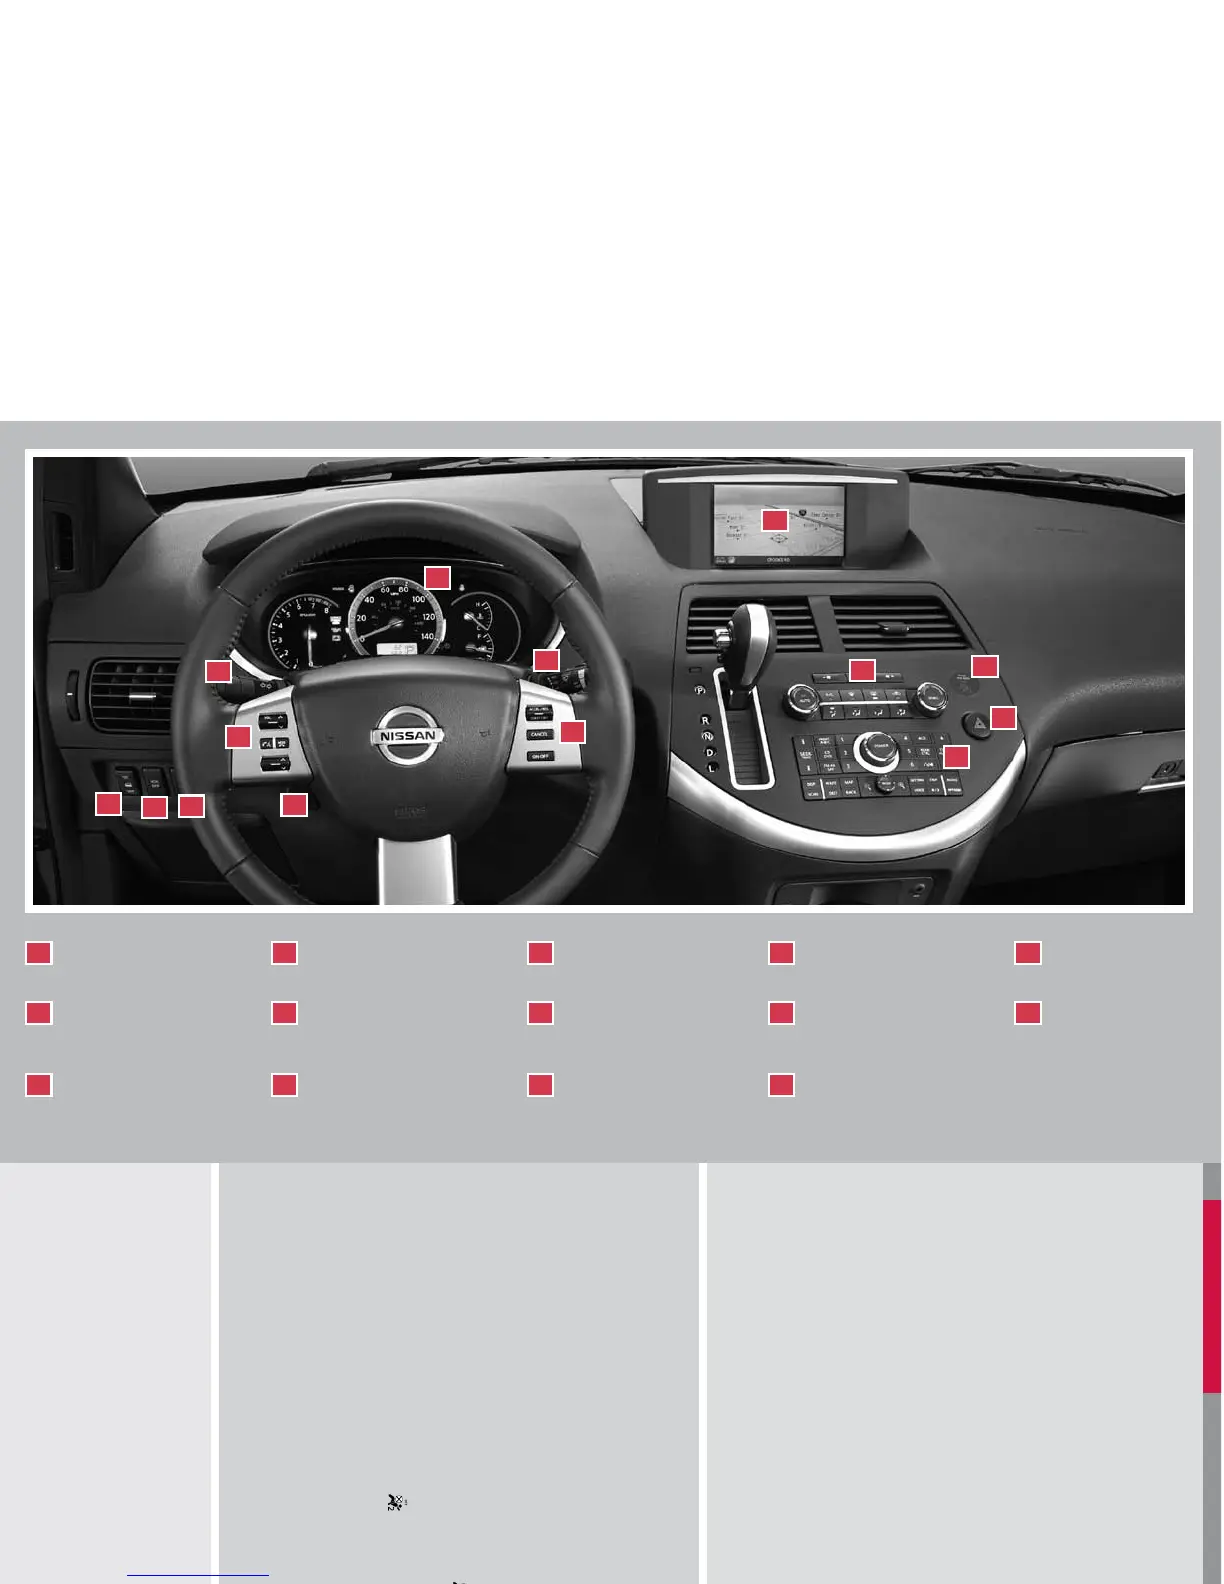
WINDSHIElD WIPER/
WASHER SWITcH
TIRE PRESSURE
MONITORING SYSTEM
HEADlIGHT AND TURN
SIGNAl SWITcH
01
02
03
*See your Owner’s Manual for more information.
lIGHTS ON
DEMAND
cRUISE cONTROl
STEERING WHEEl
SWITcHES FOR
AUDIO cONTROl
04
05
06
STEERING WHEEl
TIlT ADJUSTMENT*
REAR SONAR SYSTEM
OFF SWITcH
VEHIclE DYNAMIc
cONTROl (VDc) OFF
SWITcH*
07
08
09
FRONT-PASSENGER
AIR BAG STATUS lIGHT
clIMATE cONTROlS
cONTROl PANEl
DISPlAY
10
11
12
AUDIO cONTROlS
HAZARD WARNING
FlASHER SWITcH*
13
14
cRUISE cONTROl
To activate the cruise control, push the ON
.
OFF
switch. The indicator light in the instrument panel will
illuminate.
To set cruising speed, accelerate the vehicle to the
desired speed, push the
COAST/SET switch and
release it. The SET indicator light in the instrument
panel will illuminate.
To reset at a faster cruising speed, push and hold the
ACCEL/RES switch. When the vehicle reaches the
speed you desire, release the switch.
To reset at a slower cruising speed, push and hold the COAST/SET switch. Release
the switch when the vehicle slows to the desired speed.
To resume a preset speed, push and release the ACCEL/RES switch. The vehicle
returns to the last set cruising speed when the vehicle speed is over 24 MPH (38
km/h).
To cancel cruise control, push the CANCEL switch or tap the brake pedal. The SET
indicator light in the instrument panel will go out.
To turn off cruise control, push the ON
.
OFF switch. Both the CRUISE indicator light
and the SET indicator light in the instrument panel will go out.
FRONT-PASSENGER AIR BAG STATUS lIGHT
This vehicle is equipped with the Nissan Advanced Air
Bag system. Under some conditions, depending on
pressure detected on the passenger seat and how the
seat belt is used, the front-passenger air bag is designed
to automatically turn
OFF. When the front-passenger air
bag is
OFF, the front-passenger air bag status light will
illuminate*. For example:
When the system detects that the front-passenger’s
seat is occupied by a small adult, child or child
restraint as outlined in the Owner’s Manual, the
will illuminate to indicate that the
front-passenger
air bag is OFF and will not inflate in a crash.
When the front-passenger’s seat is occupied and the passenger meets the conditions
outlined in the Owner’s Manual, the
will not illuminate to indicate that the front-
passenger
air bag is operational.
*When the system detects that the front-passenger’s seat is unoccupied, the
passenger air bag status light will not illuminate even though the front-passenger
air bag is OFF.
Refer to the Owner’s Manual for detailed information regarding the Nissan Advanced Air
Bag System
FRONT SEAT ADJUSTMENTS
With manual seats (if so equipped):
Pull up on the lever
01
under the front of the seat
and slide backward or forward; release.
Lift the lever
02
on the side of the seat
to adjust
your seatback backward or forward; release when
you have found a comfortable angle and the seat
belt fits properly.
Use the dials
03
at the side of the driver’s seat
to
adjust the angle and height of the seat cushion.
With power seats (if so equipped):
Move the control
04
forward or backward to adjust
the seat cushion forward or backward.
Pull up to raise the driver’s seat cushion; press
down to lower the cushion.
04
Push the switch
05
forward to move the seatback
forward; press it back to move the seatback
backward.
Your driver’s seat has a lumbar support; adjust it by
moving the lever
06
forward or backward.
01
02
03
04
05
06
To move the 2nd row seats forward or backward:
Pull the lever
01
up and hold
it while you slide the seat forward or backward to the
desired position.
Release the lever to lock the seat in position.
To recline the 2nd row seatbacks:
Pull the lever
02
up
and lean forward or back.
The 2nd row seats can be tipped forward for easy entry or exit from the 3rd row seat:
To enter the 3rd row seats, lift up on the lever
03
located on the lower base of the
seat; this tips the seat forward.
To exit the 3rd row seats, pull back on the lever on the lower base of the seat and push
the seat forward.
To fold the 2nd row seats flat to the floor for maximum cargo hauling:
Lift up on the recline lever
04
to fold the seatback down on the seat base.
Press down on the small lever
05
on the back of the seat
to release the base of the
seat.
Then fold the entire seat forward into the stowed position on the floor
06
.
Reverse this process to return the 2nd row seats to a seating position. Make sure to
press the seats down to the floor until they latch into place.
ADJUSTING AND FOlDING THE 2ND ROW SEAT
01
02
03
06
05
04
To fold the 3rd row bench seat flat into the floor for maximum cargo hauling:
Disconnect and secure the center seat belt and tongue into the retractor base.
Pull the strap
01
on the seatback to allow all three head restraints to fold forward.
Pull back on the pull strap
02
to release the back of the seat and rotate the seatback
toward the back of the vehicle.
Pull up on the lever
03
located on the back of the seat base. This will fold the seat
base toward the back of the vehicle.
The entire seat will rotate toward you and stow flat in the floor.
04
Reverse this process to return the bench seat to a seating position. Make sure to press
the bench seat down into the floor and pull back on the seatback until it latches into
place.
Return all three head restraints to the upright latched position.
FOlDING THE 3RD ROW SEAT
01
02
03
04
04
05
02
01
01
04
02
05
03
10
11
12
13
14
06
07
08
09
cHIlD SAFETY REAR DOOR lOcK
Child safety locks help prevent the sliding doors from
being opened accidentally, especially when small
children are in the vehicle. The child safety lock levers
are located on the edge of the sliding doors. When the
lever is in the
LOCK position, the door can be opened
only from the outside, with the overhead console switch
or the keyfob.
ADJUSTABlE AccElERATOR AND BRAKE PEDAlS
(if so equipped)
Adjust the pedals when the automatic transmission lever is in Park.
Push
01
to move the position of the pedals forward.
Push
02
to move the position of the pedals backward.
01
02
FUEl-FIllER DOOR RElEASE
Press the switch located on the driver’s door to open the
fuel-filler door.
Close the fuel-filler door securely to lock it.
The driver’s side power sliding door is disabled when the fuel-
filler door is open. The sliding door can be partially opened
manually.
SUNROOF cONTROlS (if so equipped)
The ignition switch must be in the ON position to operate
the sunroof.
TILTING THE SUNROOF
To tilt the sunroof up, push the tilt switch toward the
UP
01
position.
To tilt the sunroof down, push the tilt switch toward the
DOWN
02
position.
SLIDING THE SUNROOF
To fully open the sunroof, push the switch toward the OPEN
03
position.
To fully close the sunroof, push the switch toward the CLOSE
04
position.
To open or close the sunroof part way, push the switch in either direction (
03
or
04
)
while the sunroof is sliding to stop it in the desired position.
01
02
03
04
SEAT BElT WARNING lIGHT AND cHIME
The light and chime remind you to fasten your seat belts. The
light illuminates whenever the ignition key is turned to the ON
or START position and remains illuminated until the driver’s
seat belt is fastened. At the same time, the chime sounds for
approximately 6 seconds unless the driver’s seat belt is
securely fastened.
The seat belt warning light may also illuminate if the front passenger’s seat belt is
not fastened when the front passenger’s seat is occupied. For 5 seconds after the
ignition switch is in the ON position, the system does not activate the warning light
for the front passenger.
Refer to the Owner’s Manual for detailed information regarding seat belt usage.
OUTSIDE MIRROR cONTROl SWITcH
Rotate the control switch to select the right or left mirror.
Adjust the mirror to the desired position by moving the control switch.
The selected mirror will automatically tilt down (if so equipped) when
the automatic transmission lever is moved to the R (Reverse) position.
The selected mirror will return to its original position when the automatic transmission
lever is moved to any position other than R (Reverse) or if the outside mirror switch is
moved to the neutral position.
REAR clIMATE cONTROl DIAlS
To adjust the climate control system for rear seat
passengers, use the dials on the overhead console.
REAR FAN SPEED CONTROL DIAL
REAR TEMPERATURE CONTROL DIAL/REAR
CTRL BUTTON
Press the
REAR CTRL button to transfer rear climate functions to the rear passengers.
02
01
 Loading...