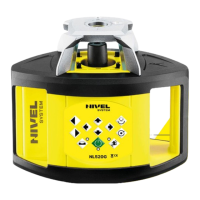
The Nivel System NL520 is a versatile self-leveling construction laser designed for determining height differences in construction measurements. It utilizes a visible laser beam and is suitable for both indoor and outdoor applications. The device is powered by rechargeable batteries and features advanced micro-controlled charging technology.
Function Description
The NL520 series lasers can project either a vertical or horizontal laser plane. Additionally, the device defines the axis of the laser plane (a line laser – point up and point down). The NL520 models can be controlled from both the device control panel and remotely. The laser level is waterproof and can be used outdoors, even in the rain, though it should not be submerged in water.
Important Technical Specifications
- Laser: Red beam (NL520R) or green beam (NL520G)
- Light source: Class II, 635 nm (NL520R), 515 nm (NL520G), <1mW
- Accuracy: ±1.0mm/10m
- Accuracy of laser plummet: ±1mm/1.5m
- Self-leveling range: ±5°
- Inclination (X and Y axis): ±10% (manual)
- Work range (diameter): 500 m (with sensor)
- Laser head rotation speed: Modes: 0-120-300-600 rpm
- Scanning: 0-10°-45°-90°-180°
- Working temperature: -20°C ~ +50°C
- Power: Li-ion battery
- Working time: About 50h
- Battery charging time: About 7h
- Dust and waterproof: IP54
- Dimensions: 206 x 206 x 211 mm
- Weight: 3.0kg
Laser Sensor: RD700 Digital – Specification
- Capture height: 90 mm
- Numeric readout height: 80 mm
- Reception angle: ±45°
- Detectable spectrum: 450 nm – 800 nm (red/green)
- Accuracy mode (mm): 1.0 / 2.0 / 5.0 / 10.0 mm
- Protection class: IP67
- Automatic shut off: After 30 min
- Power supply: 1 x AA
- Operating temperature: -20°C - 50°C
- Dimensions: 135 x 69 x 25 mm
- Weight: 0.19 kg
Remote Control Technical Specification
- Working range: About 10m (outdoor), 20m (indoor)
Usage Features
- Batteries: The NL520 uses Li-ion batteries that can be recharged. The charger shows the charging status with three modes: red light (battery not charging), green light (battery on charge), and flashing red light (charging complete). A full charge takes approximately 7 hours, providing about 50 hours of use.
- Control Panel: The device features a control panel with buttons for various functions, including ON/OFF, LED display for power state, LED for discharged batteries, manual mode, adjusting head rotation speed, adjusting slope towards X and Y axes, ASD system, and scanning.
- Turning on the power: Press the ON/OFF button. The instrument will level itself, and the power LED will light up. Once leveled, the laser head starts to spin at 600 rpm. If the instrument is inclined more than ±5°, manual mode LED will start to blink.
- Rotating laser head mode: Pressing the button allows adjustment of the laser head rotation speed. Switching is done by pressing the button, which can rotate the head clockwise or counter-clockwise.
- Scan mode: Adjusting the rotating speed of the head allows for a "drawn line" laser beam. This increases the range of the "drawn line." Depending on needs, the direction of rotation of the head can be clockwise or counter-clockwise.
- Inclination of the laser plane: The NL520 allows inclination of the laser plane in one or two directions. Pressing the manual mode button sets the instrument in manual mode. Using the arrow buttons, the laser plane can be inclined along the X and Y axes.
- ADS System: When enabled, the LED blinks slowly after automatic leveling. If the instrument experiences excessive inclination or unwanted movement/strike, the LED will blink quickly, warning the user.
- Height Measurement: After leveling, the laser head spins to set the laser plane. Attach the laser sensor to a laser staff. Place the staff with the sensor on a benchmark (zero point), reset the sensor position to define a zero level. Move the staff to another point to measure height; the difference in sensor positions indicates height differences compared to the benchmark.
- Slope Determination: Set the laser level on a tripod and align it with the desired tilt axis. Turn on the laser level. The laser plummet indicates the first point of the axis. Set the laser staff with the sensor at the other end point and reset its position. Use the remote control to change the inclination of the laser plane to match the desired slope (e.g., 1% inclination at 10m distance means a 10cm difference in height).
- Working with the vertical plane: The NL520 can set a vertical laser beam. Position the laser level as shown in the manual. After switching on, the device will self-level, and the head will start rotating to set a vertical plane.
- Remote control: The NL520 can be controlled remotely. The remote control panel has 9 buttons corresponding to those on the front panel. The operating range of the remote control is approximately 20 meters.
Maintenance Features
- Checking the laser level: Regularly check the following parameters: setting a horizontal plane, cone error, and setting a vertical plane. Checking and calibration of horizontal and vertical planes are simple and can be done by the user. Cone error can also be done by the user, but this error can only be removed by an authorized service center.
- Checking the horizontal plane:
- Set the instrument 30m from the wall so that the X-axis is perpendicular to the wall and X direction is pointed to a wall.
- Turn on the instrument and wait until it levels automatically.
- Place a sheet of paper on the wall and mark the position of the laser beam.
- Turn off the instrument.
- Loosen the tripod fixing screw and rotate the instrument 180°.
- Carefully move the instrument while the head is spinning.
- Turn on the instrument and wait until it levels automatically.
- Mark the position of the laser beam on the sheet.
- Measure the distance between the marks. If the distance is less than 6mm, calibration is not necessary. Otherwise, contact service.
- Perform similar operations for the Y axis.
- Checking the cone error:
- Set the laser centered between walls 30m apart. Set the instrument in the X or Y direction.
- Mark the position of the laser beam on both walls.
- Turn off the instrument and move it near one of the walls (1 to 2 meters). Do not change the orientation of the axes. Turn on the instrument.
- Mark the position of the laser beam on the walls.
- Measure the distance between the marks on the walls.
- If the difference in distance is less than 3mm, it can be assumed that this error does not occur. If the error is more than 3mm, contact service.
- Checking the vertical plane:
- Set the laser centered between walls 30m apart.
- Turn on the laser level.
- Place paper sheets on the walls and mark the laser beam position.
- Turn off the instrument. Set it in vertical position near one of the walls.
- Turn on the instrument.
- Mark the laser beam position on the paper sheet. Measure the distance between markers.
- Do not change the laser position and spin it 180°.
- Mark the laser beam position on the paper sheet. Measure the distance between markers.
- If the distance between markers is less than 3mm, calibration is not necessary.
Safety Precautions
- The device has a built-in laser source that generates a laser beam. Do not disassemble the device.
- Risk of fire, electric shock, or injury while self-repairing. Repairs should only be made by Nivel System service or its authorized representatives.
- The laser beam can be hazardous to the human eye if the device is improperly operated. Never repair the laser yourself. Protect your eyes from damage.
- Never look into the laser beam.
- Risk of fire and electric shock.
- Never use a wet battery.
- The possibility of explosion.
- Never use a laser level near flammable gases and liquids.
- A short-circuit may cause a fire. Pay attention not to short-circuit the battery while storing the device.
- Protection against shock: When transporting the instrument, it should be protected against shocks. Strong shocks can cause measurement errors.
- The user of this instrument should follow the instructions carefully. The manufacturer is not liable for any damage resulting from incorrect use of the instrument.
- Improper use of the laser and use not in accordance with instructions can cause injury or exposure to excessive radiation.
- Do not allow anyone to work in a laser beam. Before you begin, make sure that the laser beam is over the heads of workers. The lighting by laser beam can cause temporary blindness.
- Do not expose the body and clothing to the acid leaking from batteries and accumulators. If it occurs, quickly wash the body with clean water and consult a doctor.
- Broken or damaged transport box or transport box latches can lead to falling out of the box and damage the laser.
- The collapse of the laser level to the ground can lead to damage.
- Shaky, unstable site of laser level can lead to collapse and damage the laser. Always make sure that all screws and latches in a tripod work properly.
Exclusions of Liability
- The user is expected to comply with all recommendations regarding the use of this product and perform periodic reviews of the instrument's work.
- The manufacturer or its representatives assume no liability for damages caused by improper handling or intentional improper use, including direct or indirect damage and loss of income.
- The manufacturer and its representatives are not liable for damage or loss of income caused by natural disasters (earthquake, storm, flood, etc.), fire, accident or involving third parties in use of this instrument or using the instrument under conditions other than normal.
- The manufacturer and its representatives are not liable for any damages, loss of income, loss of data, interruption of business, etc., caused by the use of the product.
- The manufacturer and its representatives are not liable for any damages and loss of income caused by the use of the instrument in a way other than described in the manual.
- The manufacturer and its representatives are not liable for damage caused by improper activities or reactions as a result of combining with other products.
Warranty Terms and Conditions
- The manufacturer warrants good quality and efficient operation of the product provided that it is used for what it is intended, in operating conditions specified in the instruction manual of the product.
- The warranty covers defects of products/spare parts caused as a result of defects in materials, defective structure, or defects in assembly.
- The Warrantor grants the User the warranty for 12 months and the warranty period starts on the date of sale.
- The defects acknowledged as covered by the warranty shall be removed free of charge by an authorized service center in the shortest possible time not exceeding 14 business days counted from the day of delivering the product for repair.
- The repairs shall be carried out in the Warrantor's registered office or in the places specified by the Warrantor.
- The manner of removal of the defect shall be decided by the Warrantor.
- Accessories, including batteries, cells, cables, holders, chargers, etc., shall be covered with a 3-month warranty.
- The activities listed in the instruction manual which are proper and normal services related to operation, e.g., verification and calibration of surveying equipment, shall not be considered a warranty repair.
- The user shall be charged for unjustified complaints in accordance with the effective price lists.
- Warranty repairs shall be carried out only and exclusively based on purchase document containing the product serial number (NECESSARY CONDITION).
- Under the warranty, the Warrantor shall not be liable for the consequences of defects, that is damage caused to people, third parties' property, lost profits, etc.
- The warranty shall be terminated if the following is found: the standards of product operation have been exceeded, the damage has occurred as a result of using the product in violation of its instruction manual, there is some mechanical damage, the user has carried out repairs on the user's own or in unauthorized facilities.
- The provisions of the Civil Code shall be applicable to all issues not stipulated in these terms and conditions.
- The parties shall make every effort to settle amicably any disputes arising in connection with the execution of this agreement, and when it turns out to be impossible, the disputes shall be resolved by the Court with jurisdiction over the Warrantor's registered office.
- When the warranty services provided by the service center are needed, please do not hesitate to contact your seller or a Nivel System service center directly.
- e-mail: service@nivelsystem.com
- phone: +48 22 632 91 40
Extended Warranty
To use the free warranty extension of 12 months, the instrument must be registered within three months from the date of purchase. Registration is done via a form on the web: http://www.nivelsystem.com/en/extension-of-guarantee.