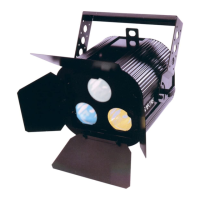
The Spectre is a versatile floodlight designed for indoor use, offering a wide range of features for professional lighting applications. It is equipped with a 1500W dichroic floodlight and three 500W halogen lamps, capable of producing 65536 colors. The device includes a built-in dimmer, allowing for precise control over brightness. For cooling, it features a temperature-controlled fan system and is housed in an extruded aluminum case, ensuring durability and efficient heat dissipation. Barn doors are fitted as standard, providing control over light spill. The Spectre can be controlled via DMX, MIDI, or 0-10V analogue signals, offering flexibility for integration into various lighting setups. It comes with a 2-year warranty.
Function Description
The Spectre's primary function is to provide floodlighting with a wide range of color options. It does not produce a focused beam of light, making it suitable for illuminating broad areas. The device's 1500W dichroic floodlight, powered by three 500W halogen lamps, allows for the generation of 65536 distinct colors. This extensive color palette is achieved through dichroic filters, which are designed to produce specific colors and should not be replaced with colored gels.
The built-in dimmer allows users to adjust the brightness of the light output, from completely off to full illumination. This dimming capability is integrated into the Spectre itself, eliminating the need for an external dimming pack.
The Spectre offers multiple control modes to suit different operational environments:
- DMX Operation: The Spectre can be integrated into a DMX lighting control system. It uses 5-pin XLR connectors for DMX input and output. Data+ is on pin 3, Data- on pin 2, and Pin 1 is earth. For multi-unit setups, DMX leads connect from DMXout of one lantern to DMXin of the next in a chain. The last lantern in the chain requires a "terminator" (an XLR plug with a 120Ω resistor between pins 2 and 3) in its DMXout socket. The device's LED indicates DMX signal status: red when switched on, yellow when receiving a valid DMX signal.
- MX90 Mode (8-channel protocol): This mode is designed for compatibility with MX90-compatible controllers, SFC1 DMX remote controllers, Merlin, or other DMX lighting control desks that support advanced features like flashing and color scrolling. In this mode, the Spectre utilizes 8 DMX channels:
- Channel 1: x-position (pan) or dish rotation
- Channel 2: y-position (tilt)
- Channel 3: color (plus color scrolling)
- Channel 4: gobo or color saturation
- Channel 5: speed
- Channel 6: strobe/blackout
- Channel 7: gobo rotation
- Channel 8: brightness
Only channels 3, 4, 6, and 8 are used on the Spectre itself for color, saturation, strobe/blackout, and brightness, respectively. The color is continuously variable, allowing for intermediate shades like orange (between red and yellow) and purple (between blue and magenta). The saturation control enables the selection of pastel shades, from fully saturated to white. To set up, users are advised to set saturation to zero, adjust brightness, then set the color. For paler shades, increase saturation. DIL switches are used to set the DMX address, with both "mode" switches set to OFF for MX90 mode.
- DMX 3-channel Mode: This mode uses fewer channels, making it suitable for general-purpose DMX controllers like the Merlin, where flashing or color scrolling can be programmed into the controller. In this mode, the DIL switches are set OFF-ON. The three channels control Brightness, Colour, and Saturation. The color is continuously variable, and saturation allows for pastel shades.
- DMX Remote Control (SFC2): The Spectre can be controlled by an SFC2 DMX remote control unit using an RJ11 lead. For multiple Spectres, they are linked via 5-pin XLR DMX connections, with the remote control connected to the first lantern. A terminator is optional. DIL switches are set with both "mode" switches off to configure the DMX address.
- MIDI Operation: The Spectre is equipped with MIDI in and MIDI through connectors, allowing it to be connected to other MIDI equipment. When switched on, the LED lights red, and flashes yellow upon receiving a valid MIDI command. To switch from DMX to MIDI operation, both mode switches on the DIL panel must be ON. After setting the mode switches, the mains power should be turned off for ten seconds and then back on. The DMX address switches are re-purposed to set the MIDI channel (from 9 to 16) and controller number (any group of four controllers). The four MIDI controllers operate as follows:
- Controller 48: Fade rate (0 for instantaneous change, 127 for gradual fade, intermediate values for fade rates less than 30 seconds)
- Controller 49: Brightness
- Controller 50: Colour
- Controller 51: Saturation
- 0-10V Analogue Operation: Three channels from a 0-10V analogue controller can be connected to the 7-pin DIN socket. An unregulated +15V supply is available on pins 6 and 7 for powering controllers like the NJD Fade-4. For short cable runs (under 5m), 6-core cable (e.g., telephone or burglar-alarm cable) can be used; for longer runs, overall-screened cable is recommended. Multiple Spectres can be controlled from one analogue input by linking them via DMX. The unit with analogue inputs becomes the MASTER, and others are SLAVES. DIL switches are set for single operation (MODE switches OFF, all others ON) or for MASTER/SLAVE configurations. The 0-10V inputs control Brightness, Colour, and Saturation, with continuously variable color and pastel shades via saturation control.
- Chroma HX Emulation Mode: This mode allows the Spectre to emulate the Chroma HX, providing a floodlighting effect with identical color when mixed with a Chroma HX spotlight in an installation. This mode is ideal for use with IQ-MX60 and IQ-MX80 controllers. The mode switches are set ON-OFF for Chroma mode. In this mode, the color pads on the IQ-MX80 controller operate the color, and the joystick's vertical movement controls brightness. While DMX 3-channel mode can also be used, colors may not match the panel, and gobo selections can be used for color saturation.
Usage Features
- Barn Doors: The fitted barn doors allow users to control light spill at the edges of the illuminated area. However, care must be taken as multiple-colored shadows can result when more than one lamp is illuminated. It is crucial not to operate the Spectre with the barn doors completely closed, as this obstructs ventilation and can lead to overheating.
- Lamp Life Extension: Several techniques can extend the life of the halogen lamps:
- High Brightness/Extended Life Switch: This switch reduces power to the lamps, slightly decreasing brightness but extending lamp life by up to 10 times.
- Operating at Less Than Full Brightness: Running the lamps below 100% brightness prolongs their lifespan.
- Soft-Fade Chases: When flashing or chasing lamps, using a soft-fade type chase is recommended.
- Slight Illumination During Off Periods: Leaving the filament slightly illuminated (e.g., setting the "Brightness" slider to about 3%) prevents it from cooling completely, similar to an electric fire element. This reduces thermal stress. Similarly, when changing color rapidly, setting the saturation slider to about 3% has a negligible effect on color but keeps lamps slightly illuminated.
- Cooling Before Movement: Filament lamps are most vulnerable to failure immediately after being switched off. Therefore, it is recommended to allow the Spectre to cool before moving it.
- Indoor Use Only: The Spectre is designed exclusively for indoor applications.
- Minimum Clearance: The Spectre should be mounted at least 0.8m from any object it is illuminating to ensure proper heat dissipation and safety.
- Safety Chain: To comply with Health and Safety legislation, a safety chain must be employed. A loop is provided at the top of the rear panel for this purpose.
- Correct Mounting: The Spectre must be installed the correct way up. Installing it upside down will seriously affect lamp life. If the hanging bracket is to be mounted below the product, the handle must be removed and re-assembled beneath the product.
- Transportation: When transporting the Spectre, it is recommended to close all four barn doors to protect the dichroic filters, which are expensive to replace.
Maintenance Features
- Lamp Replacement: To replace a lamp, first disconnect the Spectre from the mains supply. Unscrew the two fixing knobs on either side of the color filter plate, then remove the color filter plate and reflector assembly by pulling it forwards. The lamps (type A1/244 with a GY9.5 base) are then accessible. When handling new lamps, hold them by their ceramic base or with the paper packet provided, and avoid touching the glass bulb. If the bulb is accidentally touched, clean it with methylated spirit before use, as grease deposits from the skin can react with the quartz at high temperatures, reducing lamp life or causing shattering. After replacement, re-install the color filter and reflector assembly.
- Fuse Replacement: A small possibility exists for the fuse to blow if a lamp fails (due to a short circuit from a failing filament). The fuse is located in a drawer beneath the mains input connector. It should be replaced with a fuse type F10A HBC (10A Quick-blow, high breaking capacity 5x20mm). If a new fuse fails, consult a dealer.
- Cleaning: Periodic cleaning of the Spectre is necessary to prevent dust from obstructing the fan and impairing the ventilation system. The dichroic filters should be cleaned with a soft, lint-free cloth using alcohol or hi-fi cleaning fluid.
- Ventilation: Ensure there are no obstructions to the ventilation system. Air intakes are located around the edges of the color-filter frame, and hot air is exhausted through the fan. Keep readily flammable items away from the case.
- Power Supply Protection: The mains supply must be fitted with an isolating switch or plug and socket, protected by a fuse or circuit breaker rated at 10A or 16A. If an MCB is used, a time-delay MCB (Type 3 or Type C to BS3871) is recommended to reduce "nuisance tripping" caused by the large inrush current of the halogen lamps. The Spectre should not be connected to a switching pack.