(Ax stickers to track. DO NOT COVER METAL WITH STICKERS!)
(Apposez des autocollants sur le tracé. NE COUVREZ PAS LE MÉTAL AVEC DES AUTOCOLLANTS!)
(Coloque pegatinas en la pista. ¡NO CUBRA EL METAL CON PEGATINAS!)
M
A
MZ
Z M
6
6
6
6
6
6
C
C
Z
D
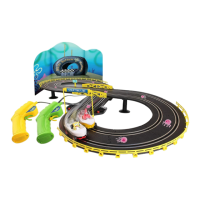
Layout Size : 38” x 19”
Dimension D’agencement/Medidas : 96.5cm x 48.3cm
Approx. 8 Feet Of Racing Action!
Approx. De 2.5 M D’activité De Course!
Aprox. De 2.50 Metros De Pista De Carreras!
Batteries Required: 4 x 1.5V LR6/R6/AA (Not Included)
Piles Requises: 4 x 1.5V LR6/R6/AA (Non Fournies)
Baterías Requeridas: 4 x 1.5V LR6/R6/AA (No Incluidas)
5+
# 2531
Battery Powered Raceset
OPERATOR’S MANUAL
Ensemble De Course Alimenté Par Batteries
MANUEL D’UTILISATION
Juego De Carreras Con Baterías
MANUAL DE USUARIO
STOP STOP STOP
If you have questions or diculty operating this toy
DO NOT RETURN IT TO THE STORE
Call us
Toll-Free: 888-656-5869
Monday - Friday between 10:00am - 4:00 pm Pacific Standard Time
or email us at: customerservice@nkok.com
Si vous avez des questions ou des dicultés à faire fonctionner ce jouet
NE PAS RETOURNER AU MAGASIN
Appelez-nous sans frais:
888-656-5869
Lundi - Vendredi entre 10h00-16h00 heure normale du Pacifique
ou par courriel à: customerservice@nkok.com
Si tiene alguna duda o dificultad de utilizar este juguete
NO LO DEVUELVA A LA TIENDA
Llame al número gratuito:
888-656-5869
Lunes - Viernes entre las 10:00 am - 4:00 pm Hora del Pacífico
o envíenos un correo electrónico a: customerservice@nkok.com
• Contents • Contenu • Contenidos • Layout • Mise en Page • Diseño
O
N
SpongeBob Boat
Voiture Spongebob
Vehículo de Spongebob
Patrick Boat
Voiture Patrick
Vehículo de Patrick
x 1
x 1
x 1
x 1
x 1
x 2
x 2
x 2
x 2
x 2
x 12
x 8
x 1
x 1
x 1
Stickers
Autocollants
Pegatinas
Back Drop
De retour tomber
Fondo Atrás
M
Curve track
Chenille en courbe
Tramo curvado
Straight track
Chenille droite
Tramo recto
Power intake track
Chenille prise d’assaut
Tramo con toma de alimentación
Lap Counter
Compteur de tours
Cuentavueltas
Guardrail
Garde-fou
Barra de protección
Fence
Barrière
Sección del puente
Bridge Support
Passerelle
Soporte de puente
Bridge Support
Passerelle
Soporte de puente
Sign
Panneau
Marcador
Start post
Poste de départ
Poste de salida
Hand controller
Télécommande
Controlador de mano
Z
6
6
Attach the track/bridge supports onto the appropriate location of the layout.
Fixez les supports de voie / pont à l'emplacement approprié du réseau.
Fije los soportes de la pista / puente en la ubicación adecuada del diseño.
Attach the fence to the side of the track as shown.
Fixez le guide sur le côté du rail comme indiqué.
Fije la guía al costado del riel como se muestra.
• Steps For Tracks Assembly And Hand Controllers Installation • Pasos Para Montar Las Pistas Y La Instalación De Los Mandos
• Etapes Pour L’assemblage Des Pistes Et L’installation Des Commandes Manuelles
Hold and join the tracks together as shown.
Maintenez et joignez les pistes ensemble comme indiqué.
Mantenga y unir las pistas juntas como se muestra.
Use your fingers to adjust the distorted/bent joints before joining tracks.
Utilisez vos doigts pour ajuster les joints déformés / pliés avant de joindre les pistes.
Use sus dedos para ajustar las articulaciones distorsionadas / dobladas antes de unir pistas.
Insert 2 x 1.5V LR6/R6/AA batteries (not included) into each battery compartment.
Insérez 2 piles 1,5 V LR6 / R6 / AA (non fournies) dans chaque compartiment à piles.
Inserte 2 baterías LR6 / R6 / AA de 1,5 V (no incluidas) en cada compartimento para baterías.
gray stripe
bande grise
raya gris
Make sure plugs aren’t bent.
Assurez-vous que les fiches ne sont pas pliées.
Asegúrese de que los enchufes no estén doblados.
F
Attach the fence to the side of the track as shown.
Assembler la clôture de piste “pont” comme indiqué.
Fija la pista a la valla del puente como se muestra.
G
C
Remove screw to li cover.
Retirez la vis pour soulever le couvercle.
Retire el tornillo para levantar la cubierta.
* Screwdriver not included
* Tournevis non inclus
* Destornillador no incluido
1.5V LR6/R6/AA
1.5V LR6/R6/AA
Do not join the tracks together if the joints are distorted.
Ne pas assembler les pistes si elles faussées.
No unir los tramos si las conexiones están torcidas.
Plug the inserts of the two hand controllers into the power track (Z).
Branchez les inserts des deux contrôleurs manuels dans la piste d'alimentation (Z).
Conecte las inserciones de los dos controladores manuales en la pista de alimentación (Z).
gray stripe
bande grise
raya gris
• ORIENTATION OF PLUGS CONTROLS DIRECTION!
• ORIENTATION DES BOUGIES DIRECTION DES COMMANDES!
• ORIENTACIÓN DE ENCHUFES MANDOS DE DIRECCIÓN!
Z Z