NOCTUA NA-FD1
INSTALLATION MANUAL
Scan this code to display
multilingual manuals on
your phone.
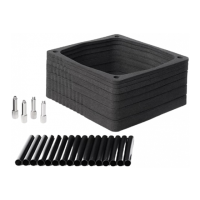
Required mounting parts:
7x foam spacers:
NA-FDS1 (3mm), NA-FDS2 (4mm), NA-FDS3 (5mm),
NA-FDS4 (6mm), NA-FDS5 (7mm), 2x NA-FDS6 (10mm)
4x NA-FDB1
steel bolts
4x NA-FDT1
plastic tubes
(16 included in total for
future installations)
Required tools (not included):
Toothpick or
similar straight,
thin object
Scissors
Philips PH2
head screwdriver
or equivalent
Pencil
Ruler or
tape measure
Video instructions!
For video instructions, please scan this code or access
https://noctua.at/en/na-fd1/video
Please rst fully assemble your system, installing the NH-L9
cooler according to the installation manual that came with
the heatsink. Then, take a toothpick or a similar straight
object that is thin enough to t through the holes located
above the cooler in your case’s perforated panel. Stick this
object through the panel, right above one of the corners of
the NH-L9’s fan, until it touches the fan’s integrated anti-
vibration pad at a 90° angle.
Mark the position of the panel on the toothpick using a
pencil.
Measure the distance between the marking and the tip of
the toothpick. Then, measure the thickness of the panel
and deduct it from the rst measurement result in order to
determine the target height of your fan duct.
The NA-FD1 contains the following spacers:
3mm, 4mm, 5mm, 6mm, 7mm, 10mm (2x)
Selecting the foam spacers2
10mm
7mm
6mm
5mm
4mm
3mm
Number of markings = thickness in millimeters
Please select the spacer(s) according to the target height
determined in step 1. The spacers can be combined to
any height between 5 and 45mm in 1mm increments. For
example, if you have measured a target height of 16mm,
please combine 1x 10mm and 6mm. If your target height is
25mm, please combine 2x 10mm and 5mm. 5mm is the
minimum height due to the height of the mounting bolts.
For optimal performance, there should be no gap between
the spacers and the panel after installation. If your case panel
is installed by sliding it onto the case sideways (perpendicular
to the cooler’s direction of airow), accepting a small gap of
1-2mm may be necessary so that the panel does not bend
the top spacer during installation.
90° angle
Measuring the gap between the fan
and the case panel
1
Target height of fan duct
Marked position of panel
Thickness of panel