IMPORTANT: Please read this manual carefully before installation and save it for reference. Make
sure the surface you intend to mount the product on is free of moisture, oil, grease, dust and dirt to
ensure proper adhesion. Test painted surfaces. Adhesive tape may damage surface when moved.
Installation
1. Wave hand once below
the sensor to turn ON
the LED light xture.
2. Wave again below the
sensor to turn OFF the
LED light xture.
model no. 052-7852-6 | contact us: 1-866-827-4985
Operation
This product carries a one (1) year warranty against defects in workmanship and materials. Noma
Canada agrees to replace a defective product, within the stated warranty period, when returned
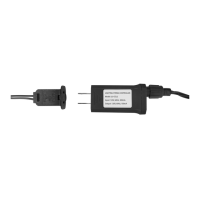
to the place of purchase with proof of purchase. This product is not guaranteed against wear or
breakage due to misuse and/or abuse.
MADE IN CHINA
Imported by Noma Canada
Toronto, Canada M4S 2B8
For indoor and dry location use only
Adhesive tape may damage surface if removed
Instruction Manual
Warranty
WAVE DETECTION SENSOR LIGHT BEAM SPREAD
1. 1 X LED light xture 8” (20.3 cm) | 145 Lumens | 25,000 hours
2. 1 X Direct connector
3. 1 X LED light xture end cap
4. 3 X Wire guides
5. 1 X Double-sided foam adhesive tape strip 6” (15.2 cm)
6. 2 X Mounting screws 3/4” (19 mm) and anchors
7. 2 X Magnetic mounting clips
8. 2 X Mounting screws 3/8” (9.5 mm)
1
2
4
3
5
7
6
* 052-7853-4: Parts 9, 2, 3, 4, 5, 6, 7, 8 | 052-7854-2: Parts 7, 12, 13, 14 | 052-7856-8: Part 10 | 052-7857-6: Part 11
2-4”
(5-10 cm)
WAVE SENSING RANGE
Safety
D. Wood surface self-tapping screw: Place the
magnetic clip over the desired mounting location
and mark the centre of the holes to be drilled.
Then place the magnetic clip over the marks and
screw in the self-tapping screws 3/8” (9.5 mm) to
secure.
NOTE: The AC/DC adaptor (Model No. 052-7854-2)
can only connect up to 4 units of the 12” (30.5 cm)
LED xtures (Model No. 052-7853-4) or 6 units of the
8” (20.3 cm) LED xtures (Model No. 052-7852-6).
INSTALLATION
1. There are 4 ways to mount the xture:
Drill two pilot holes 3/16” (4.5 – 5 mm) diameter
into the surface.
Insert the anchors.
Place the magnetic clip over the holes and screw
in the self-tapping screws 3/4” (19 mm) to secure.
(Continue to Step 2.)
C. Brick wall surface self-tapping screw: Place the
magnetic clip over the desired mounting location
and mark the centre of the holes to be drilled.
A. Double-sided foam adhesive tape: Mark the
desired area where you want to install. Remove
one side of the tape and secure to the back of the
LED light xture. Then remove the other side of
the tape and secure to where you want to install.
(Continue to Step 3.)
B. Magnetic mounting clip: For metal surface,
place the magnetic mounting clips on the desired
mounting location. (Continue to Step 2.)
2. Insert the LED light xture into the magnetic clips.
3. Connect the other LED xtures to each other using
the direct connectors or jumper cable connectors.
Then connect the wave sensor to the desired
location.
4. Connect the plug-in adaptor connector to the light
xture. Then connect the AC/DC adaptor to the LED
light xture by inserting the jack on the adaptor into
the round socket on the plug-in adapter connector.
5. Install wire guide clips where needed.
6. Once you plug the AC/DC adapter into the power
outlet, the LED light xture is ready to be used.
9 LED light xture 12” (30.5 cm) | 210 Lumens | 25,000 hours
10 Jumper cable connectors 48” (1.22 m)
11 Jumper cable connectors 10” (25.4 cm)
12 Wave sensor
13 Plug-in adaptor connector 10” (25.4 cm)
14 AC/DC adaptor plug 24 V / 6’ (1.82 m) cord
PARTS INCLUDED IN THIS PACKAGE
PARTS SOLD SEPARATELY
*
11
10
9 12 14
13
8
3/16”
(4.5–5 mm)
CAUTION:
TO REDUCE THE RISK OF FIRE, ELECTRIC SHOCK
OR INJURY TO PERSONS:
1. Use only insulated staples or plastic ties to secure cords.
2. Route and secure cords so that they will not be pinched or
damaged when the cabinet is pushed into the wall.
3. Position the under-cabinet light with respect to the cabinet
so the lamp replacement markings are able to read during re-
lamping.
4. Not intended for recessed installation in ceiling, or sots.
5. Do not permit cords to be concealed where damage to
insulation may go unnoticed. To prevent re danger, do
not run cord behind walls, ceilings, sots or cabinets where
it may be inaccessible for examination. Cords should be
examined periodically and immediately replaced when
any damage is noted.
!
The low-voltage under-cabinet light may be installed inside or
under a kitchen cabinet or other built-in furniture when:
A) The low voltage Class 2 power supply is located outside the
cabinet and is not concealed; and
B) The line voltage power supply cord is not concealed or run
through openings in the cabinet, walls, ceilings, or oors. This
requirement does not apply to the wiring between the cabinet
light and the power unit.
WARNING: Changes or modications to this unit not expressly
approved by the party responsible for compliance could void the
user’s authority to operate the equipment.
This device complies with ICES-003 of the IC rules; operation is
subject to the following two conditions:
(1) this device may not cause harmful interference, and
(2) this device must accept any interference received,
including interference that may cause undesired operation.
ENGLISH
0527852_Noma_8 in LED Under cabinet light kit IM r15.indd 1 2016-01-21 3:09 PM