Do you have a question about the NORDIC PLAY Play Kitchen and is the answer not in the manual?
Connect side panels and base supports to form the initial frame.
Secure side panels to the base structure using provided screws.
Insert and fix the internal shelves into the main frame.
Attach the back panels to the rear of the kitchen unit.
Place and secure the top panel onto the assembled structure.
Mount the hob and oven component into the designated area.
Fix the backsplash panel to the rear of the kitchen unit.
Attach the oven door to the main unit, completing initial assembly.
Assemble and attach the upper section of the play kitchen.
Secure the final top cover piece to the upper structure.
Attach the side shelving unit to the main play kitchen.
Attach hinges for the oven door to the main unit.
Install the microwave unit onto the play kitchen.
Install the sink basin and faucet assembly.
Install the drawer and attach control knobs to the unit.
Place and secure the hob burners onto the cooking surface.
Add remaining accessories like the faucet and pots.
Review all connections and ensure stability.
Complete oven door installation.
Secure the handle to the oven door.
Install remaining parts including the sink, faucet, and accessories.
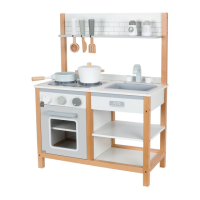
Final assembly of the play kitchen, including all accessories.
Requires adult assembly and ongoing supervision during use.
Suitable for 36 months+, not for under 3 years due to choking hazards.
Keep product away from fire and retain packaging for future reference.
| Brand | NORDIC PLAY |
|---|---|
| Material | Wood |
| Batteries Required | No |
| Type | Kitchen |
| Color | White |
| Recommended age | 3+ |