EasyManua.ls Logo

Nortek REPLCOIL HS Series - User Manual

Nortek REPLCOIL HS Series
8 pages
Print Icon
To Next Page IconTo Next Page
Loading...
SPLIT SYSTEM UNCASED REPLACEMENT INDOOR COILS
REPLCOILXXHS HIGH SEER SERIES
INSTALLATION INSTRUCTIONS
IMPORTANT
ATTENTION INSTALLERS:
It is your responsibility to know this product better than your customer. This includes being
able to install the product according to strict safety guidelines and instructing the customer on
how to operate and maintain the equipment for the life of the product. Safety should always be
the deciding factor when installing this product and using common sense plays an important
role as well. Pay attention to all safety warnings and any other special notes highlighted in the
manual. Improper installation of the furnace or failure to follow safety warnings could result in
serious injury, death, or property damage.
These instructions are primarily intended to assist qualified individuals experienced in the proper
installation of this appliance. Some local codes require licensed installation/service personnel
for this type of equipment. Please read all instructions carefully before starting the installation.
Return these instructions to the customer’s package for future reference.
DO NOT DESTROY. PLEASE READ CAREFULLY & KEEP IN A SAFE PLACE FOR FUTURE REFERENCE.
Question and Answer IconNeed help?

Do you have a question about the Nortek REPLCOIL HS Series and is the answer not in the manual?

Overview

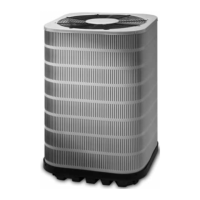
This document describes the installation and maintenance of a Split System Uncased Replacement Indoor Coils, specifically the REPLCOILXXHS High Seer Series. These coils are designed to be integrated into existing HVAC systems to improve efficiency and performance.

Function Description

The primary function of these indoor coils is to facilitate heat exchange within a split system HVAC setup. They work in conjunction with an outdoor unit to cool or heat the air circulated throughout a building. The "High Seer Series" designation indicates that these coils are designed for higher Seasonal Energy Efficiency Ratio (SEER) ratings, contributing to improved energy efficiency and reduced operating costs. The uncased design allows for flexible installation within existing plenums or ductwork.

Important Technical Specifications

The manual provides detailed specifications for various models, including nominal cabinet height, horizontal drain kit dimensions, and replacement coil kit part numbers with corresponding widths and orifice sizes.

Replacement Coil Kits (Table 2):

  • REPLCOIL01HS: Available in models A, B, and C with orifice sizes ranging from 0.067 to 0.099.
  • REPLCOIL02HS: Available in models A, B, and C with orifice sizes ranging from 0.067 to 0.099.
  • REPLCOIL03HS: Available in models A, B, and C with orifice sizes ranging from 0.067 to 0.099.
  • REPLCOIL04HS: Available in models A, B, and C with orifice sizes ranging from 0.067 to 0.099.
  • REPLCOIL05HS: Available in models A, B, and C with orifice sizes ranging from 0.067 to 0.099.

Replacement Tube Kit P/N's (Table 3): These kits are available in various widths (18", 24", 28") for models C5 REPL TUBE, B18, B24, and C24. For example, 921287 is for C5 REPL TUBE, A18, 1 ea, and 921291 is for C5 REPL TUBE, C24, 1 ea.

Air Handler Model to Coil Substitution Matrix (Table 4): This matrix links specific air handler models (e.g., B4VM-X24K-A, B4VM-X30K-A) to compatible replacement coil models (e.g., REPLCOIL01HS, REPLCOIL02HS) and associated TXV kits and tube kits. For instance, B4VM-X24K-A uses replacement coil 919528D (REPLCOIL01HS) with TXV kit 920668A and tube kit 921287.

Coil Substitution Matrix (Table 5): This table provides a cross-reference for older coil models to newer replacement coil models, TXV kits, and tube kits. For example, C4BA-X24U-B (old coil 917138D) can be replaced with REPLCOIL01HS, TXV kit 920669A, and tube kit 921288.

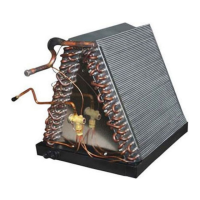
The coils are designed to handle refrigerants like R-410A. The installation process involves brazing refrigerant lines, which requires careful attention to prevent contamination and ensure proper flow. Orifice sizing is critical for optimal performance and is determined by the specific coil model and application.

Usage Features

The uncased design offers flexibility in installation, allowing the coil to be integrated into various existing ductwork configurations. This adaptability is crucial for replacement scenarios where space and existing infrastructure may be limiting factors. The coils are designed for both upflow and horizontal applications, making them versatile for different system layouts.

Key usage features include:

  • High SEER Performance: Designed to contribute to higher SEER ratings, leading to improved energy efficiency and lower operating costs.
  • Flexible Installation: Suitable for upflow, downflow, and horizontal applications, accommodating diverse HVAC system designs.
  • Compatibility: Designed to work with a range of outdoor units and air handlers, as detailed in the substitution matrices.
  • Orifice Sizing: The manual emphasizes the importance of correct orifice sizing for optimal performance and provides guidelines for selection.
  • Drain Pan: Includes provisions for a secondary drain pan to manage condensate effectively and prevent water damage.

Maintenance Features

Proper installation and regular maintenance are crucial for the longevity and efficient operation of these indoor coils. The manual outlines several maintenance-related considerations:

  • System Depressurization: Before any service, the system must be depressurized to remove refrigerant. This involves recovering the refrigerant and removing the Schrader valve core.
  • Checking for Leaks: After installation or any service involving refrigerant lines, a thorough leak check is mandatory using an electronic leak detector.
  • Orifice Maintenance: The orifice, which regulates refrigerant flow, should be inspected and cleaned if necessary during maintenance. The manual provides instructions for loosening and tightening the orifice.
  • Drain Pan and Lines: Regular inspection and cleaning of the condensate drain pan and lines are essential to prevent blockages, overflows, and potential water damage. The manual recommends using a small paintbrush for cleaning.
  • Coil Cleaning: While not explicitly detailed as a routine maintenance task, the importance of a clean coil for efficient heat transfer is implied. Any buildup of dirt or debris on the coil fins can impede performance.
  • Brazed Line Sets: The manual provides detailed instructions for brazing refrigerant lines, emphasizing the use of nitrogen flow to prevent internal oxidation and scaling, which can affect system performance and longevity.
  • TXV Kit Installation: For models requiring a TXV (Thermostatic Expansion Valve) kit, the manual provides instructions for its installation, including proper tightening of nuts and securing the sensing bulb. The sensing bulb must be located at the 12 or 6 o'clock position of the suction line.

The manual stresses the importance of having qualified individuals perform all installation and service procedures to ensure safety and proper operation. It also highlights that any modifications or improper installation can lead to serious injury, death, or property damage.

Nortek REPLCOIL HS Series Specifications

General IconGeneral
BrandNortek
ModelREPLCOIL HS Series
CategoryAir Conditioner
LanguageEnglish

Related product manuals