EasyManua.ls Logo

Northbeam OXFORD BAR CABINET - User Manual

Northbeam OXFORD BAR CABINET
12 pages
Print Icon
To Next Page IconTo Next Page
Loading...
Thank you for choosing northbeam™ OXFORD BAR CABINET.
With a little care and maintainance, the northbeam™ OXFORD BAR CABINET will provide
you with comfort and enjoyment for many years to come!
northbeam
tm
CARE INSTRUCTIONS
NOTE: Please read all instructions carefully before starting assembly.
Also, we recommend that the unit is fully assembled on a level surface.
Two people are recommended to assemble this product.
DO NOT over torque screws and bolts.
OXFORD BAR CABINET
WNR0101710800
To clean panels, use clean water on a damp cloth.
When assembling northbeam™ OXFORD BAR
CABINET, please handle all the panels and/or
hardware with care to avoid any possibilities of
damages and/or injuries.
Question and Answer IconNeed help?

Do you have a question about the Northbeam OXFORD BAR CABINET and is the answer not in the manual?

Summary

Product Care Instructions

Cabinet Parts Identification

Main Panels and Racks

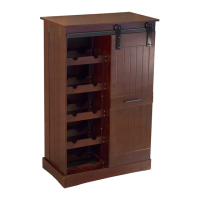
Identifies top, side, interior, wine rack, and back panels.

Sliding Door Component

Identifies the sliding door component of the cabinet.

Cabinet Shelves and Crossers Identification

Shelving and Structural Components

Lists various shelves and crosser pieces for cabinet assembly.

Hardware Components

Fasteners and Connectors

Lists all fasteners, bolts, cams, dowels, and caps used in assembly.

Specific Hardware Items

Lists screws, corner supports, handles, sliding hardware, and latch.

Assembly Steps

Step 1: Initial Panel Assembly

Assembling the initial frame using panels and hardware.

Step 2: Adding Shelving and Supports

Attaching middle shelves and various support pieces.

Step 3: Attaching Side and Top Structure

Securing side panels and front/back top crossers.

Step 4: Base Assembly

Connecting base structure, bottom crossers, and back plates.

Step 5: Back Panel Installation

Installing the back panels using corner supports.

Step 6: Top Panel Attachment

Attaching the main top panel to the assembled unit.

Step 7: Sliding Door Hardware

Attaching sliding hardware to the door and cabinet.

Step 8: Inserting Sliding Door

Installing the sliding door onto the cabinet tracks.

Step 9: Final Hardware and Latch

Securing sliding mechanism and attaching the latch.

Contact Information

Northbeam OXFORD BAR CABINET Specifications

General IconGeneral
Product TypeBar Cabinet
MaterialWood
ShelvesYes
DoorsYes
DrawersYes
Assembly RequiredYes

Related product manuals