EasyManua.ls Logo

Norton 6000 Series - User Manual

Norton 6000 Series
24 pages
Print Icon
To Next Page IconTo Next Page
Loading...
• Allen wrench set (inch) • Center punch
• Flat blade screwdriver (potentiometer & terminal size) Wire stripper
• Screwdriver (Phillips size 2) • #7 drill 1/4-20 tap (metal frame install)
Tape ruler Ø3/8 drill (door sex bolt install)
• Power drill
!
Tools required:
Use screw pack and hardware provided to mount operator.
WARNING: To reduce the risk of injury to person,
use this operator only with Pedestrian Swing doors.
For Indoor Use Only.
Item No. Description
1 Motor (6000M)
2 Cover (6000COV)
3 Control Inverter (6000IN)
4 Power Supply 24VDC (6000SUP)
5 Closer Assembly (7500LAP)
6 Unitrol Arm - standard reveal (6660-1); deep reveal (6670-1)
6060 / 6070
5
4
2
1
3
6
Model No.
Reveal Type
6060 Standard 2-1/4” to 4-3/4”
6070 Deep 4-13/16” to 7-3/8”
Reveal Depth
Door Swing
85°
Minimum
Door Width
90° 95° 100° 105° 110°
36” 35” 34” 34” 33” 33”
Reveal
Adjusting Rod
Reveals less than
2-1/4” may be achieved
by field cutting adjusting rod.
5-13/32”
2-3/16”
ETL certified; conforms to ANSI/UL standard
325 for automatic closing doors and UL10C
Positive Pressure Fire Test for Door Assemblies.
Certified to ANSI/BHMA A156.19 for Low Energy
Door Operators.
6000 Series
Power Operator
Installation and Instruction Manual
ASSA ABLOY
Copyright © 2015 Yale Security Inc., an ASSA ABLOY Group company. All rights reserved.
Reproduction in whole or in part without the express written permission of Yale Security Inc. is prohibited.
80-9360-1003-020 (08-15)
Question and Answer IconNeed help?

Do you have a question about the Norton 6000 Series and is the answer not in the manual?

Summary

6060; 6070 Product Information

Required Installation Tools

Lists essential tools for operator installation.

Critical Safety Warnings

Emphasizes safety for indoor use on pedestrian doors.

Product Certifications

Details ETL and ANSI/BHMA certifications.

General Operation and Features

Operator Modes and Activation

Explains Push & Go, manual, and switch activation.

Door Opening and Closing Cycles

Describes automatic door movement and obstruction handling.

Extended Hold Open Functionality

Details how to keep the door open longer.

Electrical Power Connection Warning

Crucial safety warning about disconnecting power.

Door Preparation and Technical Specifications

Frame Reinforcing and Fasteners

Guides on frame material thickness and screw types.

Key Technical Data Summary

Lists input power, consumption, door specs, and angle limits.

Compliance with Standards

References ANSI/UL, UL10C, ADA, and ANSI A117.1.

Installation - Initial Steps

Essential Installation Guidelines

Covers reading instructions, door balance, and lock disabling.

Operator Unpacking Procedure

Steps for removing the operator from its packaging.

Initial Frame Hole Drilling

Instructions for preparing the door frame with holes.

Installation - Mounting Components

Wall Preparation and Blocking

Requirements for wall framing and anchoring.

Back Plate Mounting Procedure

Steps for attaching the back plate to the frame.

Concealed Wiring Routing

How to prepare for concealed wiring installation.

Installation - Sub-Assembly and Wiring

Securing Back Plate Screws

Finalizing back plate attachment with screws.

Assembling Closer and Power Unit

Connecting the closer and power supply sub-assemblies.

Wiring Harness Management

Routing wires to avoid interference and ensure proper fit.

Installation - Door Hardware

Preparing the Door for Shoe Attachment

Steps for drilling and preparing door holes for the shoe.

Mounting the Adjusting Tube and Shoe

Attaching the shoe assembly to the door.

Installation - Arm Assembly

Assembling the Main Arm to Pinion

Sliding the rod and placing the main arm onto the pinion.

Securing the Main Arm

Tightening the screw to secure the main arm to the pinion.

Aligning and Securing the Adjusting Rod

Positioning the arm perpendicular to the door and securing it.

Closer Mechanical Adjustments

Adjusting Closer Spring Force

Increasing power for consistent closing.

Setting Sweep, Latch, and Backcheck

Adjusting closing speeds and cushioning.

Electrical Connections and Controller Setup

Incoming Power Connection Guide

Steps for connecting the main power supply.

Controller Interface Navigation

Using the joystick and LCD for settings.

Final Configuration and Assembly

Setting Door Positions

Programming the door's start and end points.

Connecting Accessories and Adjustments

Linking accessories and making controller adjustments.

Installing Unit Cover and Label

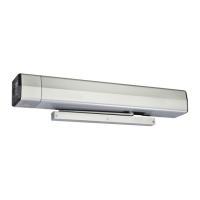
Finalizing the unit with the cover and label.

Electrical Information and Error Codes

General Electrical Specifications

Wiring sizes, voltage, and current draw limits.

Critical Safety Instructions Review

Reiterates vital safety procedures for operation.

Controller Error Code Reference

Lists error codes and their descriptions for diagnostics.

Controller Interface Parameters

Detailed Interface Settings Description

Explains each menu option and adjustment parameter.

Wiring Diagrams - Standard and Strike

Factory Pre-Wiring Overview

Diagram showing factory connection points.

Standard Switch Wiring Configuration

Wiring for basic push plate or switch activation.

Fail Secure Electric Strike Wiring

Wiring for a fail-secure electric strike.

Wiring Diagrams - Electric Strikes and Exit Devices

Fail Safe Strike;Lock Wiring

Wiring for fail-safe electric strikes or electromagnetic locks.

24 VDC Electric Exit Device Wiring

Wiring for 24VDC electric exit devices.

Wiring Diagrams - Exit Devices and Executive Functions

Electric Dogging Exit Device Wiring

Wiring for electric dogging exit devices.

Hard Wired Executive Function Wiring

Wiring for hardwired executive door functions.

Wiring Diagrams - Latch Retraction

Electric Latch Retraction Wiring

Wiring for electric latch retraction exit devices.

Smoke Ventilation Wiring Configuration

Wiring for smoke ventilation with blow-open function.

Wiring Diagrams - Radio Frequency

RF Standard Function Wiring

Wiring for standard radio frequency activation.

RF Executive Function Wiring

Wiring for executive radio frequency activation.

Wiring Diagrams - Vestibule Function

Vestibule Door Switch Wiring

Wiring for vestibule systems with inside/outside switches.

Troubleshooting Guide

Common Issues and Corrective Actions

Provides solutions for common operational problems.

433 MHz Receiver User Guide

Receiver Setup and Configuration

Guides on setting dip switches and programming transmitters.

Transmitter Code Management

Instructions for deleting transmitter codes.

Receiver Troubleshooting Tips

Solutions for common receiver operational issues.

Installation Template

Removable Template Details

Provides dimensions and usage for the installation template.

Norton 6000 Series Specifications

General IconGeneral
BrandNorton
Model6000 Series
CategoryGarage Door Opener
LanguageEnglish