PARTS & ASSEMBLY
Your RETRO SERIES™ SNOW CONE MAKER comes fully assembled.
Before first use, lift the Top Housing off of the Main •
Unit and remove the Ice Shaving Canister.
The Ice Shaving Canister can be removed by taking off the Ice Shaving •
Canister Lid and lifting Ice Shaving Canister from Top Housing.
Wipe clean the inside of the Main Unit and Ice Shaving Canister •
with a non-abrasive moist sponge, a non-abrasive towel, or
a damp cloth followed by a non-abrasive dry towel.
After cleaning the inside, reassemble the Ice Shaving Canister •
and Main Unit, and put the top back on the Main Unit.
Use EXTREME caution when cleaning and handling the Ice •
Shaving Canister, as the blades are VERY sharp.
Now you are ready to enjoy cool, refreshing icy snacks from •
your RETRO SERIES™ SNOW CONE MAKER!
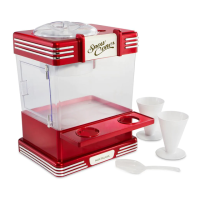
PARTS
ASSEMBLY
Ice Shaving
Canister Lid
Locking Cap
Ice Feed Insert
Ice Shaving
Canister
When assembling Ice Shaving
Canister parts, turn Locking
Cap clockwise to lock and turn
counter-clockwise to unlock.
Main Unit
Door
Ice Shaving
Canister
2 Plastic Cones
Locking Cap
Ice Scoop
Ice Shaving
Canister Lid
Top Housing
Ice Feed Insert
Cone Shelf
 Loading...