32 - NTNV 67691
6. Once heating is complete, allow warmer time to cool down. Remove the bottle and shake well (about 10 seconds*) to distribute heat evenly. If the bottle is
not warm enough, add more water and reheat as necessary. Always test the temperature of the liquid first, before feeding it to baby.
7. Allow unit to cool for at least 10 minutes between uses.
8. *Note: If bottle was frozen, shake for a longer time if necessary.
FOOD WARMING INSTRUCTIONS
1. When ready to begin, insert plug into wall outlet. Preheating is not necessary.
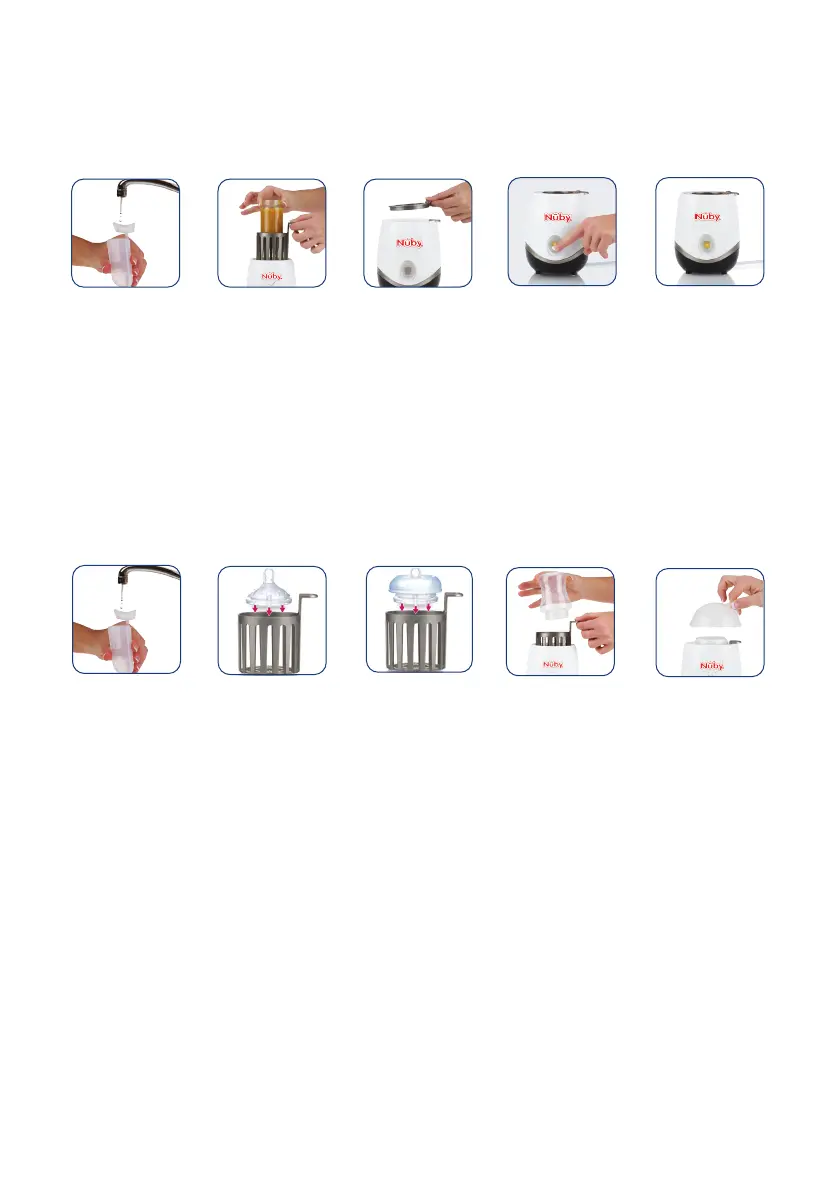
2. ADD the amount of
water as advised by
the chart (pg. 43) for
intended size of the
food jar. Pour the water
directly into the warming
basin.
3. Remove lid from food
jar or container. Place
the frozen, refrigerated,
or room temperature
food jar into the lift-out
basket. Always use this
basket to prevent dam-
age to food containers.
4. Place the adapter ring
on top of the warmer.
Do not lose this ring as
the food will not warm
properly without it. Do
not use unit lid.
5. Press down the
POWER button to turn
your warmer ON. The
button will light up
ORANGE.
6. The size of the food
jar or container, and
how much water is
used will determine the
time it takes to warm
the food. The unit will
shut off when the water
runs out.
2
3
4
5
6
WARNING: Beware of hot steam from the warming basin; do not put your hands or face in or around the warming basin during or immediately after warming.
- Once heating is complete, remove the food jar or container and stir well (about 10 seconds*) to distribute heat evenly. If food is not warm enough, add
more water and reheat as necessary. Always test the temperature of the food first, before feeding it to baby. Allow unit to cool for at least 10 minutes
between uses. *Note: If food was frozen, stir for longer time if necessary.
STERILIZATION INSTRUCTIONS
1. When ready to begin, insert plug into wall outlet.
2
3a
3b
4
5
2. Pour 45 ml of water
directly into the warming
basin.
3a. Disassemble nipple
from screw ring. Place
nipple into the lift-out
basket first.
3b. Lightly place the screw
ring in the lift-out basket
over the nipple.
4. Place bottle base upside
down in the basket on
top of the screw ring and
nipple. Always use this
basket to prevent damage
to bottles, nipples, etc.
5. Place the lid* on top.
Only use the lid for
sterilizing.
6. Press the POWER button to turn your unit ON. The sterilization process will begin automatically. The unit will turn off once water runs out.
7. When sterilizing is complete, remove the lid carefully by the handle. LID WILL BE VERY HOT. Keep hands and face away from unit when opening lid. Allow
unit to cool for at least 10 minutes between uses.
*Note: The lid may not completely close when sterilizing taller bottles, however, sterilization will still occur inside bottle. Keep hands and face away from lid
opening as steam will be very HOT.
STERILIZATION instructions for Pacifiers and Small Accessories
The basket also allows pacifiers and small accessories (like bottle nipples and rings) to be disinfected quickly and easily. Pacifiers or small items can be
placed in the basket to disinfect. The basket must be in the chamber with the lid on for the disinfecting process to work properly.
• Please note- only items that are able to withstand the heat of steam
sterilization (as instructed by individual item’s washing instructions) can be used with this feature.
• Item must be small enough so that it is completely contained within the
lift-out Basket. Do not use with items that extend through the baskets’s open areas, into the warming basin. The sterilizing lid must be completely in place.
• Before placing item into basket, remove all foreign material from item with
soapy water. Rinse thoroughly. This must be done before any disinfection
process so the foreign material will not prevent disinfection.
• Please note- preheating is not necessary or recommended.
1. When ready to begin, insert plug into wall outlet.
2. Measure 45 ml of water and pour directly into the warmer basin.
3. Place pacifier or small accessory in the lift-out basket. Always use this
basket to prevent damage to pacifiers and small accessories.
4. Place the sterilizing lid on top of the unit.
5. Press the POWER button to turn your unit ON. The sterilization process
will begin automatically. The unit will turn off once water runs out.
6. When sterilizing is complete, remove the lid carefully by the handle. LID
WILL BE VERY HOT. Keep hands and face away from unit when opening lid.
Allow unit to cool for at least 10 minutes between uses.