18
19
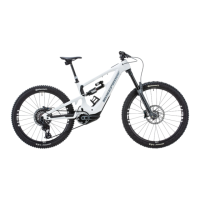
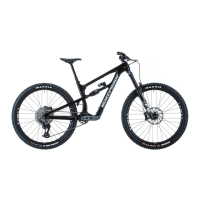
4.A. INITIAL ASSEMBLY
Nukeproof bicycles are shipped from the
factory to the Authorised Nukeproof Dealer
only partially assembled. Your Authorised
Nukeproof Dealer will complete the assembly
of the bicycle, and perform any adjustments
required to make it t you. It is strongly
recommended that you allow your Authorised
Nukeproof Dealer to perform the assembly
and tting operations, as it requires specic
knowledge of each part, appropriate tools, and
understanding of the interactions of various
materials. Your bicycle is a high-performance
machine, much like a racing car, and as such
requires skilled maintenance to ensure your
bike functions safely and effectively.
Your Authorised Nukeproof Dealer will perform
the following assembly operations before your
bicycle is delivered to you:
• Fork cut to appropriate length.
• Headset and stem installed and
adjusted.
• Handlebars clamped into stem. (May
not be installed with mail order)
• Brake/shift levers installed onto
handlebars.
• Front brake installed on fork.
• Brake and shifter cables threaded and
attached.
• Brakes and derailleur adjusted.
• Handlebars wrapped with bar tape and
plugged.
• Seat and seatpost installed.
• Wheels installed. (May not be installed
with mail order)
• Pedals (of your choice) installed. (May
not be supplied and/or installed with
mail order)
If you choose to perform any assembly
operations yourself, ensure that all operations
are done in accordance with the specic
assembly instructions published by the
component manufacturer.
These assembly instructions are included
in the bike box provided to your Authorised
Nukeproof Dealer. Alternatively, assembly
instructions are usually posted on the
component manufacturer’s websites or are
available from their service departments.
4.A.1. Tools needed to assemble your bike
• Allan Keys – 4mm/5mm/6mm/8mm
• Pedal Spanner – 15mm
4.B. WHEELS
4.B.1. Wheel Quick Release
Warning: Riding with an improperly
adjusted wheel quick release can
allow the wheel to wobble or fall off
the bicycle, which can cause serious
injury or death. Therefore, it is
essential that you:
• Ask your Authorised Nukeproof
Dealer to help you make sure you
know how to install and remove your
wheels safely.
• Understand and apply the correct
technique for clamping your wheel in
place with a quick release.
• Each time, before you ride the bike,
check that the wheel is securely
clamped.
The wheel quick release uses a cam action
to clamp the bike’s wheel in place. Because
of its adjustable nature, it is critical that
you understand how it works, how to use it
properly, and how much force you need to
apply to secure the wheel.
Warning: The full force of the cam
action is needed to clamp the wheel
securely. Holding the nut with one
hand and turning the lever like a
wing nut with the other hand until
everything is as tight as you can get
it will not clamp the wheel safely in
the dropouts.
4.B.1.A. Adjusting the quick release
mechanism
The wheel hub is clamped in place by the
force of the quick release cam pushing against
one dropout and pulling the tension adjusting
nut, by way of the skewer, against the other
dropout. The amount of clamping force is
controlled by the tension adjusting nut. Turning
the tension adjusting nut clockwise while
keeping the cam lever from rotating increases
clamping force; turning it anti-clockwise while
keeping the cam lever from rotating reduces
clamping force. Less than half a turn of the
tension adjusting nut can make the difference
between safe clamping force and unsafe
clamping force.
4.B.1.B. Front wheel secondary retention
devices
Most bicycles have front forks which utilize a
secondary wheel retention device to reduce
the risk of the wheel disengaging from the
fork if the quick release is incorrectly adjusted.
Secondary retention devices are not a
substitute for correct quick release adjustment.
Secondary retention devices fall into two basic
categories:
4.B.1.B.1. The clip-on type is
a part which the manufacturer
adds to the front wheel hub or
front fork.
4.B.1.B.2. The integral type is
moulded, cast, or machined
into the outer faces of the
front fork dropouts. Ask your
Authorised Nukeproof Dealer
to explain the secondary
retention device on your bike.
Warning: Do not remove or disable
the secondary retention device. As its
name implies, it serves as a back-up
for a critical adjustment. If the quick
release is not adjusted correctly,
the secondary retention device
can reduce the risk of the wheel
disengaging from the fork. Removing
or disabling the secondary retention
device may also void the warranty.
Secondary retention devices are not
a substitute for correct quick release
adjustment. Failure to properly
adjust the quick release mechanism
can cause the wheel to wobble or
disengage which could cause you
to lose control and fall, resulting in
serious injury or death.
4.B.2. Removing and installing quick
release wheels
4.B.2.A. Removing a quick release front
wheel
4.B.2.A.1. If your bike has rim brakes,
disengage the brake’s quick release
mechanism to increase the clearance between
the tyre and the brake pads.
4.B.2.A.2. Move the wheel’s quick-release
lever from the locked or CLOSED position to
the OPEN position.
4.B.2.A.3. Quick release levers should
be embossed with the words “OPEN” and
“CLOSED” to indicate the current position of
the lever.
4.B.2.A.4. If your front fork does not have a
secondary retention device go to Section
4.B.2.B.
4.B.2.A.5. If your front fork has a clip-on type
of secondary retention device, disengage it,
and go to Section 4.B.2.B.
SECTION 4 - technical
 Loading...