Do you have a question about the Nuna pipa aire rx and is the answer not in the manual?
Fill in model number and manufactured date. Register to be reached in a recall. Send details to Nuna Baby Essentials Inc. or call 1.855.NUNA.USA.
For recall information, call the U.S. Government's Vehicle Safety Hotline or visit http://www.NHTSA.gov.
High-quality products are covered by a custom limited warranty. Have proof of purchase, model number, and date available when contacting Nuna.
Contact customer service for replacement parts, service, or warranty questions. USA contact: infousa@nunababy.com, www.nunababy.com, 1.855.NUNA.USA.
Suitable for children 4-30 lb (2-13.6 kg) and under 30 inches (76 cm). Recommended rear facing until at least 2 years old.
DEATH OR SERIOUS INJURY can occur if warnings are not followed. Child safety is your responsibility. NEVER leave child unattended.
Snugly adjust belts with no slack. Check expiration date. Do not press on child's flesh or push body unnaturally.
NEVER place carrier on elevated surfaces. Stay within arm's reach. Ensure handle locks. Do not use on shopping carts.
Children can STRANGLE in loose harness straps. Infant carrier can suffocate child on soft surfaces. NEVER place on beds or sofas.
A minor crash involves: vehicle drivable, no damage to door near seat, no passenger injuries, no air bag deployment, no visible car seat damage.
NHTSA recommends replacing car seats after moderate/severe crashes. Replacement is not always needed after a minor crash.
Children safer in rear seats. Install only in forward-facing vehicle seats. DO NOT install in side or rear-facing seats.
NEVER install rear facing with a frontal air bag unless off. Airbags can cause severe injury to a child's neck and spine.
Consult vehicle manual to determine if belts lock via retractor or latch plate for securing the child restraint.
Motorized belts need removable shoulder belt. Dual Retractor lap belts may be used if allowed. Airbag/Inflatable Belts cannot be used.
Non-Locking (ELR) Lap Belts require a shortening clip. Door Mounted and forward Lap Belts should not be used.
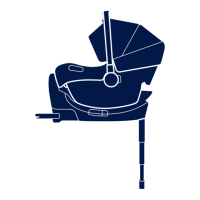
Head Support, Seat Pad, Shoulder Pads, Chest Clip, Body Support, Low Birth Weight Pillow, Buckle, Harness components, Belt Guide, Magnetic Buckle Holder.
Handle Adjustment Button, Stroller Release Buttons, Handle, Sky Drape™ Zipper, Canopy Window, Canopy.
Belt Guide (Shoulder Belt), Canopy Mount, Harness Slots, Base Attachment Bars, Shoulder Harness Straps, Harness Loop, Harness Splitter Plate.
Latch Guides, Vehicle Belt Lock Off, Lock Off Release Button, Belt Positioner, Rigid Latch (Lower Anchors), Rigid Latch Release Button.
Recline Indicator Window, Recline Adjustment Button, Child Restraint Release Button, Stability Leg components.
Stability Leg, Adjustment Button, Indicator, Storage Release Button, and Storage area.
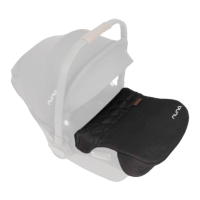
Unzip canopy bow, pull Sky drape out, and attach to magnets on carrier front corners for ventilation.
Canopy window opens for ventilation. To remove, undo snap, press button, and pull canopy bow out.
Loosen harness, unbuckle. Place buckle tongues against magnetic area on side of restraint to hold them in place.
Shoulder pads are removable. Unbutton the two snaps to remove. MUST be removed if child reaches 22 lb.
Crotch pad is removable. Slide plastic tab from behind buckle and pull pad off. MUST be removed if child reaches 22 lb.
Used for snug fit for small babies. Straps go through top two harness slots only. Unfasten hook and loop ends behind fabric.
Body support uses bottom harness slot. Low birth weight pillow used for smaller babies, MUST be removed around 11 lb.
Tighten harness snugly on child's shoulders. Straps must be at or just below shoulders. Adjust height using harness adjustment button.
Turn restraint over, remove harness loop from splitter plate. Pull loop through slot to correct slot. Repeat for second strap.
DO NOT allow harness to pass over base attachment bars. Top of child's head must be at least 1 inch below top of child restraint.
Squeeze handle buttons on sides and rotate until it clicks into a locked position. Handle has 3 locked positions.
Ensure handle is locked before lifting. Handle must not contact vehicle interior when installed on base.
Loosen harness with adjustment button. Harness straps must be positioned at or just below child's shoulders to avoid injury.
Press button to release chest clip. Separate clip and spread straps. Place chest clip at child's armpit level.
Insert buckle tongues, listen for clicks. Snap chest clip. Tighten harness by pulling adjustment strap. Verify snugness around waist and shoulders.
Verify buckle fastened, straps not twisted, harness snug (no slack), chest clip level, straps at/below shoulders, pads removed if child > 22 lb.
Press release button on base bottom to release stability leg from storage. Allow leg to hang over vehicle seat edge.
Press adjustment button, extend leg perpendicular to floor until it contacts floor and indicator turns green.
Green indicator means proper contact. Red indicator means poor contact; adjust leg. Stability leg must be perpendicular to floor.
If leg lifts base > 1 inch, adjust to close gap. DO NOT use stability leg to recline the base.
Press adjustment button to shorten leg, push into storage area until release button clicks into place.
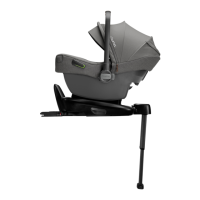
Rotate rigid latches down and away from base. Position base in forward-facing seat with stability leg deployed.
Install latch guides on vehicle anchor bars. Connect rigid latch anchors to vehicle lower anchor bars by pushing down and forward.
Base bottom must be firmly seated on vehicle seat surface with no gap between base and seat.
Pull base to check installation; green indicator on connectors means attached. Rigid latch and stability leg indicators must show green.
Base retracts into three positions. Push on top/back of base until it touches seat back and clicks into a retracted position.
Unhook rigid latch from anchor bars and rotate latch up into storage position to reset base to original position.
Test security near latch, not end of base. Check for movement, indicators, and seat back gap. Ensure base is close to seat back.
Lift lock off release button. Route lap belt across designated area. Route shoulder belt diagonally across designated area.
Buckle belt. Ensure both belts are under lock off and lay flat. Tighten belt by pulling upward on the shoulder belt.
With shoulder belt tight, push down on lock off to close it. Lock only after vehicle belt lock off on base is closed.
If only a lap belt is available, route it along the lap belt path under the lock off.
Test security near belt path. Base should not move > 1 inch side-to-side. Belt(s) must be tight and lay flat under lock off.
Lower child restraint onto base, listen for click. Check lock by pulling up on handle. Handle must not contact vehicle interior.
Adjust recline to match child's weight/height. Positions 1&2 for 4-20 lb, Positions 3&4 for 21-30 lb (up to 30 inches).
Push recline button down, slide base top. Release button; if it doesn't pop up, recline is not locked. Push/pull base top to lock.
After adjusting recline, pull up on handle to ensure child restraint is securely attached to the base.
Squeeze child restraint release button on base, then pull child restraint up to detach.
Squeeze rigid latch release buttons, pull base off bars, rotate latch to neutral storage position.
Lift lock off release button, unbuckle belt, un-route belts from base, and remove the base.
Route lap belt under guides, buckle. Allow shoulder belt to lay against seat back.
Route lap belt under guides, buckle. Route shoulder belt around back of restraint through blue shoulder belt guide.
Use lap belt only if no shoulder belt. Route belt under guides, buckle. Tension and lock vehicle belt firmly.
Adjust angle with towel/noodle. Angle correct when blue line on restraint is level with ground.
Tension vehicle belt firmly into seat, lock it. Ensure it is not loose or twisted.
Position restraint facing aircraft seat back. Route aircraft lap belt under guides and buckle.
Adjust angle using towel/blanket. Angle correct when blue line is level with aircraft floor. Tighten belt firmly.
Attach infant carrier to Nuna strollers using adapters (sold separately). Visit nunababy.com for more info.
Attach infant carrier to other brands of strollers using adapters. Visit nunababy.com for more information.
Adapters for Nuna and other strollers. Infant Car Seat Ring Adapter, Infant Car Seat Post Adapters available. Instructions included.
PIPA aire rx is compatible with the PIPA series base, sold separately.
Refer to care label for instructions. Do NOT remove foam under seat pad. Air dry all parts.
Clean shell, handle, straps with mild detergent and water. Rinse buckle with warm water only. DO NOT use soaps, solvents, or lubricants.
Remove carrier from vehicle if not in use long-term. Store in a cool, dry place inaccessible to children.
Fabric may color from sunlight or show wear. Check regularly for proper function. Stop use if parts are torn, broken, or missing.
| Brand | Nuna |
|---|---|
| Model | pipa aire rx |
| Category | Baby Carrier |
| Language | English |