EasyManua.ls Logo

Nureva HDL300 User Manual

Nureva HDL300
2 pages
To Next Page IconTo Next Page
Page #1 background imageLoading...
Page #1 background image
K
31
½
"
80cm
J
A
30”
76.2cm
4
5
/
8
11.7cm
31
1
/
2
80.0cm
1
1
/
4
3.2cm
5
7
/
8
14.9.cm
60”
152.4cm
1
1.1
18 lb.
8.2 kg
3/16ʺ
0.5 cm
K
K
31
1
/
2
80cm
J
J
A
A
A
J K
A
B G
HC
D
F I
#10 pan head screws
or
M5 pan head screws
#10 pan head anchors
or
M5 pan head anchors
A - HDL300 Integrated
microphone and speaker bar
B - Breakout box
C -
D -
E - Ethernet cable 50 (15 m)
F - USB cable
G - Power adaptor
H - Power cable 6 (2 m)
I -
A
PACKAGE CONTENTS
YOU WILL NEED
10031 3 - 0 1
85
216 cm
A
E
1
1.2
3/16"
0.5 cm
4
"
11.7 cm
31
½
"
80.0 cm
1
¼
"
3.2 cm
A
5
"
14.9 cm
60"
152.4 cm
A
18 lb.
8.2 kg
A
A
A
H
HDL300 and DUAL HDL300
QUICK START GUIDE
PACKAGE CONTENTS
30”
76.2cm
4
5
/
8
11.7cm
31
1
/
2
80.0cm
1
1
/
4
3.2cm
5
7
/
8
14.9.cm
60”
152.4cm

1
1.1
18 lb.
8.2 kg
3/16ʺ
0.5 cm
A
Y
X
X
0 - 2 3
2 - 4 6
4 - 8 12
0 - 40mm 60mm
40 - 80mm 120mm
80 - 200mm 300mm
Y
A
0 - 4 cm
4 - 8 cm
8 - 20 cm
6 cm
12 cm
30 cm
B
C
F
I
D
G
1.1
J
#10 pan head screws
or
M5 pan head screws
K
#10 pan head anchors
or
M5 pan head anchors
101349-06
YOU WILL NEED
A
HDL300-D
E
E
HDL300
30'
76.2 cm
15'
38.1 cm
HDL300-D
HDL300
HDL300-D
HDL300-D
HDL300
A - Integrated microphone and
speaker bar
B - Connect module
C - Mounting plate
D - Mounting screws
E - Ethernet cable 50' (15 m)
F - USB cable 6 (2m)
G - Power adaptor
H - Power cable 6 (2m)
I - Remote and batteries
HDL300
DUAL HDL300
Altura mínima de instalação recomendada
Zalecana minimalna wysokość montażu
Suositeltu minimikorkeus asentamiseen
Ajánlott minimum telepítési magasság
推奨最小設置高さ
권장 최소 설치 높이
ץלמומ ילמינימ הנקתה הבוג
   
PT
PL
FI
HU
JA
KO
HE
AR
Não bloqueie os microfones
Nie należy blokować mikrofonów
Älä estä mikrofoneja
Ne blokkolja a mikrofonokat
マイクを塞がないでください
마이크를 차단하지 마십시오
םינופורקימ םוסחת לא
 
PT
PL
FI
HU
JA
KO
HE
AR
Faça a instalação afastada dos cantos
Należy zamontować z dala od narożników
Älä asenna nurkan läheisyyteen
Ne sarokba telepítse
隅から離して設置してください
모서리로부터 멀리 설치하십시오
תוניפמ קחרה ןקתה
    
PT
PL
FI
HU
JA
KO
HE
AR
PT PL FI HU JA KO HE AR
QR
Code
Here

Other manuals for Nureva HDL300

Question and Answer IconNeed help?

Do you have a question about the Nureva HDL300 and is the answer not in the manual?

Nureva HDL300 Specifications

General IconGeneral
Microphone technologyMicrophone Mist technology
Beamforming TechnologyYes
Echo CancellationYes
Noise ReductionYes
Operating Temperature0°C to 40°C (32°F to 104°F)
Storage Temperature-20°C to 70°C (-4°F to 158°F)
Microphone pickup range7.6 m (25 ft)
Speaker output2 x 20W
ConnectivityUSB 2.0
Audio Coverage360 degrees
Frequency Response20 kHz
Power48V DC
Operating systemmacOS
CompatibilityZoom, Microsoft Teams, and more
Humidity90% RH, non-condensing
Dimensions60 in. W × 5.91 in. H × 3.5 in. D (152.4 cm × 15 cm × 8.9 cm)

Summary

Package Contents

Integrated Microphone and Speaker Bar

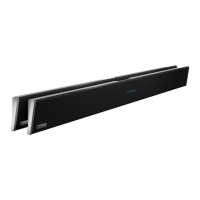
The main audio and microphone unit for the system.

Connect Module

The module that connects to the computer.

Mounting Plate

Component used for attaching the device to a wall or surface.

Mounting Screws

Hardware for securing the mounting plate.

Ethernet Cable

50 ft (15 m) cable for network connection.

USB Cable

6 ft (2m) cable for USB connection.

Power Adaptor

Device to supply power to the system.

Power Cable

6 ft (2m) cable for connecting the power adapter.

Remote and Batteries

Control unit and power source for the remote.

Installation Guidelines

Recommended Minimum Installation Height

Specifies the minimum height for optimal microphone performance.

Microphone Obstruction Warning

Caution to avoid blocking the microphones for proper operation.

Corner Installation Advisory

Guidance to install the device away from room corners.

Mounting Instructions

Mounting Plate Installation

Steps for attaching the mounting plate to the wall.

Speaker Bar Mounting

Procedure for attaching the main unit to the mounting plate.

System Setup and Configuration

Connect Module Attachment

Connecting the connect module to the speaker bar.

Cable Connections

Connecting power, USB, and Ethernet cables.

Default Device Configuration

Setting the HDL300 as the default audio device on a computer.

Nureva Room Manager

Information on downloading and using the audio manager software.

Related product manuals