16
GB
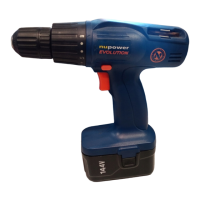
COMPONENTS AND CONTROLS (PIC .1)
VARIABLE SPEED CONTROL (PIC.2)
Simply apply light pressure to the trigger to start the drill on a
slowspeed.Increasingthepressurewillallowavariablespeed
increase.
Always remove the battery before carrying out any adjustments
ormaintenance.
KEYLESS CHUCK OPERATION (PIC.3)
The keyless chuck fitted to this drill/driver allows for the easy
installationandremovalofbitsanddrills(Pic.3).
Thechuckhastworotatinggrips(AandB).Selectthedrill/driver
bit required and insert it into the chuck jaws, turn grip A in a
clockwisedirectionuntiljawsgripthedrill/driverbit.Withyour
free hand hold grip B firmly and rotate grip A in a clockwise
direction until it tightens onto the drill/driver bit. Do not use
unnecessaryforcetotighten.
Re-fitthebattery,yourdrill/driverisnowreadyforuse.
TORQUE ADJUSTMENTS (PIC.4)
This feature allows setting of the torque or tightening power
of your drill/driver and depending on the application, various
levelsofdrivingpowerarerequired.Whendrivinglargerscrew
diameters a higher torque power is required to drive the screw
untilit’sproperlyseated.
When the selected torque is reached the chuck will stop
rotating
THERE ARE 16 TORQUE SETTINGS:
1-3 Fordrivingsmallscrews.
4-5 Fordrivingscrewsintosoftmaterialsorplastics
6-7 Fordrivingscrewsintosoftwoods.
8-9 Fordrivingscrewsintomedium/hardwoods.
10-13 Fordrivingscrewsintohardwoods.
14-16 For powerful screw driving or drilling metal or using
spade(hole)bits.
NOTE: Alwaysstartonthelowestsetting.
The symbol gives the highest torque setting and is used
whendrillingandfordrivinglargerscrews.
FORWARD & REVERSE SWITCH (PIC.5)
This feature is selected via a slide switch located above the
trigger.Toselectdirectionofthedrillrotation simplypushthe
buttonfullyinontheleftsideforreverserotation.Tochangeto
forward rotation, push the button fully in on the right side of the
handle.
WARNING!
Themachineisdesignedasadrillanddriver.Donotattachany
otheraccessoriesotherthanthoserecommended.
PLEASE NOTE
As a safety precaution from accidental engagement while being
carried pushing the forward/reverse button into the middle or
neutralpositionwillrenderthedrillinoperative.
HINTS FOR SCREW DRIVING
1. Use candle or bees wax on the screw threads to speed
application.
2. Wheneverpossibledrillsmalldiameterpilotholesforfaster
screwing,eliminatingthepossibilityofsplittingthewood.
1
Battery
2
Battery release catch
3
On/Off trigger switch
4
Forward/reverse
5
Torque adjuster
6
Hand grip
7
Keyless chuck
8
Charger
9
DrillC/Wbattery
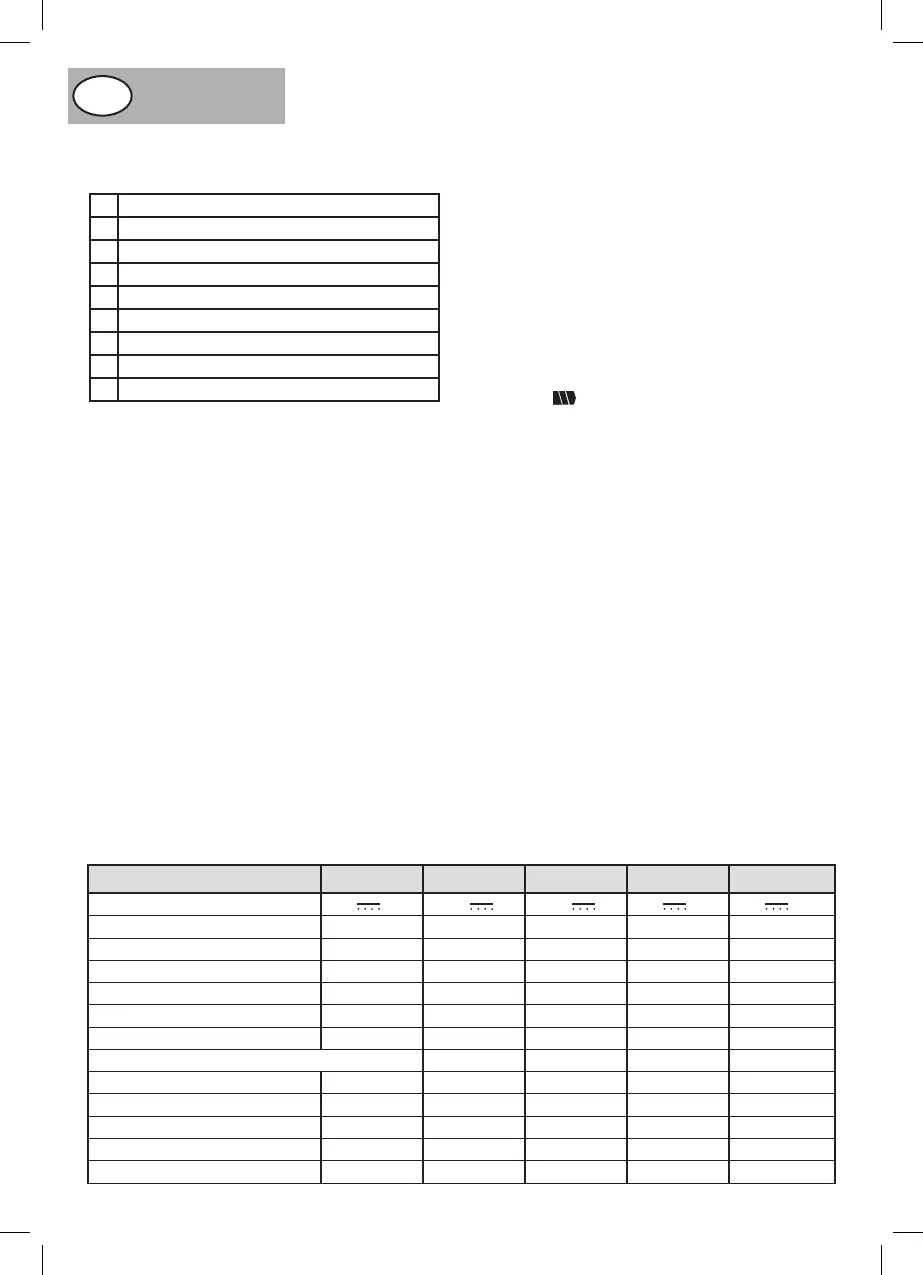
TECHNICAL SPECIFICATION
NPEK12 NPEK14 NPEK14-2 NPEK18-C NPEK18-2
Voltage
12V 14,4V 14,4V 18V 18V
Variable speed
0-550min
-1
0-550min
-1
0-550min
-1
0-550min
-1
0-330/0-1200min
-1
Torque settings
15+1No. 15+1No. 15+1No. 15+1No. 15+1No.
Chuck size
10mm 10mm 10mm 10mm 10mm
Charger input voltage
230V~50Hz 230V~50Hz 230V~50Hz 230V~50Hz 230V~50Hz
Charger output voltage
15V-400mA 18V-400mA 18V-400mA 23V-400mA 23V-400mA
Charge time
3-5hr 3-5hr 3-5hr 3-5hr 3-5hr
Drill capacity
Wood
25mm 25mm 25mm 25mm 25mm
Metal
8 mm 8 mm 8 mm 8 mm 8 mm
Sound Pressure Level
L
PA80.0dB(A)
L
PA80.0dB(A)
L
PA80.0dB(A)
L
PA80.0dB(A)
L
PA80.0dB(A)
Sound Power Leve
L
WA91.0dB(A)
L
WA91.0dB(A)
L
WA91.0dB(A)
L
WA91.0dB(A)
L
WA91.0dB(A)
Vibration Level
4.17m/s
2
4.17m/s
2
4.17m/s
2
4.17m/s
2
4.17m/s
2