This document describes the NVK TC-20 Dog Training Collar, a device designed to assist in dog training through various stimulation modes.
Function Description:
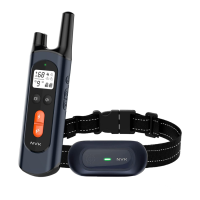
The NVK TC-20 Dog Training Collar system consists of a handheld remote transmitter and a receiver collar. It offers three primary training modes: vibration, tone (beep), and static stimulation. The device is intended to help eliminate unwanted behaviors in dogs, such as barking, by providing adjustable levels of stimulation.
The manual emphasizes several safety precautions. A "WARNING" indicates situations that could result in serious injury, such as using the device with aggressive dogs. It explicitly states that the product is not for use with aggressive dogs, as they can cause severe injury to owners and others. Users are advised to consult a veterinarian or certified trainer if unsure about the product's suitability.
A "CAUTION" with the safety alert symbol indicates situations that could result in minor or moderate injury to humans or harm to the pet. During on-leash training, it's crucial for the dog to be on a strong leash, long enough for some movement but short enough to prevent access to unsafe areas. The user must also be physically strong enough to restrain the dog. The device is not a toy and should be kept away from children.
Another "CAUTION" specifically addresses the risk of skin damage to the pet. Proper fit of the collar is paramount. Wearing the collar for too long or too tightly can cause skin damage, ranging from redness to pressure ulcers, commonly known as bed sores. To prevent this, users should:
- Avoid leaving the collar on the dog for more than 12 hours per day.
- Reposition the collar on the pet's neck every 1 to 3 hours.
- Check the fit to prevent excessive pressure, following the instructions in the manual.
- Never connect a leash to the electronic collar, as this will cause excessive pressure on the contact points. If a separate collar is used for a leash, ensure it does not put pressure on the electronic collar.
- Wash the dog's neck area and the collar's contacts weekly with a damp cloth.
- Check the contact area daily for signs of a rash or a sore.
- If a rash or sore is found, discontinue use of the collar until the skin has healed. If the condition persists beyond 48 hours, veterinary consultation is recommended.
Important Technical Specifications:
- Training Modes: Vibration, Tone, and Static stimulation.
- Vibration Levels: 9 adjustable levels (0-9).
- Static Levels: 99 adjustable levels (00-99).
- Battery Status Display: Dual battery status display for both the remote and receiver.
- Receiver Collar: IPX7 waterproof (the remote is not waterproof).
- Remote Range: 1000-1600 feet.
- Battery Type: Long-life Lithium Polymer battery.
- Display: Big digital display on the remote.
- Multi-Dog Support: Supports a maximum of 4 receiver collars with one remote.
- Charging: Magnetic charging port for the receiver.
Usage Features:
- Charging: Both the collar and remote are charged using a magnetic charging cable. A green light indicates charging completion.
- Fitting the Receiver Collar: The contact points must have direct contact with the dog's skin on the underside of the neck. The collar should be snug, allowing one finger to fit comfortably between the collar and the neck.
- Turning On/Off:
- Remote: Rotate the level regulator (A) to turn on the remote.
- Receiver: Press the button for 3 seconds to turn on the receiver; the green LED will flash. To turn off the receiver, long-press the button for 3 seconds. Turning off the collar when not in use helps increase battery life.
- Keypad Lock: The remote features a keypad lock function to prevent accidental button presses.
- Beep Tone Command: Delivers a non-adjustable volume beep tone to the collar.
- Vibration Command: Delivers vibration to the collar. Vibration intensity is adjustable by pressing and holding the vibration level button (B) while rotating the level regulator (A) on the remote.
- Static Stimulation Command:
- Static Button: Delivers the currently selected static stimulation level to the collar.
- Static + Button: Delivers a static stimulation that is 10% higher than the currently selected level. This is useful for quick access to a higher setting if the dog doesn't respond to lower levels.
- Static Intensity Adjustment: Press and hold the static level button (C) while rotating the level regulator (A) on the remote to adjust the intensity.
- Finding the Best Static Level:
- Always start at the lowest level.
- Begin at Level 10 on the digital display and press the static button to observe the dog's reaction.
- Gradually increase the stimulation levels until the pet reliably responds.
- If the dog shows no response at Level 50, check the receiver collar's fit. For dogs with long or thick hair, consider using longer contact points or trimming the hair around the contact points.
- If all steps are followed and the dog still shows no reaction, refer to the "How to Use Test Light Tool" section.
- Pairing (Initial Setup): The device is factory-paired, but manual pairing steps are provided if needed.
- Ensure the receiver is off.
- Press and hold the receiver's switch for 5 seconds until the green light flashes fast.
- Press the remote's Pairing/Channel Select button (D) to pair.
- Successful pairing is indicated by the receiver beeping and the green light flashing slowly.
- Two, Three, Four Receiver System (Multi-Dog Training):
- Requires additional receiver collars.
- Pairing Additional Receivers: Follow the same pairing steps as above, but on the remote, press and hold the channel button (D) while rotating the level regulator (A) to select the desired dog icon (e.g., Dog 2, Dog 3, Dog 4). The selected dog icon will flash.
- Receiver Switching: The remote can train up to 4 dogs simultaneously. To switch between dogs, press and hold the channel button (D) while rotating the level regulator (A) to select the dog to train.
- Reset All Paired Receiver Collars: With the remote ON, press and hold the Static level button (C) and Vibration level button (B) simultaneously while turning the regulator switch (A) OFF to ON. All paired receivers will be removed, and the Dog 1 icon will flash. Then, pair the receivers again.
- Training Tips (Example for Barking):
- Attach a separate non-metallic collar with an 8-10 foot leash above the receiver collar, ensuring no pressure on the contact points.
- Hold the leash and the remote.
- Choose the pet's Recognition Level.
- When the pet barks, press the Stimulation button and give a command like "No" or "No barking."
- Release the Stimulation button immediately once the dog stops barking and verbally praise them.
- If the pet ignores the stimulation, increase the Intensity Level by 3 to 5.
- Practice this exercise in different areas.
Maintenance Features:
- Test Light Tool:
- Static Function Test: Ensure the remote and receiver collar are on. Hold the Test Light tool contacts to the contact points. Press a Static button on the remote transmitter; the Test Light should illuminate.
- Contact Point Adjustment: The Test Light tool can also be used to tighten or loosen the contact points.
- Contact Point Selection:
- For dogs with shorter coats: Use 2 shorter contact points or install conductive silicone caps onto the contact points for a softer feel, which may be better for the dog's skin.
- For dogs with thicker coats: Use 2 longer contact points or install conductive silicone caps.
- Troubleshooting:
- Pet not responding to commands: Check if the receiver collar is on, if batteries are low in either the remote or receiver, verify stimulation delivery with the Test Light, increase correction level, and ensure contact points are snugly against the pet's skin.
- Receiver collar not turning on: Ensure the receiver collar has been charged.
- Receiver collar not responding to remote transmitter: Verify the receiver collar has been turned on.
Compliance:
The device complies with Part 15 of the FCC Rules. Operation is subject to two conditions: (1) it may not cause harmful interference, and (2) it must accept any interference received. Users are warned that modifications not expressly approved by Radio Systems Corporation could void their authority to operate the equipment. The device has been tested and found to comply with Class B digital device limits, designed to provide reasonable protection against harmful interference in a residential installation. If interference occurs, users are advised to reorient or relocate the receiving antenna, increase separation between equipment, connect to a different circuit, or consult customer care/technician.