EasyManua.ls Logo

Ocean Breeze RG51G(1)/CEFU1 - User Manual

Ocean Breeze RG51G(1)/CEFU1
12 pages
Print Icon
To Next Page IconTo Next Page
Loading...
IMPORTANT NOTE:
OWNER’S MANUAL
Thank you for purchasing our air
conditioner. Please read this manual
carefully before operating your new air
conditioning unit. Make sure to save this
manual for future reference.
REMOTE CONTROL
Question and Answer IconNeed help?

Do you have a question about the Ocean Breeze RG51G(1)/CEFU1 and is the answer not in the manual?

Summary

Remote Control Specifications

Handling the Remote Control

Inserting and Replacing Batteries

Instructions for inserting and replacing batteries in the remote control.

Battery Usage and Disposal Guidance

Notes on battery performance, mixing types, and proper disposal methods.

Remote Control Usage and Interference Notes

Tips for optimal use and notes on potential interference with signals.

Buttons and Functions

Temperature, Mode, and Fan Speed Controls

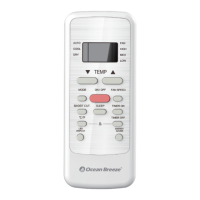
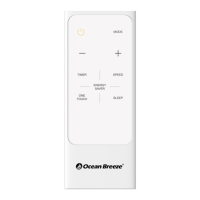
Controls for setting temperature, operating mode (AUTO, COOL, DRY, FAN), and fan speed.

Power, Timer, and Sleep Controls

Buttons for turning the unit on/off, setting timers, and activating sleep mode.

Display and Special Function Controls

Controls for switching temperature units (°C/°F), LED display, Energy Saver, and Shortcut.

Remote Screen Indicators

Mode Display Indicators

Icons indicating the selected operating mode (AUTO, COOL, DRY, FAN).

Operational Status Indicators

Indicators for data transmission, remote control ON status, and timer settings.

Temperature and Lock Indicators

Display of set temperature, timer settings, and keypad lock status.

Fan Speed and Sleep Indicators

Indicators for fan speed levels and activation of the SLEEP function.

How to Use Basic Functions

Cool Mode Operation

Steps to select COOL mode, set temperature, fan speed, and start the unit.

Auto Mode Operation

Steps to select AUTO mode and set temperature for automatic operation.

Fan and Dry Mode Operations

Instructions for using FAN mode and DRY mode, including limitations.

Setting the TIMER

TIMER ON Setting

Procedure to set the time for the unit to automatically turn ON.

TIMER OFF Setting

Procedure to set the time for the unit to automatically turn OFF.

TIMER ON & OFF Example

An example demonstrating how to set both ON and OFF timers simultaneously.

How to Use Advanced Functions

ENERGY SAVER Function

Explains the operation of the ENERGY SAVER mode for energy efficiency.

SHORTCUT Function

Restores previous or current settings by pressing the SHORTCUT button.

°C;°F and LED DISPLAY Functions

How to switch temperature units and control the LED display on the unit.

SLEEP Function

Conserves energy during sleep hours; available only in specific modes.

Overview

This document is an owner's manual for a remote control designed for an air conditioning unit, specifically an "Ocean Breeze" model. It provides comprehensive instructions on how to use the remote control, its various functions, and how to maintain it.

The remote control serves as the primary interface for operating the air conditioning unit, allowing users to adjust settings such as temperature, operating mode, and fan speed. It features a clear LCD screen that displays current settings and indicators for active functions.

Function Description:

The remote control offers several core functions to manage the air conditioner's operation:

  • ON/OFF: This button powers the unit on or off.
  • MODE: This button cycles through different operating modes: AUTO, COOL, DRY, and FAN.
    • AUTO Mode: In this mode, the unit automatically selects either COOL or FAN operation based on the set temperature. The fan speed cannot be manually adjusted in AUTO mode.
    • COOL Mode: This mode is used for cooling the room. Users can set a desired temperature and select a fan speed (AUTO, LOW, MED, or HIGH).
    • DRY Mode (Dehumidifying): This mode is designed to dehumidify the room. Users can set a desired temperature, but the fan speed cannot be changed in DRY mode.
    • FAN Mode: This mode operates the fan without cooling or heating, providing air circulation. Users can select a fan speed (AUTO, LOW, MED, or HIGH). Temperature settings are not applicable in FAN mode, and the remote's LCD screen will not display temperature.
  • TEMP ▲ / TEMP ▼: These buttons allow users to increase or decrease the desired temperature in 1°F increments. The minimum settable temperature is 62°F, and the maximum is 86°F. The operating temperature range for the unit is 62-86°F (17-30°C).
  • FAN SPEED: This button cycles through available fan speeds: AUTO, LOW, MED, and HIGH.
  • TIMER ON: This function sets a timer for the unit to automatically turn on after a specified duration.
  • TIMER OFF: This function sets a timer for the unit to automatically turn off after a specified duration.
  • SHORTCUT: This button is used to restore the current settings or resume previous settings. When pressed while the remote is on, the system reverts to the previous settings, including operating mode, set temperature, fan speed, and sleep feature (if activated). Holding this button for more than 2 seconds will automatically restore the current operation settings.
  • SLEEP: This function is designed to conserve energy during sleeping hours. It can only be activated via the remote control and is not available in Fan or Dry mode.
  • ENERGY SAVER: This mode helps save energy. When activated, the fan continues to run for 3 minutes after the compressor shuts off. The fan then cycles on for 2 minutes at 10-minute intervals until the room temperature rises above the set temperature, at which point the compressor restarts cooling. Pressing the button again deactivates the function.
  • °C/°F: This button switches the temperature display between degrees Celsius (°C) and degrees Fahrenheit (°F).
  • LED DISPLAY: This button turns the indoor unit's LED display on and off.
  • LOCK: Pressing and holding the °C/°F and TIMER OFF buttons simultaneously for 5 seconds locks or unlocks the keypad on the remote control, preventing accidental changes to settings.

Usage Features:

The manual provides a quick start guide for basic operation, including inserting batteries, selecting a mode, setting the temperature, pressing the power button, pointing the remote towards the unit, and selecting the fan speed.

For setting timers, the process involves pressing either the TIMER ON or TIMER OFF button, then repeatedly using the TEMP ▲ or TEMP ▼ buttons to set the desired time. The time increments are 30 minutes up to 10 hours, and then 1 hour increments from 10 to 24 hours. The timer will revert to 0.0 after 24 hours, effectively canceling the function. The manual includes an example of setting both TIMER ON and TIMER OFF, illustrating how the unit can be programmed to turn on and off at specific times relative to the current time.

The remote control's LCD screen provides visual indicators for various functions:

  • Mode display: Shows AUTO, COOL, DRY, or FAN.
  • Transmission indicator: A signal icon appears when data is transmitted.
  • Remote ON indicator: An icon indicates when the remote control is active.
  • Timer indicators: Separate icons for TIMER ON and TIMER OFF.
  • Temperature display: Shows the set temperature or timer setting.
  • Lock indicator: An icon appears when the remote control is locked.
  • Sleep indicator: An icon appears when the SLEEP function is activated.
  • Fan speed indication: Icons for HIGH, MED, LOW, and NO display (for AUTO fan speed).

Maintenance Features:

The manual includes instructions for inserting and replacing batteries. It advises users to slide the back cover downward, insert two R03/LR03 dry cell batteries, ensuring correct polarity, and then slide the cover back into place.

Important Notes for Maintenance and Usage:

  • Battery Notes: To ensure optimum performance, users should not mix old and new batteries or batteries of different types. If the remote control will not be used for more than 2 months, the batteries should be removed.
  • Battery Disposal: Batteries should not be disposed of as unsorted municipal waste; users should refer to local laws for proper battery disposal.
  • Remote Control Usage Tips: The remote control must be used within 26.24 feet (8 meters) of the unit. The unit will emit a beep when it receives a signal. Curtains, other materials, and direct sunlight can interfere with the infrared signal receiver.
  • Function Compatibility: Button designs on the remote may differ slightly from the examples shown. If the indoor unit does not have a particular function, pressing that function's button on the remote control will have no effect. In cases of wide differences between the "Remote control Manual" and the "USER'S MANUAL" in function descriptions, the description in the "USER'S MANUAL" shall prevail.
  • Regulatory Compliance: The device complies with local and national regulations, including CAN ICES-3(B)/NMB-3(B) in Canada and part 15 of the FCC Rules in the USA. Users are advised on how to address potential interference issues, such as reorienting antennas or increasing separation between equipment and receiver. Changes or modifications not approved by the responsible party could void the user's authority to operate the equipment.

This comprehensive guide ensures that users can effectively operate and maintain their Ocean Breeze air conditioning unit using the provided remote control.

Ocean Breeze RG51G(1)/CEFU1 Specifications

General IconGeneral
BrandOcean Breeze
ModelRG51G(1)/CEFU1
CategoryRemote Control
Power Source2 x AAA batteries
Operating RangeUp to 10 meters
DisplayLCD
CompatibilityOcean Breeze Air Conditioner
ButtonsPower

Related product manuals