Do you have a question about the OdorStop OS36PRO and is the answer not in the manual?
Emphasizes the importance of reading all instructions before proceeding with installation.
Highlights critical safety precautions related to UV light exposure, electrical hazards, and system handling.
Provides an overview of the installation process for the OdorStop UV Air Treatment System.
Details the criteria and steps for choosing an appropriate mounting location for the UV system.
Instructions on how to clean and replace the UV bulbs for optimal system performance.
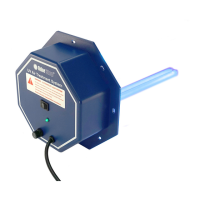
The OdorStop UV Air Treatment System is a state-of-the-art device designed to sanitize air and surfaces within an HVAC system, aiming to produce cleaner, fresher air. This system utilizes ultraviolet (UV) light technology to prevent the growth of microorganisms such as mold, bacteria, and viruses on surfaces like cooling coils, drain pans, and ductwork. It is available in several models, including OS36PRO, OS72PRO, and OS144PRO, each differing in the number of UV bulbs and corresponding LED indicators.
The core function of the OdorStop UV Air Treatment System is to emit UV light into the HVAC ductwork. This UV light disrupts the DNA of microorganisms, effectively neutralizing them and preventing their reproduction. The system is equipped with an airflow sensor, which ensures that the UV bulbs are only activated when there is sufficient airflow within the HVAC system. This design optimizes energy consumption and extends the lifespan of the UV bulbs. The system is intended for indoor installation within a closed duct system and should not be installed near a return air opening.
For HVAC systems equipped with air conditioning, it is recommended to mount the unit directly above the cooling coil ("A Coil") to maximize its effectiveness in preventing microbial growth on these surfaces. If the HVAC system does not have air conditioning, the unit should be installed on the supply air duct, or if necessary, on a return air duct. The system operates on a 120 Volt grounded power outlet and comes with a 6-foot power cord, requiring installation within reach of a suitable outlet.
LED indicator lights on the unit provide visual feedback on its operational status. A solid green light indicates that the system and its bulbs are functioning properly. Blinking LED lights signal a faulty bulb that needs replacement. If one or more LED lights are not illuminated, it could indicate several issues, such as a lack of power, no air movement, faulty bulbs, a blown fuse, or insufficient airflow to activate the airflow sensor. In cases of insufficient airflow, the airflow sensor lead may need to be extended into the air flow.
Installation of the OdorStop UV Air Treatment System involves several steps, beginning with turning off power to the HVAC system. A template is provided to guide the drilling of holes in the ductwork for mounting the unit. Depending on the model (OS36, OS72, or OS144), a specific number of 1/8" pilot holes and 2 1/2" metal cutting holes are required. Tin snips are then used to cut out the metal ducting between the drilled holes. It is crucial to prevent the cut metal disc from falling into the HVAC system, although if it does, it will not negatively affect operation.
Once the holes are prepared, the UV bulb(s) are installed by sliding them in from the inside until they snap into place. Care should be taken not to touch the bulbs with bare hands; if touched, they should be wiped with a cloth to remove fingerprints. The system is then inserted into the metal ductwork and secured with eight sheet metal screws using a 1/4" nut driver. It's important to tighten the screws evenly without overtightening.
After mounting, the system is plugged into a grounded 120V power outlet, and an extension cord should not be used. The power to the HVAC system is then turned back on. To initiate the sanitizing process, the fan switch on the thermostat should be set to the "ON" position. It is recommended to run the system continuously for at least 24 hours to "jump start" the sanitizing process. During this initial period, a unique odor may be present as the UV system actively eliminates mold, mildew, bacteria, and viruses. After 24 hours, the fan switch can be set to "AUTO" mode, allowing the system to operate only when airflow is detected. The system will not turn on unless air is moving in the duct.
To ensure the OdorStop UV Air Treatment System operates at maximum effectiveness, regular maintenance is recommended. The UV bulb(s) should be cleaned every 3 months and replaced annually.
For cleaning and replacement, the following steps should be followed:
The system is designed with no serviceable parts and should never be opened, except for bulb maintenance. Bulbs contain mercury and must be disposed of properly. If a bulb breaks, sweep up any broken glass and do not use a household vacuum. Protective gloves should be worn when handling bulbs. The fuse on the system is also replaceable if it becomes faulty.
| Model | OS36PRO |
|---|---|
| Product Type | Air Purifier |
| Filter Type | HEPA + Activated Carbon |
| Filtration Technology | HEPA, Activated Carbon |
| Odor Control | Yes |
| Ozone Output | No Ozone |
| Quiet operation | Yes |
| Weight | 28 lbs |
| Timer | Yes |
| Warranty | 5 years |
| Filter Life | HEPA filter: 12 months, Carbon filter: 6 months |