EasyManua.ls Logo

OfficeSource PL112 - User Manual

OfficeSource PL112
3 pages
Print Icon
To Next Page IconTo Next Page
Loading...
IMPORTANT !!IMPORTANT !!
being scratched. being scratched.
Keep all hardware parts out of reach of children.
Check that you have all parts and hardware.
Keep all hardware parts out of reach of children.
Check that you have all parts and hardware.
Place all wooden parts on a clean and smooth surface such as a rug or carpet to avoid the parts from
Remove all wrapping materials, including staples & packing straps before you start to assemble.
Do not tighten any screws or bolts until the unit is completely assembled.
Place all wooden parts on a clean and smooth surface such as a rug or carpet to avoid the parts from
Remove all wrapping materials, including staples & packing straps before you start to assemble.
Do not tighten any screws or bolts until the unit is completely assembled.
A
377 x 16 x 3mm
Aluminum Bar
4 Pcs
Thank you for purchasing the Office Source 2 Drawer Lateral File.
Please follow these instructions for easy assembly.
2 DRAWER LATERAL FILE
File Clip
8 Pcs
Metal Scallop
Shape Handle
2 Sets
B
C
790 x 16 x 3mm
Aluminum Bar
2 Pcs
D E
Keys
1 Set
PL 112 GGA-A2
M4 x 64mm Allen
Key
1 Pc
F
G
Adjustable
Glide
4 Pcs
#8 x 1
1
2
"
Pan Head Screw
2 Pcs
H
PAGE 1 OF 3
MODEL NO. PL112
OFFICESOURCE.COM
ASSEMBLY INSTRUCTIONS
Last Updated: 2/2023
Question and Answer IconNeed help?

Do you have a question about the OfficeSource PL112 and is the answer not in the manual?

Summary

Assembly Instructions

Attach Adjustable Glide

Screw the adjustable glide into the bottom of the side panel.

Attach Drawer Front and File Clip

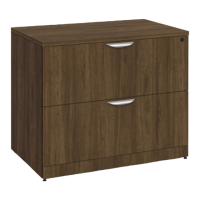
Attach handle to drawer front, screw from behind. Attach file clip to drawer side and insert aluminum bar.

Optional: Remove Top Panel

Instructions for optionally removing the top panel by loosening screws.

Overview

This document provides assembly instructions for the Office Source 2-Drawer Lateral File, model PL112. It outlines the components included and offers guidance for assembly, as well as optional steps for removing the top panel.

Function Description

The Office Source 2-Drawer Lateral File is a piece of office furniture designed for storage, specifically for organizing and storing files. Its lateral design allows for efficient use of space, often fitting well under desks or against walls. The two drawers provide ample storage capacity, and the inclusion of file clips and aluminum bars suggests it is specifically configured for hanging files, making it suitable for both letter and legal-sized documents depending on the bar configuration. The adjustable glides indicate that it can be leveled on uneven surfaces, ensuring stability. The optional top panel removal feature suggests potential for customization or integration with other furniture components, or for easier access during maintenance or relocation.

Important Technical Specifications

The manual details the following components and their quantities:

  • Adjustable Glide (A): 4 pieces. These are used to level the unit and protect the floor.
  • Metal Scallop Shape Handle (B): 2 sets. These are the handles for the two drawers.
  • File Clip (C): 8 pieces. These clips are crucial for holding the aluminum bars within the drawers.
  • 790 x 16 x 3mm Aluminum Bar (D): 2 pieces. These longer bars are inserted into the file clips to support hanging files.
  • 377 x 16 x 3mm Aluminum Bar (E): 4 pieces. These shorter bars are also used with file clips for hanging files, likely for different file orientations or sizes.
  • Keys (F): 1 set. This indicates that the file cabinet likely has a locking mechanism for security.
  • M4 x 64mm Allen Key (G): 1 piece. This tool is provided for assembly, suggesting the use of Allen head screws.
  • #8 x ½" Pan Head Screw (H): 2 pieces. These are specific screws used in the assembly process.

The dimensions of the aluminum bars (790 x 16 x 3mm and 377 x 16 x 3mm) are important for understanding the internal filing capacity and compatibility with different file sizes. The inclusion of an Allen key implies that the primary fasteners for the main structure are likely Allen head screws, ensuring a secure and flush finish.

Usage Features

  1. Adjustable Leveling: The four adjustable glides (A) allow users to level the file cabinet on uneven floors, preventing wobbling and ensuring stability.
  2. Secure Storage: The inclusion of keys (F) indicates a locking mechanism, providing security for confidential documents stored within the drawers.
  3. File Organization: The file clips (C) and aluminum bars (D, E) are designed to support hanging files, facilitating organized storage of documents. The presence of two different lengths of aluminum bars suggests versatility in file orientation or the ability to accommodate both letter and legal-sized documents.
  4. Ergonomic Handles: The metal scallop shape handles (B) are designed for easy opening and closing of the drawers.
  5. Optional Top Panel Removal: The manual includes optional steps for removing the top panel. This feature could be useful for:
    • Integration: Allowing the file cabinet to be placed under a specific desk or counter, or to be combined with other modular office furniture.
    • Maintenance: Providing easier access to internal components or for cleaning.
    • Customization: Potentially allowing for a different top surface to be installed.

Maintenance Features

The "IMPORTANT !!" section provides crucial guidelines for maintaining the product and ensuring a smooth assembly process:

  1. Surface Protection: "Place all wooden parts on a clean and smooth surface such as a rug or carpet to avoid the parts from being scratched." This prevents cosmetic damage during assembly.
  2. Component Verification: "Check that you have all parts and hardware." This is a standard pre-assembly check to ensure all necessary components are present, preventing delays or incomplete assembly.
  3. Packaging Removal: "Remove all wrapping materials, including staples & packing straps before you start to assemble." This ensures all parts are accessible and prevents any packaging materials from interfering with assembly or damaging the product.
  4. Gradual Tightening: "Do not tighten any screws or bolts until the unit is completely assembled." This is a critical assembly practice that allows for minor adjustments and alignment of parts before final tightening, preventing misalignment or stress on components.
  5. Child Safety: "Keep all hardware parts out of reach of children." This is a vital safety precaution, as small hardware parts can be a choking hazard.

While the manual primarily focuses on assembly, these points indirectly contribute to the longevity and proper functioning of the device by ensuring it is assembled correctly and without damage. The ability to remove the top panel (optional step) could also be considered a maintenance feature, as it might facilitate access for cleaning the interior or making repairs if needed. The durable materials like aluminum for the bars and metal for the handles suggest a design intended for long-term use in an office environment.

OfficeSource PL112 Specifications

General IconGeneral
BrandOfficeSource
ModelPL112
CategoryIndoor Furnishing
LanguageEnglish