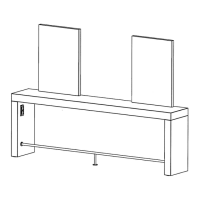
MO Square Doppelplatz
> see illustr. 7 + 8
5.1 Mirror without lighting:
§ Push 4 stainless steel supports (T) for mirror support
plates onto the drillings in the tabletop and fix them from
the down side by means of M8 screws.
§ Fix mirror to mirror support plate by means of double
sided mirror tape: top and sides flush, below (edge with
holes) approx. 2 mm distance to edge.
§ Push the mirror support plate onto the tubes.
5.2 Mirror with lighting:
§ Push 4 supports (stainless steel tubes) for mirror
support plates onto the drillings in the tabletop and fix
them from the down side by means of M8 screws.
§ Mount 3 aluminium profiles (LP) L = 30 mm onto L/H
and R/H longitudinal edges of mirror support plate (TP)
by means of chipboard screws 4x40 mm:
in the middle as well as 55 mm from above and below
(position is pre-drilled).
§ Make a drilling (BO) Ø 10 mm for LED connection
cables into worktop on both sides of mirror support
plate with a distance of 30 mm as shown in illustration.
§ Glue LED-Stripes (LED) onto middle of aluminium
strips (AB).
§ Put aluminium stripes (AB) into aluminium profiles (LP)
(see illustr.), while this lead LED connection cables
through drilling to underside of worktop.
§ Glue double-sided mirror adhesive tape (K) onto mirror
support plate: L/H, R/H and in the middle each 2 vertical
strips one above the other.
§ Apply mirror silicone „Sikabond“ onto the sides of all
aluminium profiles (LP).
§ Glue on mirror (SP): same distance L/H and R/H,
distance upper edge of mirror to worktop 850 mm
(underlay mirror below for mounting)
-
satinated mirror to back side
§ Clip plastic covers (KA) into aluminium profiles (LP).
Mount stainless steel cover (LA) onto mirror support
plate by means of double-sided mirror adhesive tape, if
necessary, height compensation by additional double-
sided adhesive tape.
§ Mount power supply unit with distributor underneath
the worktop by means of double-sided tape.
§ Plug 12V connection cable of lighting into distributor of
power supply.
6. Mount handbag hook (if ordered) > see illustr. 11
§ Placement according to customers requirements.
§ Our recommendation:
> parallel to side, with a distance of approx. 80 mm
> d
irectly behind front of worktop
or:
> ce
nter under worktop
> d
irectly behind front of worktop
> d
istance approx. 160 mm with 2 hooks
> not
in the swivel range of a blow dryer!
> not
beside sockets! (unless the customer wants to
use
the handbag hook for hanging up the dryer cable
§ Mount handbag hook to underside of worktop by means
of 2 chipboard screws 4x16 mm, for this pre-drill
Ø 2,5
mm.
nly with wall standing unit:
> see illustr. 9 + 10
§ make a drilling (BO) into the 90 mm high edge of work-
top for cable routing from wall:
long hole Ø max. 15 mm x width max. 40 mm,
drilling centered in width and height.
§ Route wall outlet cables through the drilling to the
bottom side of worktop.
§ Styling station must be fixed to the wall due to
regulations for stationary furnitures! (e.g. by means
of mounting brackets (BW) – see illustr. 10)
8. Mount wipe strip (if ordered): > see illustr. 10
§ Fix wipe strip (WL) of white Acrilian to the wall by means
of silicone adhesive:
lower edge of whipe strip = upper edge of worktop
9. Make electrical connections: > see illustr. 9
(if plug sockets / mirror lighting ordered)
§ PLEASE NOTE: electrical connections are reserved
to authorized electricians!
Floor cable outlet:
§ Mount distributor box (VD) - included - centric to
underside of worktop by means of screws.
Please note: all electrical connections
under the worktop must be secured by means of a
distributor box confirming to standards!
§ Connect floor connection cables to the connection cables
of sockets (SD) inside of distributor box.
§ With mirror lighting: connect the 230V connection cable
of power pack for mirror lighting to the centrically
customer switched cable inside of distributor box.
Please note: store only a minimum length of cable
inside the side!
§ Fix all cables professional under worktop by means of
cable plates and cable binders (with lighting version
included).
Wall cable outlet:
§ Mount distributor box (VD) centric to underside of
worktop (with lighting version included).
Please note: all electrical connections
under the worktop must be secured by means of a
distributor box confirming to standards!
§ Connect wall connection cables to the connection cables
of sockets (SD) inside of distributor box.
§ With mirror lighting: connect the 230V connection cable
of power pack for mirror lighting to the centrically
customer switched cable in the distributor box.
§ Fix all cables professional under worktop (with lighting
version by means of included cable plates and cable
binders).
GB
 Loading...