CelonLab
ENT
EN Instructions for Use
8
W7098046
3. Installation Instructions
The unit must be properly installed and commissioned by Olympus Winter & Ibe
GmbH or by a person or firm (distributor) commissioned and authorised by
Olympus Winter & Ibe GmbH.
3.1 Power Supply Connection
The unit must only be connected to the power supply system with the cable
supplied or a cable of the same quality (see Chapter 7
Technical Data
). The
power socket must be correctly installed and must have an earthing contact.
Before connecting up to the power supply, check that the supply voltage agrees
with the electrical data on the power supply unit’s rating plate.
3.2 Equipotential Bonding
To increase electrical safety, the unit can be connected to the equipotential
bonding system of the treatment room. (The housings of all equipment that
comes into contact with the patient are electrically connected in order to prevent
low-frequency electrical currents endangering the patient in the event of a
defect in the conventional protective conductor system.)
3.3 Moisture Protection
The unit’s housing is drip-proof (IP 21). Nevertheless, no containers containing
liquid should be placed on the unit.
The CelonFoot
Switch
is watertight (IP 68). If it comes into contact with liquid
there is no risk of short circuit.
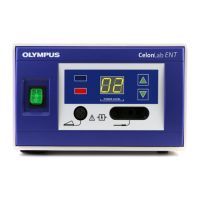
3.4 Commissioning
Before any unit is used for the first time, the following functional test must be
carried out:
1. Connect to the power supply and equipotential bonding (see above).
2. Connect the footswitch to the socket (3).
3. Switch on the control unit at the power switch (1); the green pilot lamp
must glow.
4. Set the maximum coagulation power with buttons (7) and (8) up to the
maximal value of 25. Check that the power display (6) shows all values
between 1 and 25 correctly.
5. Press the footswitch: The blue signal lamp (4) must now glow, an acoustic
signal (intermittent tone) must be audible.
6. Release the footswitch.
7. End of commissioning.
 Loading...