61
EN
N
Natural color ......................................... 24
O
OLYMPUS Master 2 .............................40
Operation guide ....................................12
P
PANORAMA .......................................... 26
PERFECT FIX
H
.................................. 28
PictBridge ............................................. 35
Playback image
Closeup view ..................................... 22
Index view .......................................... 22
Movies ............................................... 15
On TV ................................................ 34
Viewing images ..................................15
P mode ................................................. 14
PW ON SETUP ..................................... 32
POWER SAVE ...................................... 34
Print ...................................................... 35
Print Reservations (DPOF) ................... 38
Protecting images 0 .......................... 29
R
RESET
D
.............................................. 27
Rotating images y ...............................29
S
mode ...........................................17
Self-timer .............................................. 21
Shooting................................................14
Shooting movies n .............................. 18
SHUTTER SOUND ............................. 33
SILENT MODE
F
................................. 34
SLIDESHOW
G
.................................... 28
Sound recording R ..........................25, 29
SOUND SETTINGS .............................. 33
SPOT .................................................. 26
Strap ..................................................... 10
SUPER MACRO %..............................20
SWITCH SHOOTING MODES
C
....... 27
T
Turning on the camera .......................... 13
K/q ............................................... 31
U
USB cable ....................................... 35, 40
Using the Menu.......................................3
V
VIDEO OUT .......................................... 34
Volume ................................................ 33
W
Warning sound 8............................... 33
WB ........................................................ 24
Z
Zoom.....................................................19
bookd439096enUA.indb61 2008/11/0413:31:33
4
EN
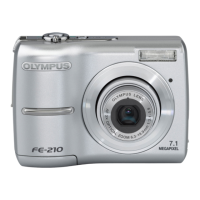
Using the Direct ButtonsUsing the Direct Buttons
Frequently used shooting functions can be accessed using the
direct buttons.
Shutter button (p. 14)
K
button (shooting/switching shooting modes)
(p. 17, 18)
q button (playback) (p. 15)
Zoom buttons (p. 19)
F button (exposure compensation) (p. 20)
& button (macro) (p. 20)
# button ( ash) (p. 19)
Y button (self-timer) (p. 21)
g/E button (changing information display/
menu guide) (p. 21, 22/p. 17)
"/ button (backlight boost/erase)
(p. 21/p. 16, 30)
Using the FUNC Menu (p. 21)Using the FUNC Menu (p. 21)
Frequently used shooting menu functions can be set with less
steps using the FUNC menu.
B button (p. 21)
Arrow pad
B button
Buttons in use
bookd439096enUA.indb4 2008/11/0413:30:21
3
EN
Buttons in use
1
Press the button.
This example describes how to use the
menus to set the [POWER SAVE].
CAMERA MENU
MENU
EXIT SET
OK
Shooting mode top menu
2
Use klmn to select the desired
menu, and press the B button.
Pressing and
holding the E
button displays
an explanation
(menu guide)
of the selected
option.
BACKUP
NO
1
2
3
SETUP
SET
OK
ENGLISH
PIXEL MAPPING
MEMORY FORMAT
MENU
EXIT
Submenu 1
●
Please read “Menu Settings” (p. 23 to 34) while referring to this page.
button
Arrow pad
B button
3
Use kl to select the desired
Submenu 1, and press the
B button.
1
2
3
SETUP
MENU
EXIT SET
OK
POWER SAVE OFF
X
NTSCVIDEO OUT
1
2
3
SETUP
MENU
SET
OK
BACK
POWER SAVE OFF
X
NTSCVIDEO OUT
POWER SAVE
OFF
ON
Page tab Submenu 2
To quickly move to the desired submenu,
press m to highlight the page tab, and then
use kl to move the page. Press n to
return to the submenu.
Some menus include submenus that
appear by pressing the B button.
4
Use kl to select Submenu 2,
and press the B button.
Once a setting is selected, the display
returns to the previous screen.
There may
be additional
operations.
“Menu Settings”
(p. 23 to 34)
1
2
3
SETUP
MENU
EXIT SET
OK
POWER SAVE ON
X
NTSCVIDEO OUT
5
Press the button to complete
the setting.
●
Three Types of Setting Operations
E button
Using the MenuUsing the Menu
Various camera settings can be accessed through the
menus, including functions used during shooting and
playback and the date/time and screen display.
There may be menus that are unavailable depending
on other related settings or the mode (p. 17).
bookd439096enUA.indb3 2008/11/0413:30:18
 Loading...