25
EN
2
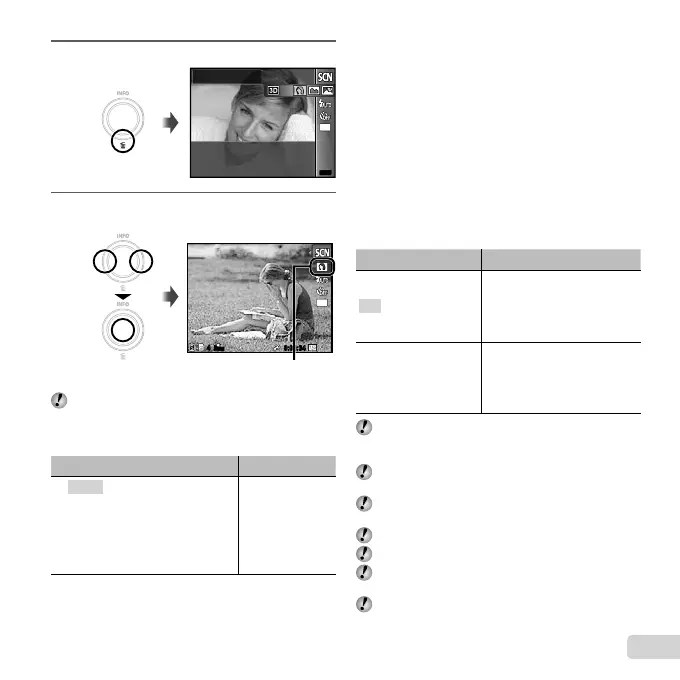
Press G to go to the submenu.
MENUMENU
Portrait
MENUMENU
14
M
3
Use HI to select the best shooting mode for
the scene, and press the Q button.
14
M
0:00:340:00:34
44
N
ORM
Icon indicating current mode
In
mode, the optimum shooting settings are
pre-programmed for specifi c shooting scenes.
For this reason, some settings cannot be changed in
some modes.
Option Application
B Portrait/F Landscape/
G Night Scene
*1
/M Night+Portrait/
C Sport/N Indoor/W Candle
*1
/
R Self Portrait/S Sunset
*1
/
X Fireworks
*1
/V Cuisine/
d Documents/
K
Beach & Snow/
Pet/W 3D Photo
The camera takes
a picture using the
optimum settings
for the scene
conditions.
*1
When the subject is dark, noise reduction is
automatically activated. This approximately doubles the
shooting time during which no other pictures can be
taken.
To take pictures of a moving subject like a
To take pictures of a moving subject like a
pet ([
Pet])
1 Use HI to select [ Pet], and press the Q button
to set.
2 Hold the camera to align the AF target mark on the
subject and press the Q button.
● When the camera recognizes the subject, the
AF target mark automatically tracks the subject
movement to focus on it continuously. “To focus on
a moving subject continuously (AF Tracking)” (p. 33).
To shoot W
images (W
mode)
1 Use HI to select [Auto] or [Manual] and then press
the Q button to set.
Submenu 1 Description
Auto
The user only composes the
shots so that the target marks
and pointers overlap, and the
camera automatically releases
the shutter.
Manual
After shooting the fi rst frame,
move the camera to overlap
the subject with the image in
the screen. Then manually
release the shutter.
Depending on the subject or the situation (if the
distance between the camera and subject is too
short), the image may not look 3D.
The 3D viewing angle varies depending on the
subject, etc.
To exit 3D shooting mode without saving an image,
press the button.
The [Image Size] (p. 31) is fi xed to [0].
The zoom ratio is fi xed.
The focus, exposure and the white balance are fi xed
when the fi rst image is taken.
The fl ash is fi xed to [$Flash Off].