Do you have a question about the Olympus VISERA and is the answer not in the manual?
Switch on the camera system using the workstation master switch which will then turn from white to green.
There is a secondary power switch on the transformer under the workstation.
Insert the camera head into the camera processor, ensuring the connector is the correct way up.
Connect the light guide cable to the output socket.
Place the lamp onto standby by pressing and holding the lamp button.
Press the brightness mode button to select Auto.
Warning: Never allow the distal end of an endoscope/light guide cable to contact flammable materials.
Attach the camera head to the telescope by rotating the endoscope mount and securing the lock ring.
Perform white balance by surrounding the telescope tip with a white swab.
Press and hold the white balance button until 'White Balance Complete' appears.
Enable brighter light by connecting compatible endoscopes and pressing the intensity mode button.
Warning: Do not use high intensity mode with endoscopes of 4.1 mm or less outer diameter to avoid burns.
Caution: Do not touch the endoscope distal end/light guide connector while the lamp is lit up.
Adjust image focus using the one touch auto focus switch on the camera head for optimal results.
Use the manual focus ring for telescopes of diameter 2.7 mm where auto focus may not work.
The three programmable buttons can be assigned to insert actions 1, 2, and 3.
Press 'Info' then 'Scope Information' to view data and settings on the monitor.
Details include user preset name, scope model, serial number, and remote switch functions.
Ensure all devices are powered on and the transformer isolation switch is turned on.
Check power, monitor input, and unplug the camera head to verify colour bars.
Check the condition of the telescope and the light lead.
Check that a compatible Olympus light lead is being used.
Check the lamp meter on the light source has not exceeded 500 hours.
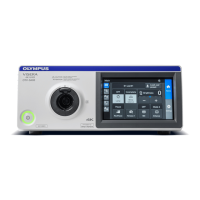
The VISERA UHD 4K Camera System is a medical imaging device designed for endoscopic procedures, providing high-definition 4K video output. This quick reference guide outlines its basic operation, from initial setup to troubleshooting.
The VISERA UHD 4K Camera System captures and processes high-resolution video during endoscopic examinations. It consists of a camera head, a camera processor, a light source, and a workstation. The system is designed to provide clear, detailed images to assist medical professionals in diagnosis and treatment. Key functions include:
While specific numerical specifications are not extensively detailed in this quick reference guide, the following can be inferred:
This quick reference guide serves as a concise overview; users are advised to consult the complete Instructions For Use for each item of equipment for comprehensive information on handling, use, and storage.
| Brand | Olympus |
|---|---|
| Model | VISERA |
| Category | Digital Camera |
| Language | English |