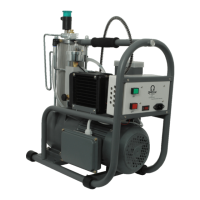
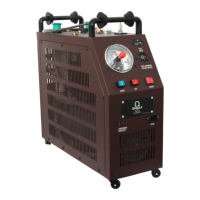
The Omega Air Charger is a 4500 psi compressor designed for filling PCP (Pre-Charged Pneumatic) and carbon fiber air tanks. It is capable of rapidly filling tank sizes ranging from 6 cubic feet to 120 cubic feet.
Function Description:
The primary function of the Omega Air Charger is to compress air to high pressures (up to 4500 psi) for the purpose of refilling PCP air tanks and carbon fiber tanks used in various applications, such as airguns. The compressor features an automatic shut-off mechanism that prevents over-filling and is equipped with shock-resistant pressure gauges for accurate monitoring. It incorporates a sophisticated cooling system and lubrication system to ensure efficient and reliable operation.
Important Technical Specifications:
- Maximum Pressure: 4500 psi
- Tank Filling Capacity: 6 cubic feet to 120 cubic feet
- Cooling System: Utilizes Royal Purple radiator coolants (Purple Ice radiator coolant and anti-freeze pre-mixed solution) to reduce operating temperatures and enhance heat exchange efficiency by up to 30%. Requires purified water to be added to the radiator prior to initial start-up.
- Lubrication System: Employs high-quality Bio-based food-grade lubricants from Renewable Lubricants in the crankshaft and multi-stage high-pressure piston chambers. This protects the PCP air tank's inner surface from oxidation and provides excellent adhesion/cohesion properties.
- Air-Water Separation: Standard on all units, with manual water release.
- Burst Disc Setting: Set to 4800 psi to prevent over-pressurization. Spare discs are provided for easy replacement.
- Continuous Operation: Can run continuously for a maximum of 8 hours.
- Power: The device requires an electrical outlet for power.
Usage Features:
- Ease of Use: Designed to be user-friendly and economical.
- Initial Start-up Procedure:
- Pour the supplied ICE and coolant into the water tank and fill with water to approximately 1/2 inch below the water flume.
- Locate the grease port, remove the shipping screw, and replace it with the green extra volume grease head (hand tighten). Apply 1 click (1/3 turn) of grease every 6 hours of compressor running.
- Set the desired PSI using the red knob on the compressor gauge (which has two needles).
- Connect the power cord to the compressor power socket.
- Ensure the fan and water pump are operating before pushing the green start switch.
- Connect the air tank to the high-pressure fill hose using a 1/8 inch quick-connect adaptor, ensuring a firm connection.
- Push the green button to start air compression. The compressor will run until the desired PSI is reached and then shut off automatically.
- After shut-off, close the air tank and bleed out excess air using the release valve at the bottom of the compressor.
- Allow the radiator to run for an additional 5 minutes to cool the piston chamber completely before switching off the entire compressor.
- Release all compressed air from the hose before removing the adaptor.
- Operating Environment: Should be operated on a smooth, flat surface. Avoid dusty, humid conditions, or temperatures below 45°F.
- Water/Air Release: Open the manual air/water control knob every 15-20 minutes during operation (more often in high humidity) to release accumulated water and air.
- Safety Precautions:
- DO NOT overfill air cylinders or gun air tanks, as this can cause serious injury or death. Always use common sense when operating high PSI compressors.
- DO NOT fill air tanks above 4500 psi.
Maintenance Features:
- Basic Maintenance: The compressor comes with necessary seals and instructions for basic end-user maintenance.
- Radiator Fluid: Check before each use and change as needed. Use non-distilled purified water, regular anti-freeze, and Purple Ice when refilling. Add 1/2 ounce of Purple Ice and 1 ounce of Anti-freeze first, then fill with non-distilled purified water. Maintain fluid level 1/2 inch below the water output. DO NOT USE DISTILLED WATER.
- Lubrication: Only use Renewable Lubricants E.P Grease #0 for upper cylinder piston lubrication.
- Long-term Storage: Drain the water tank and gently blow compressed air through water lines or use a Dry-vac to suck out water. Keep the compressor covered.
- Troubleshooting (Compressor not "ON" / no lights):
- Check power at the electrical outlet.
- Ensure the power cord is fully inserted into the compressor socket.
- Verify the red circuit breaker has not tripped.
- Inspect for loose wires behind the front panel (due to shipping).
- Troubleshooting (Compressor not running but lights are "on"):
- Check for loose wires.
- Ensure the gauge has not been set too low.
- Verify the red off button is not stuck (listen for a click when pressed).
- Troubleshooting (Compressor not building pressure):
- Ensure the bleed screw is hand-tightened (DO NOT use tools). Check for tightness as PSI climbs.
- Inspect the burst disc for damage. Replace if damaged (located under the 14mm brass fitting).
- Check the High Pressure Check Valve. Clean or replace if damaged (located under the 19mm brass fitting). Ensure the spring is placed small end down.
- Spray soapy water on all airline connectors and the air/water separator to check for leaks. Tighten connections as needed. Avoid spraying electrical components.
- Most leaks occur at the compressor fill hose, customer's hose, gauges, and fill tanks.
- Troubleshooting (No water flow):
- Ensure there is water in the compressor radiator reservoir.
- Check for 12 volts at the water pump electrical connections. If 12 volts are present and no flow, the water pump may be faulty.
- Disconnect an upper water line while the pump is running to purge air, or rock the compressor side to side.
The manual includes an exploded diagram of the compressor with a detailed parts list, as well as a wiring diagram for the electrical components. A maintenance parts list is also provided, detailing various seals, rings, springs, and tools for routine upkeep. The product is covered by a one-year retail limited warranty from Raptor Pneumatics, LLC, covering manufacturing defects and faults under normal use, provided maintenance instructions are followed.