Do you have a question about the Omega HH520 and is the answer not in the manual?
Data can be stored in the meter or directly saved on a computer for processing.
Specifies altitude, humidity, and ambient temperature limits for safe operation.
Guidelines for servicing and cleaning the instrument to ensure longevity and safety.
Defines safety symbols used, including CE compliance, for user awareness.
Highlights four-channel inputs, thermocouple support, alarm, fast response, data logging, and PC interface.
Details temperature measurement ranges for K, J, E, T thermocouples and their respective resolutions.
Specifies accuracy under defined ambient conditions and the temperature coefficient.
Information on sample rate, battery type, and approximate battery lifetime.
Defines the acceptable operating and storage temperature and humidity ranges.
Provides physical dimensions, weight, and a list of standard included accessories.
Defines various indicators on the device display, such as battery, recording, and memory status.
Explains the meaning of labels and icons associated with the device's buttons and functions.
Identifies buttons for power, backlight, data operations, setup, and memory functions.
Locates the main display screen and its various status indicators.
Identifies the USB interface, tilt stand, and battery compartment.
Instructions for turning the meter on and off using the dedicated power button.
How to activate and deactivate the LCD backlight for improved visibility in dark environments.
Freezing and unfreezing readings on the display, noting button lock in this mode.
Starting and stopping data logging, with notes on full memory and low battery warnings.
Saving current readings to memory groups, supporting up to 100 sequential storage groups.
Recalling previously saved readings and selecting memory groups for review.
Monitoring and storing maximum, minimum, and average values, and exiting the mode.
Switching between Celsius (°C) and Fahrenheit (°F) measurement units.
Entering and exiting the setup options menu for configuring device settings.
Steps to enter setup, adjust parameters using navigation buttons, and save changes.
Procedure for selecting the type of thermocouple (K, J, E, or T) to be used.
Setting the time interval for data logging, from seconds to minutes, for recording frequency.
Adjusting readings to compensate for probe errors within a specified range of ±5°C or ±9°F.
Configuring alarm points for channel T1, including setting Hi and Lo temperature limits.
Enabling or disabling the mode to display the difference between T1 and T2 temperature readings.
Configuring the automatic power-off timer for energy saving, with various duration options.
Setting the device's internal clock for accurate time stamping of recorded data.
Detailed steps to select the appropriate thermocouple type using navigation buttons.
Configuring the data logging interval, specifying the duration in minutes or seconds.
Adjusting readings to compensate for thermocouple probe inaccuracies.
Enabling/disabling the alarm and setting Hi/Lo limits for temperature monitoring on channel T1.
Activating T1-T2 subtraction mode and viewing the temperature difference on the LCD.
Selecting options for automatic power off, including duration or disabling the feature.
Setting the year, date, and time for accurate data logging and record keeping.
Procedure to turn off, then turn on with button press to clear all stored logger data.
Steps to clear instant read-out memory by powering on the unit with specific button combinations.
How to connect the meter to a PC using a micro USB cable for data transfer and monitoring.
Instructions for replacing batteries when the voltage is low, including safety precautions.
Lists the items included in the HH520 software package: CD disk and Micro USB cable.
Specifies the operating systems compatible with the HH520 software.
Details the necessary hardware for installing and running the HH520 software.
Guide to connecting the thermometer and recording real-time data in waveform.
Instructions on how to save recorded data from the graph window to a file.
Describes available file formats (ghf, txt, csv) and their usage details.
Steps to load recorded data from the meter to the PC and save it as a file.
Explains the functions available in the main menu: File, Real Time, Data Logger, View, Window, Help.
Accessing the control panel within the software to manage and control the meter.
Displaying and graphing the present data in real-time within the software interface.
Starting and stopping the collection of real-time data within the software application.
Using the DataLogger window to load recorded meter data onto the PC for analysis.
Graphing tabular data loaded from the meter within the software application.
Understanding the graph display, tool bar options, and data set selection for analysis.
Explanation of tool bar icons like Statistic1, Statistic2, cursor, and annotation functions.
Using 'Split' to separate or combine channels and customizing Y-axis range for clarity.
Adjusting the minimum and maximum values for the Y-axis display range of the graph.
How to zoom in on graph sections using the mouse and undo the zoom action.
Choosing specific channels or multiple channels to display on the graph for detailed review.
Instructions for removing the HH520 software from the computer via Control Panel.
Procedure for zooming into specific areas of the graph using mouse actions.
Explanation for potential data loss during fast sampling and suggested solutions.
Recommendations for calibrating the thermometer annually and cleaning the device.
Warnings against using harmful cleaning agents and tools that could damage the instrument.
Details the 13-month warranty, exclusions, and conditions that may void the warranty.
Excludes liability for consequential damages and limits remedies to purchase price.
Prohibits use in nuclear, medical applications, or on humans, with specific disclaimers.
Steps for returning products for warranty service, including obtaining an AR number.
Information required for non-warranty repairs and contacting OMEGA customer service.
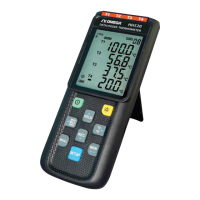
The HH520 is a 4-channel data logger thermometer designed for measuring and recording temperature using various thermocouple types (J, K, T, E). It offers a range of features for both real-time monitoring and data logging, making it suitable for applications requiring temperature tracking over time.
The primary function of the HH520 is to measure temperature from up to four independent channels simultaneously. It supports multiple thermocouple types, providing flexibility for different measurement needs. Beyond real-time display, the device can log temperature data internally, storing up to 16,000 records per channel. This logged data can then be transferred to a computer for further analysis and processing using the included Windows software. The device also supports real-time monitoring when connected to a PC, allowing users to view live temperature readings and waveforms.
The HH520 is designed for user-friendly operation with a clear LCD display and a set of intuitive buttons.
To ensure the long-term accuracy and performance of the HH520, regular maintenance is recommended:
| Input Type | Thermocouple |
|---|---|
| Display | LCD |
| Interface | USB |
| Operating Temperature | 0 to 50°C (32 to 122°F) |
| Thermocouple Types | J, K, T, E, R, S, N |
| Resolution | 0.1°C |
| Sampling Rate | Selectable: 1 second to 24 hours |