EasyManua.ls Logo

Omix-Ada 13551.23 User Manual

Omix-Ada 13551.23
3 pages
To Next Page IconTo Next Page
Page #1 background imageLoading...
Page #1 background image
Copyright © 2018 Omix-Ada
®
, Inc.
460 HORIZON DR. SUITE 400 | SUWANEE, GA 30024 | PHONE: 770-614-6101 | FAX: 770-614-6069 | info@omix-ada.com
Dash Multi-Mount System for Wrangler JL
Page 1/3
Part 13551.23
OMIX-ADA
®
TECHNICAL SUPPORT
PHONE: M-F 8am - 5pm EST 1-800-449-6649 | EMAIL: techsupport@omix-ada.com
FOR WARRANTY INFORMATION VISIT: www.Omix-Ada.com
1. Multi-Mount Tray (1)
2. Universal Ball Mount (1)
3. Cap Piece (1)
4. 17mm Ball Phone Mount (1)
Components
1
2
4
3
Four Congurations for Dash Multi-Mount System:
*Shown with Rugged Ridge Phone Mount (Part #13551.13)
No Accessory Camera/Tripod
Mount Only
Phone/GPS
Mount Only*
Phone and
Camera Mount*
JL Multi Mount System.indd 1 9/7/18 9:51 AM
Question and Answer IconNeed help?

Do you have a question about the Omix-Ada 13551.23 and is the answer not in the manual?

Omix-Ada 13551.23 Specifications

General IconGeneral
Part Number13551.23
ManufacturerOmix-Ada
CategoryAutomobile Accessories
ColorBlack
MaterialPlastic

Summary

Dash Multi-Mount System Components

Multi-Mount Tray

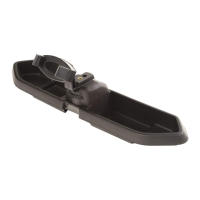
The primary tray component of the dash multi-mount system for the Wrangler JL.

Universal Ball Mount

An adjustable ball mount designed for attaching various accessories to the system.

Cap Piece

A functional or aesthetic cap piece for the multi-mount system.

17mm Ball Phone Mount

A specific mount adapter designed for phones with a 17mm ball interface.

Dash Multi-Mount System Configurations

No Accessory Configuration

The dash multi-mount system shown installed without any additional accessories attached.

Phone/GPS Mount Configuration

The dash multi-mount system configured to hold a phone or GPS device.

Camera/Tripod Mount Configuration

The dash multi-mount system configured to hold a camera or tripod.

Phone and Camera Mount Configuration

The dash multi-mount system configured to hold both a phone and a camera simultaneously.

Installation Steps

Step 1: Remove Interior Liner

Remove the interior rubber liner from the dash compartment, possibly by prying a corner.

Step 2: Remove Phillips Screws

Locate and remove two Phillips screws from the inside of the compartment.

Step 3: Position Multi-Mount System

Place the multi-mount system into position, ensuring the area is clean before installation.

Step 4: Reinstall Phillips Screws

Reinsert the Phillips screws removed in Step 2 through the multi-mount system into the dash.

Accessory Attachment Procedure

Attach Outer Ring to Ball Mount

Place the outer ring over the end of the ball mount for initial connection.

Insert Phone Mount Adapter

Press the phone mount adapter piece into the ball mount.

Secure Phone Mount Adapter

Pull the outer ring over the phone mount adapter and twist to secure the connection.

Related product manuals