EasyManua.ls Logo

OMNI mount G3FP - User Manual

OMNI mount G3FP
22 pages
Print Icon
To Next Page IconTo Next Page
Loading...
Thank you for purchasing an OmniMount product.
G3FP Eng PN:1002851—Rev F 7/2006
OmniMount Systems, Inc.
8201 South 48th Street • Phoenix, AZ 85044-5355
1-800-MOUNT-IT • www.omnimount.com
Specifications are subject to change without prior notice.
Every effort has been made to provide accurate and error-free assembly and installation. OmniMount Systems disclaims liability for any difficulties arising from
the interpretation of information contained in these instructions. If OmniMount products are used for purposes other than their original intent, OmniMount, its
distributors and retailers shall not be held responsible or liable for injuries or property damage, direct, indirect, or consequential, which may arise from the inabil-
ity to use this product safely, properly, and in the manner for which it has been designed and manufactured. Warranty does not apply to products which have
been lost, damaged by misuse, abuse, or accident.
Les spécifications sont susceptibles d’être modifiées sans préavis.
Tous les efforts ont été mis en œuvre pour fournir des instructions de montage et d’installation précises et sans erreur. OmniMount Systems décline toute respon-
sabilité pour toute difficulté éventuelle liée à l’interprétation des informations contenues dans ces instructions. Si des produits OmniMount sont utilisés à d’autres
fins que celles pour lesquelles ils ont été conçus, OmniMount, ses distributeurs et ses revendeurs ne peuvent être tenus responsables des blessures ou dommages
directs, indirects ou consécutifs pouvant résulter de l’incapacité à utiliser ce produit correctement, dans de bonnes conditions de sécurité et de la manière prévue.
La garantie ne s'applique pas aux produits perdus ou endommagés suite à une mauvaise utilisation, à une utilisation abusive ou à un accident.
Las especificaciones pueden cambiar sin previo aviso.
Se ha hecho un especial esfuerzo para facilitar un montaje y una instalación correctos y sin errores. OmniMount Systems no se hace responsable de problemas o
contratiempos que pudieran tener lugar como consecuencia de la interpretación de la información contenida en estas instrucciones. Si los productos OmniMount
se usan para propósitos distintos a los intencionados originalmente, OmniMount, así como sus distribuidores y vendedores, no serán responsables de posibles
daños físicos o a la propiedad, ya sean directos o indirectos, que puedan derivarse de un uso imprudente, inseguro o incorrecto de este producto o de una forma
distinta para la cual ha sido diseñado y fabricado. La garantía no cubre productos que se hayan perdido o dañado por un mal uso, abuso o por accidente.
G3FP: Universal Flat Panel Floor Stand
Installation Instructions — NA
IMPORTANT
Do not begin the installation until you have thoroughly reviewed this document and understand the instructions.
NEVER exceed the Maximum load capacity:
Mounting Head—200lbs. (90.1 kg); Shelf—50lbs. (22.7 kg); Base Shelf—100 lbs. (45.4 kg)
English
Français
Español
Question and Answer IconNeed help?

Do you have a question about the OMNI mount G3FP and is the answer not in the manual?

Summary

Installation Instructions

Important Safety and Usage Notes

Key safety warnings and usage guidelines before starting installation.

Component Guide

Identify Product Components

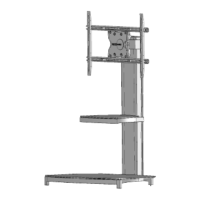
List and visual identification of all parts included in the kit.

Parts List

List of Hardware and Accessories

Detailed list of all screws, washers, and tools provided.

Assembling the Base

Prepare the Base

Locate the base and position it for assembly.

Attach Foot Screws

Thread the foot screws into the designated base feet.

Attaching Mounting Post to Base

Insert Mounting Post

Insert the mounting post into the base assembly.

Secure Base Screws

Attach the base to the stand using base screws and washers.

Final Tightening

Ensure all base screws are securely tightened.

Shelf Assembly

Prepare Shelf Brackets

Attach shelf screws loosely to shelf brackets and T-bars.

Install and Tighten Shelf Brackets

Slide brackets onto post, position, and tighten securely.

Installing Shelves

Insert Shelf Screws

Insert shelf screws into the top screw holes of the shelf.

Slide and Secure Shelves

Slide shelves onto brackets and tighten screws.

Level and Adjust Shelves

Use a level to adjust shelves for proper positioning.

Installing the Mounting Head

Place Tensioning Pucks

Insert tensioning pucks into the mounting head.

Attach Shelf Screws Loosely

Loosely thread shelf screws into pucks, leaving space.

Mount Head to Post

Slide and position the mounting head onto the mounting post.

Fitting the UAL

Position UAL on Display

Place the UAL onto the back of the display.

Align Display Rails

Adjust rails to align with the display's mounting holes.

Modifying the UAL

Remove Rails

Detach the rail screws and the rails from the UAL.

Install New Rails

Select and attach appropriate rails to the UAL connectors.

Selecting Mounting Hardware

Position UAL

Place the UAL on the display's back over mounting holes.

Consult Hardware Chart

Refer to chart for correct spacers and screws for your display.

Attaching the UAL to the Display

Install Washer and Screw

Place square washer on screw, insert into rail.

Add Spacers

Slide necessary spacers onto the screw.

Secure to Display

Screw the UAL assembly into the display.

Important Caution

Warning against using power tools or over-tightening screws.

Attaching the Display to the Stand

Connect UAL to Stand

Thread UAL screws into UAL, leaving space.

Lower Display onto Mount

Lower the UAL assembly onto the stand's mounting head.

Secure UAL to Mount

Insert and tighten UAL screws through mount.

Installing the Glass Shelves

Prepare Shelves with Pads

Place rubber pads on shelf edges after removing adhesive.

Prepare Shelves with Strips

Place rubber strips on shelf rears after removing adhesive.

Position Glass Shelves

Place the glass shelves onto the stand.

Secure Glass Shelves

Install glass shelf screws into the rear of the shelves.

Routing the Cables

Route Cables Through Post

Guide cables through post channels and recessed areas.

Finishing the Stand

Install Cable Covers

Thread screws through cable covers into the mounting post.

Attach Top Cover

Place and press the top cover onto the mounting post.

Display Adjustment

Adjust Tilt

Loosen, adjust display tilt, and then tighten.

Adjust Swivel

Loosen, adjust display swivel, and then tighten.

OMNI mount G3FP Specifications

General IconGeneral
BrandOMNI mount
ModelG3FP
CategoryRacks & Stands
LanguageEnglish