Do you have a question about the Onean Carver X and is the answer not in the manual?
Crucial safety instructions for using the Carver board and its systems, emphasizing user awareness and proper handling.
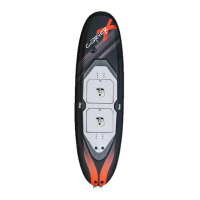
Details on the Carver board's construction, weight, dimensions, and volume.
Description of the semi-rigid Carver bag, including its padded reinforcement and detachable wheels.
Specifications for the Carver's jet units, including nominal power and static push.
Information on the multicell Lithium-Ion batteries, covering type, weight, capacity, and voltage.
Specifications for the charger, including protection features, input/output power, and charging current.
Details on the watertight wireless remote control, including its display, sensors, and battery.
Description of the Qi inductive charger designed for the wireless controller.
Details on the custom-designed, CNC-machined stator and nozzle parts made of tempered aluminum.
Technical specifications for the custom-designed impeller, including dimensions and material properties.
Description of the durable thermoplastic rubber handle with reinforced stitching for strength and security.
Information on the conventional and custom tools provided for impeller extraction and insertion.
Explanation of the trigger's purpose to ease pressing the drop for jet activation.
Details on the coiled leash, padded cuff, and the magnetic security key system for safety.
Description of the hard plastic and fibre US Box fins included with the equipment.
Step-by-step guide on how to correctly insert and secure the fins into the board's finbox.
Instructions for attaching the leash to the board using the provided insert and screw.
Procedure for inserting the cylindrical battery magnet into the designated battery compartment.
Guide on placing and securing footstraps on the board for different riding styles and optimal positioning.
Covers battery transport, storage, connection, disconnection, and charge level indication.
Step-by-step instructions for securely connecting and disconnecting the battery from the board.
Detailed instructions on how to properly charge the Carver board's batteries, including connection and indicator lights.
Introduction to the wireless controller and its basic operation for controlling the jet's power.
Steps to access the controller's configuration menu for advanced settings like synchronization and sensitivity.
Guide on synchronizing the wireless controller with the Carver board for optimal communication.
Instructions on how to adjust the maximum power output of the jet via the controller's interface.
Steps to adjust the controller's sensitivity for different jet response profiles and rider preferences.
Procedure to reset the wireless controller to its factory default settings.
Instructions for charging the wireless controller using the provided Qi charger and verifying charge status.
Guide on how to properly attach the leash and the function of the magnetic security key.
Overview of various safety features that automatically stop the jet in critical situations like overheating or falls.
Guidelines on suitable conditions, regulations, and limitations for Carver board usage.
Essential checks to perform before getting into the water, including leash, key, and remote functionality.
Recommended procedures and precautions for initial usage, including starting up and turning.
Procedures and warnings for safely exiting the water after use, including engine cooldown.
Broad safety advice covering protective gear, operating alone, water conditions, and proximity to others.
Procedures for rinsing the jet, cleaning parts, and general care of the board after use, especially in saline environments.
Guidelines for handling, storing, and maintaining the Carver board batteries correctly to ensure longevity.
Recommendations for cleaning and maintaining the wireless controller, including avoiding direct sunlight and humidity.
Detailed steps for unmounting and mounting the impeller using specialized tools.
Step-by-step guide for correctly mounting the impeller onto the jet unit shaft using the provided tooling.
Instructions for replacing corroded battery power connectors using a specific tube hex key.
| Type | Electric Surfboard |
|---|---|
| Top Speed | 45 km/h |
| Ride Time | 40 minutes |
| Remote Control | Yes |
| Battery | 48V |
| Battery Weight | 12 kg / 26.5 lbs |
| Charging Time | 2.5 hours |