EasyManua.ls Logo

Onkyo RC-390M - User Manual

Onkyo RC-390M
12 pages
Print Icon
To Next Page IconTo Next Page
Loading...
58
Using remote controller
Overview
The RC-390M remote controller is a useful tool to help you
operate the components of your home theater. To do so, first press
the Mode button that corresponds to the device you wish to
control. At this time, the display on the remote controller will
change to show the component that is selected. Then simply press
the desired operation button and the component will operate
accordingly. For example, if you wish to select the CD input
source at the TX-DS787 with the remote controller, first press the
AUDIO/TAPE MODE button to select the TX-DS787 (AUDIO
will appear on the display) and then press the CD (INPUT
SELECTOR) button.
Using the remote controller to control each
device
In order to use the remote controller, you must first turn on the
POWER switch at the TX-DS787 so that it enters standby mode.
1. Press the AUDIO/TAPE MODE button.
AUDIO appears in the remote controller display.
2. Press the ON button to turn on the TX-DS787
and press the STNBY button to put it back in
the standby mode.
When you press the STNBY button on the remote controller, it
puts the TX-DS787 in the standby state but does not turn it
completely off.
SEND/LEARN indicator
This indicator acts as a guide when commands are programmed
into or sent by the remote controller. It also warns the user when an
error is made or battery power is low.
Controlling the TX-DS787
If AUDIO is already appears in the display, proceed to step 2.
1. Press the AUDIO/TAPE MODE button.
AUDIO appears in the remote controller display.
2. Press the desired operation button. The
buttons shaded in the figure to the left are the
operation buttons that can be used to control
the TX-DS787.
ON
AUDIO/TAPE
MODE
STNBY
OPEN/CLOSEREC
AUDIO MUTING
DISCTRACK
DVD
CD
PH
TUN
T2T1
V1
STEREO
123
654
7
+
10 0
ENT
89
SURROUND THX DSP
LEVEL
+
CH SELRe-EQ
LEVEL
DIMMER
HOME THEATER CONTROLLER
RC-390M
LATE NIGHT
DIRECT DSP
V2 V3 V
ON
AUDIO/TAPE
MODE
STNBY
VOL
DISPLAY
CH
Re-EQ
LATE NIGHT
DIMMER
SLEEP
AUDIO
LIGHT
TEST
MUTING
LEVEL +
LEVEL
CH SEL
SEND/LEARN
indicator
INPUT
SELECTOR
buttons
Listening
mode buttons
Question and Answer IconNeed help?

Do you have a question about the Onkyo RC-390M and is the answer not in the manual?

Summary

Remote Controller Operation Guide

Overview and Features

General introduction to the RC-390M remote controller's capabilities and features.

Basic Device Control

Steps to select a device mode and operate it.

SEND;LEARN Indicator Function

Function and interpretation of the SEND/LEARN indicator.

TX-DS787 Control Instructions

Specific steps to operate the TX-DS787 receiver.

Detailed Button Functions

General Operation Buttons

Descriptions of buttons like LIGHT, SLEEP, VOLUME, MUTE, etc.

Audio Listening Mode Selection

Buttons for selecting listening modes like STEREO, SURROUND, DIRECT, THX, DSP.

Component Control: CD and MD Players

Controlling an Onkyo CD Player

Instructions for operating the CD player using the remote.

Controlling an Onkyo MD Recorder

Instructions for operating the MD recorder using the remote.

Component Control: Cassette and Radio

Controlling an Onkyo Cassette Tape Deck

Instructions for operating the cassette deck using the remote.

Tuner Input and Radio Station Selection

Procedure to select radio stations using the tuner input.

Component Control: DVD and Other Modes

Controlling an Onkyo DVD Player

Instructions for operating the DVD player using the remote.

SAT, CABLE, VCR, and TV Modes

Information on using mode buttons for other devices.

Remote Controller Programming

Learning Remote Control Commands

How to learn commands from other remote controllers.

Managing Programmed Commands

Erasing Programmed Commands

Procedures for erasing single or all programmed commands.

Macro Functionality

Macro Function Overview

Explanation of macro functions for automating button sequences.

Programming and Running Macros

Steps to create and execute multi-button macros.

Direct Macro Functionality

Programming and Running Direct Macros

Steps to create and execute macros using the DIRECT MACRO button.

Macro Management

Erasing MODE MACRO Functions

Procedure to erase macros from MODE MACRO buttons.

Erasing DIRECT MACRO Functions

Procedure to erase macros from the DIRECT MACRO button.

Remote Controller Reset

Erasing All Programmed Commands and Macros

Procedure to reset the remote to factory default settings.

Overview

Onkyo RC-390M Home Theater Controller

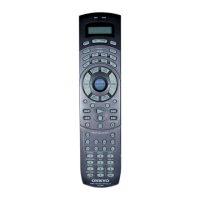
The Onkyo RC-390M is a versatile remote controller designed to operate various components of a home theater system, primarily the Onkyo TX-DS787 receiver, as well as Onkyo CD players, MD recorders, cassette tape decks, and DVD players. It also features learning capabilities to control other devices and macro functions for executing a series of commands with a single button press.

Function Description

The RC-390M operates by first selecting the desired device's MODE button. Once a mode is selected, the remote's display shows the selected component, and its buttons become active for controlling that specific device.

Controlling the TX-DS787 Receiver:

  • AUDIO/TAPE MODE: Selects the TX-DS787 and displays "AUDIO" on the remote.
  • ON/STNBY: Turns the TX-DS787 on or puts it into standby mode. Standby mode does not completely power off the unit.
  • LIGHT: Illuminates the remote's buttons.
  • SLEEP: Sets a timer for the TX-DS787 to automatically turn off. Pressing it once sets a 90-minute timer, and subsequent presses decrease the time by 10-minute intervals. The remaining time can be checked by pressing SLEEP. To cancel, press SLEEP when the displayed time is less than 10 minutes.
  • DISPLAY: Changes the display on the TX-DS787, mirroring its front panel button.
  • VOL A/V: Adjusts the master volume of the TX-DS787.
  • CH+/-: Selects tuner preset stations.
  • TEST: Outputs a test tone for setting speaker levels. Used in conjunction with LEVEL +/- and CH SEL buttons to calibrate speaker levels without entering the OSD Menu. Outputs pink noise.
  • MUTING: Mutes the playback sound immediately, displaying "Muting" on the TX-DS787. Press again to unmute.
  • AUDIO: Selects the audio input signal, cycling through "AUTO," "Multichannel," and "Analog."
  • INPUT SELECTOR: Selects an input source, mirroring the TX-DS787's front panel buttons.
  • Re-EQ: Toggles the cinema re-equalization function on or off, depending on the listening mode. This function reduces "edginess" or "brightness" in home cinema sound to compensate for theater mixes.
  • LATE NIGHT: Sets the late night function to "High," "Low," or "Off." This narrows the dynamic range of cinema sound, making quieter sounds more audible at low volumes. Effective only on Dolby Digital encoded software, and its depth depends on the software.
  • CH SEL: Selects a speaker for adjusting its output level, used with the TEST button.
  • DIMMER: Adjusts the display brightness of the TX-DS787 (Normal, Dark, Very Dark).
  • LEVEL +/-: Increases or decreases speaker levels, used with the TEST button.

Listening Mode Buttons:

  • STEREO: Directly changes to Stereo listening mode. If pressed, the listening mode for the selected input source in the Listening Mode Preset sub-menu is also changed to Stereo.
  • SURROUND: Changes to surround mode for the current input signal (e.g., Dolby Pro Logic, Dolby Digital, DTS). If pressed, the listening mode for the selected input source in the Listening Mode Preset sub-menu is also changed to Surround. For Dolby Digital or DTS sources, it cycles through 6.1-channel matrix playback modes: Auto → On → Off → Auto...
  • DIRECT: Directly changes to Direct listening mode. If pressed, the listening mode for the selected input source in the Listening Mode Preset sub-menu is also changed to Direct.
  • THX: Directly changes to THX listening mode. If pressed, the listening mode for the selected input source in the Listening Mode Preset sub-menu is also changed to THX. For THX Surround EX sources, it cycles through: Auto → On → Off → Auto... ("Auto" only for Dolby Digital sources).
  • DSP: Changes the listening mode through a sequence: Direct → Stereo → Theater-Dimensional → Surround → THX → Mono Movie → Enhanced7 Orchestra → Unplugged → Studio-Mix → TV Logic → All Ch Stereo → Direct. If pressed, the listening mode for the selected input source in the Listening Mode Preset sub-menu is also changed.

Controlling Onkyo CD Player (via RI connector):

  • CD MODE: Selects CD player control.
  • TRACK: Selects a track.
  • DISC: Selects a disc in a CD changer.
  • Track down/up, Play, Stop, Fast reverse/forward, Pause, OPEN/CLOSE, 0-9, +10 (Numeric keys).

Controlling Onkyo MD Recorder:

  • MD MODE: Selects MD recorder control.
  • ON/STNBY: Turns MD player on/off.
  • Track down/up, Play, Stop, Fast reverse/forward, REC, Pause, Eject, 1-9, +10 (Numeric keys), ENT (Enters settings).

Controlling Onkyo Cassette Tape Deck (via RI connector):

  • AUDIO/TAPE MODE: Selects tape deck control.
  • Play, Stop, Rewind, Fast forward, REC, Reverse playback.

Calling up Preset Radio Stations:

  • AUDIO/TAPE MODE: Selects tuner control.
  • TUN (Input Selector): Displays "(TUN)" then "AUDIO."
  • CH +/-: Selects preset station numbers.

Controlling Onkyo DVD Player:

  • DVD MODE: Selects DVD player control.
  • ON/STNBY: Turns DVD player on/off.
  • DVD SET: Enters DVD setup menu.
  • MENU: Displays the menu.
  • Cursor (Δ///), ENTER, RETURN: For on-screen navigation.
  • Chapter/Track down/up, Play, Stop, Fast reverse/forward, Pause, OPEN/CLOSE, 0-9, +10 (Numeric keys), ENT (Confirm).

SAT, CABLE, VCR, and TV MODE Buttons:

  • These buttons have no preset codes but can be programmed to control other devices.

Usage Features

Learning Function: The RC-390M can learn commands from other remote controllers.

  1. Place the RC-390M and the other remote controller 5-15 cm apart, facing each other.
  2. Press and hold the desired MODE button, then press ENT, and release both. The SEND/LEARN indicator lights, turns off, then lights again, and "LEARN" appears.
  3. Press and release the button on the RC-390M to which the command will be transferred. "RCV" appears, and the indicator turns off, then lights again.
  4. Press and hold the corresponding button on the other remote controller until the SEND/LEARN lamp flashes twice and "SAVED" appears. The indicator lights again, and "LEARN" reappears.
  5. Repeat steps 3 and 4 for all desired commands under the same MODE.
  6. Press the MODE button (from step 2) to complete programming.
  7. Test the newly programmed buttons.
  • Memory Slots: The remote has 408 memory slots (8 modes x 51 buttons).
  • Error Handling:
    • No button pressed for >30 seconds: "ERROR" appears, indicator flashes 3 times, exits programming.
    • Invalid operation: "ERROR" appears, indicator flashes 3 times, exits programming.
    • Failure (5 times in a row): "ERROR" appears, indicator flashes 3 times, exits programming.
    • Programming beyond capacity: "FULL" appears, indicator flashes 6 times, exits programming.
  • Overwriting: Programming a new command to an already programmed button overwrites the old command.
  • Infrared Compatibility: Uses infrared rays. While most codes can be learned, some remote controllers with different systems may not be programmable.
  • Multi-function Buttons: If an external remote has a single button for multiple functions, each function must be programmed to a separate button on the RC-390M.
  • Battery Check: Ensure both remotes have new batteries for proper learning.

Macro Function: Allows programming a series of up to 16 button operations into a single button.

  • MODE MACRO: A different macro can be programmed for each of the eight MODE buttons.
  • DIRECT MACRO: Only one macro can be programmed for the DIRECT MACRO button.

Programming a Macro:

  1. Press and hold the desired MODE button (e.g., CD MODE), then press MODE MACRO, and release both. The indicator flashes, lights again, and "M 01" appears.
  2. Press the operation buttons in the desired sequence (e.g., AUDIO/TAPE MODE → ON → CD (INPUT SELECTOR) → CD MODE → playback). The display changes (M 01 → M 02 → M 03...).
  3. Press MODE MACRO to complete. The indicator flashes twice, and "SAVED" appears.
  4. Run the macro to verify.
  • Macro Execution: Point the remote at the device, press the MODE button (for MODE MACRO) or DIRECT MACRO, and verify operation. Keep pointing until the SEND/LEARN indicator turns off.
  • Timing: Macro codes transmit at 0.5-second intervals. If a device needs more time, press the MODE button again between operations to add another 0.5 seconds.
  • Changes: If a button command within a macro is changed or erased, the macro will no longer work correctly and must be reprogrammed.

Maintenance Features

Erasing Programmed Commands:

From One Button:

  1. Press and hold the desired MODE button, then press ENT, and release both. The indicator lights, turns off, then lights again, and "LEARN" appears.
  2. Press and release the button to erase. The indicator turns off, "RCV" appears, then lights again.
  3. Press and release the same button again. The indicator flashes twice, and "CLEAR" appears. The command is erased.

All Commands Under a MODE Button:

  1. Press and hold the desired MODE button, then press ENT twice, and release both. The indicator lights, turns off, flashes twice, then lights again.
  2. Press and release the same MODE button again. The indicator flashes twice, and "CLEAR" appears. All commands under that MODE button are erased.

From a MODE MACRO Button:

  1. Press and hold the desired MODE button, then press MODE MACRO, and release both. The indicator lights, turns off, flashes once, then lights again, and "M 01" appears.
  2. Press MODE MACRO again. The indicator flashes twice, and "CLEAR" appears. The macro is erased.

From the DIRECT MACRO Button:

  1. Press and hold any of the eight MODE buttons, then press DIRECT MACRO, and release both. The indicator lights, turns off, flashes once, then lights again, and "M 01" appears.
  2. Press DIRECT MACRO again. The indicator flashes twice, and "CLEAR" appears. The direct macro is erased.

All Commands and Macros (Factory Reset):

  1. Open the battery cover and remove batteries.
  2. While pressing and holding ON and STNBY, re-insert batteries, then release both. The indicator flashes, and "CLEAR" appears.
  3. Press ENT. The indicator lights for ~10 seconds, turns off, and "AUDIO" appears. All programmed commands and macros are erased, and the remote returns to factory presets.
  • Note: Perform step 3 immediately after step 2 to avoid quick battery consumption. Pressing any other button in step 3 will not erase anything.

Onkyo RC-390M Specifications

General IconGeneral
BrandOnkyo
ModelRC-390M
CategoryRemote Control
LanguageEnglish

Related product manuals