EasyManua.ls Logo

OPCODE STUDIO 4 User Manual

OPCODE STUDIO 4
91 pages
To Next Page IconTo Next Page
Page #1 background imageLoading...
Page #1 background image
Studio 4
Opcode Systems, Inc.
365 East Middlefield Road
Mountain View, CA 94043
(650) 429-2400
http://www.opcode.com
Opcode Part Number: 110-0222-01
Copyright ©1995 Opcode Systems, Inc. All rights reserved. This document may not, in whole or
part, be copied, photocopied, reproduced, translated or converted to any electronic or machine
readable form without prior consent of Opcode Systems, Inc.

Table of Contents

Question and Answer IconNeed help?

Do you have a question about the OPCODE STUDIO 4 and is the answer not in the manual?

OPCODE STUDIO 4 Specifications

General IconGeneral
BrandOPCODE
ModelSTUDIO 4
CategoryRecording Equipment
LanguageEnglish

Summary

LIMITED WARRANTY

CHAPTER 1: Getting Started

CHAPTER 5: Introduction

CHAPTER 10: Stripe SMPTE Window

Setting and Using Start and Stop Times

Explains how to define the start and stop points for SMPTE timecode generation.

SETTING AND USING START AND STOP TIMES

Guides on setting start/stop times, frame rates, MIDI format, and output levels for SMPTE striping.

Setting and Using SMPTE Frame Rates

Details the selection and use of various SMPTE frame rates for timecode generation.

Setting and Using the MIDI Format

Covers choosing the MIDI synchronization format (MTC, DTL, DTLe) for SMPTE conversion.

JAM SYNC

Explains Jam Sync for signal regeneration and JamStripe for continuous generation during dropouts.

Syncing to Tape

Guides on using the Studio 4 to synchronize a Macintosh to a tape with SMPTE timecode.

APPENDIX A: Troubleshooting

Communication Problems

Addresses issues related to data transmission errors like overrun messages between Studio 4 and Macintosh.

Sync Problems

Covers common synchronization issues, including SMPTE striping and loss of sync.

Studio 4 loses sync

Details troubleshooting steps when the Studio 4 loses synchronization with tape or computer data.

MIDI Problems

Covers MIDI routing conflicts, non-OMS application connectivity, and sampler compatibility issues.

SMPTE Time Code

CHAPTER 2: Panel Descriptions

Front Panel Overview

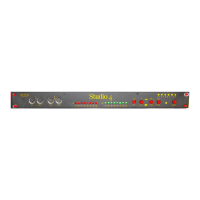
Details the Studio 4's front panel controls, ports, and indicators like LEDs, switches, and I/O assignments.

Rear Panel Overview

Describes the connectors and ports on the Studio 4's rear panel, including power, SMPTE, computer, and MIDI connections.

Computer Ports and Thru Ports

CHAPTER 3: Hardware Installation

POWER CONNECTION

Instructions on how to connect the Studio 4 to a power source using the provided adapter.

COMPUTER CONNECTIONS-ONE STUDIO 4

Guides on connecting the Studio 4 to a Macintosh computer via serial ports.

Connecting Two Macintosh Computers

COMPUTER CONNECTIONS-NETWORKING

Two Networks

Connecting Three Studio 4's to a Macintosh

Connecting Four Studio 4's to a Macintosh

Networking Studio 4's and MIDI Time Pieces

Three Studio 4's

Four Studio 4's

CHAPTER 4: Software Installation and Setup

INSTALLING OMS AND THE STUDIO 4 SOFTWARE

Guides on installing the necessary Opcode MIDI System (OMS) and Studio 4 software and drivers.

LAUNCHING THE OMS SETUP APPLICATION

Creating a New Custom Studio Setup Document

Updating an Old Studio Setup Document

USING THE STUDIO 4 WITH NON-OMS APPLICATIONS

STUDIO 4<->MACINTOSH COMMUNICATION SPEED

CHAPTER 6: Network Routing Window

WHEN TO USE THE NETWORK ROUTING WINDOW

Identifies scenarios where the Network Routing window is necessary for configuring MIDI data flow.

SETTING THE MIDI INPUTS

SETTING THE MIDI OUTPUTS

CHAPTER 7: Routing, Channelizing and Muting Window

WHEN TO USE THE ROUTING, CHANNELIZING AND MUTING WINDOW

Identifies the purpose and use cases for the Routing, Channelizing, and Muting (RCM) window.

WINDOW OVERVIEW

MIDI MUTING

Using MIDI Channelizing

MIDI CHANNELIZING

CHAPTER 8: Saving and Opening Studio 4 State Documents

SAVING A STUDIO 4 STATE DOCUMENT

Guides on saving current routing and muting configurations as Studio 4 state documents.

OPENING A STUDIO 4 STATE DOCUMENT

ESTABLISHING A "DO NOTHING" STATE

CHAPTER 9: SMPTE Reader Window

USING THE SMPTE READER WINDOW

Introduces the SMPTE Reader window and its displays for timecode, user bits, and rate.

Format Menu

SMPTE TUTORIAL

APPENDIX B: Studio 4 Networking

Networking with Standard MIDI Interfaces

Guides on connecting Studio 4 with standard MIDI interfaces, including setup and limitations.

Networking Studio 4 with Studio 3

Details the process and benefits of networking a Studio 4 with an Opcode Studio 3 interface.

APPENDIX C: Specifications