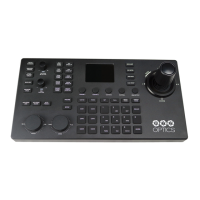
The PT-SUPERJOY-G1 is a first-generation network and serial camera controller designed to provide in-depth control for PTZOptics and HuddleCamHD cameras in production environments and other settings. It offers flexible control by supporting both IP and serial communication from a single device.
Function Description:
The PT-SUPERJOY-G1 allows users to remotely operate and fine-tune cameras through a combination of physical buttons, dials, a joystick, and an alpha-numeric keypad. It supports various control protocols including PTZOptics VISCA, VISCA over IP, Pelco-D, Pelco-P, and limited Sony VISCA and NDI support. The controller can manage up to 28 channels/cameras across four camera groups.
Usage Features:
White Balance Control:
This section allows for precise adjustment of the camera's white balance settings.
- RESET R/B GAIN Button: Resets red and blue gain to default values.
- ONEPUSH TRIGGER Button: Calibrates the white balance of the room. This function requires the camera to be in OnePush White Balance mode.
- WHITE BALANCE CYCLE Button: Cycles through various white balance modes including Auto, Indoor, Outdoor, OnePush, and Manual.
- RED GAIN / BLUE GAIN Knob: Adjusts the red and blue gain values. Twisting this knob automatically switches the camera to Manual White Balance.
Exposure Control:
This section manages the camera's exposure settings.
- BACKLIGHT Button: Toggles the camera's backlight compensation.
- EXPOSURE CYCLE Button: Cycles through exposure modes such as Auto, Manual, Shutter Priority, Iris Priority, and Brightness Priority.
- IRIS / SHUTTER Knob: Adjusts the Iris and Shutter values. Pressing the knob toggles between Iris and Shutter adjustment. Twisting this knob automatically switches the camera to Manual Exposure.
These buttons allow users to adjust the speed of the joystick's camera movements.
- TILT SPEED UP / DOWN Buttons: Adjusts camera tilt speed.
- PAN SPEED UP / DOWN Buttons: Adjusts camera pan speed.
- ZOOM SPEED UP / DOWN Buttons: Adjusts camera zoom speed.
- FOCUS SPEED UP / DOWN Buttons: Adjusts camera focus speed.
- PRESET SPEED UP / DOWN Buttons: Adjusts camera preset speed.
These four buttons can be configured to send custom commands to network-based equipment. Options include HTTP Trigger, UART, TCP, UDP, and Super Presets.
This section provides access to and navigation of the camera's on-screen display (OSD) menu.
- OSD ON / OFF Button: Opens and closes the OSD menu.
- OSD ENTER Button: Selects an OSD menu option.
- OSD BACK Button: Navigates back one OSD menu option.
The joystick is used to traverse the OSD menu (up, down, left, right). PTZOptics cameras automatically close their OSD Menu after 2 minutes 30 seconds of inactivity.
SuperJoy Unique Control:
These buttons offer specific functionalities for the SuperJoy.
- CAM GROUP Button: Cycles through the four camera groups.
- HDMI OUTPUT Button: Enables the HDMI output of the connected camera.
- BASIC MODE Button: Toggles between Basic Mode control and normal control. Basic Mode disables most SuperJoy capabilities, limiting control to the joystick and/or calling presets.
- MATRIX MODE Button: Toggles between Matrix Mode control and normal control. Matrix Mode limits controls to calling presets 1-3 of cameras 1-3 using the alpha-numeric keypad.
Joystick Controller:
The central joystick allows for pan, tilt, and zoom (twist) movements of the camera. The control speed is influenced by the Speed Control dial settings.
Focus Mode Control:
This section manages the camera's focus mode.
- AUTO FOCUS LOCK Button: Locks the focus in its current position.
- AUTO FOCUS UNLOCK Button: Unlocks the focus from its current position.
- AUTO FOCUS Button: Sets the camera to auto focus mode.
These buttons allow users to find and edit controller parameters.
- INQUIRE Button: Opens the controller's device list.
- SETUP Button: Opens the controller's OSD menu.
This section is used to set and call camera presets.
- HOME Button: Sends the camera to its home position (facing forward).
- SET Button: Sets a camera preset using the alpha-numeric keypad for a preset number.
- CALL Button: Calls a camera preset using the alpha-numeric keypad for a preset number.
- Quick Set Preset Shortcut: Press and hold a number on the alpha-numeric keypad for 3+ seconds to set a camera preset at the current location.
- Quick Call Preset Shortcut: Quickly press a number on the alpha-numeric keypad to call a camera preset.
When using a PTZOptics camera, a preset can be called at a specific focus value if set in manual focus mode.
Focus & Zoom Control Dials:
These dials allow for fine adjustments to the camera's image.
- FINE TUNE FOCUS Dial: Finely zooms the camera in and out at the lowest speed (1).
- FINE TUNE ZOOM Dial: Finely zooms the camera in and out at the lowest speed (1).
This section allows users to select which camera to control.
- CAM ID Button: Selects any camera on the controller using the alpha-numeric keypad.
- CAM # Button: Quickly selects cameras 1-6.
Alpha-Numeric Keypad:
Used for entering numbers and letters for various controller features, such as setting and calling presets, and entering IP addresses.
Installation & Setup:
The joystick can be powered via the included 12V 2A international power supply or Power over Ethernet (802.3af). It is important not to power the joystick using both PoE and the power supply simultaneously.
Connecting Cameras:
- Network Control: Connect an Ethernet cable from the LAN to the controller and another to the camera. The camera's IP address is then added to the joystick's camera list. The PT-SUPERJOY-G1 dynamically obtains an IP address via DHCP, but a static IP can be assigned through the OSD menu.
- Serial Control (RS-232, RS-485, RS-422): Use the appropriate serial cables to connect the joystick and camera. For multiple cameras, "Daisy-Chaining" (connecting joystick to camera 1, then camera 1 to camera 2, etc.) or "Home-Run" (connecting all cameras directly to the controller's 5-port phoenix connector) setups are supported.
Adding a Camera:
Cameras can be added via the joystick's OSD setup menu or the web interface.
- From Joystick OSD: Navigate to "Network Device" for IP cameras or "Analog Device" for serial cameras. Fill in details like Channel (Joystick Camera Address), Protocol (VISCA, VISCA over IP, Pelco-D, Pelco-P, Sony VISCA, ONVIF, NDI), IP address, Control Port, Address (for serial), and Baud Rate.
- From Web Interface: Access the controller's WebUI by typing its IP address into a browser. Log in with "admin" (no default password). Select a camera group, then click "Modify" to configure the camera's settings, including Protocol, IP, Control Port, RTSP User/Password/URL, Baudrate, and Address.
The controller's OSD menu allows for various settings adjustments:
- Add Network Device / Add Serial Device: For adding cameras.
- Device List: Shows current configurations of the 28 channels.
- Network Connection: For network setup.
- Language: Adjusts the display language (English).
- Button Tone: Toggles button sounds On or Off.
- Upgrade Firmware (USB): Connect a USB drive with firmware to the USB 2.0 port to upgrade.
- Import Config (USB): Connect a USB drive with an export file to import settings.
- Export Config (USB): Connect a USB drive to export settings.
- Restore Factory: Resets the joystick to factory default settings, removing all cameras, resetting control speeds, and network information.
- System Info: Displays controller information (Software Version, Hardware Version, Web Version, Gateway, Subnet Mask).
Adjusting the Camera's Image:
Beyond white balance and exposure, the controller allows for fine-tuning of the image:
- Focus Control: Twist the [FOCUS] Dial for Near or Far adjustments. The [AUTO FOCUS] button enables autofocus. The [AUTO FOCUS LOCK] button locks focus, providing manual control via the dial. [AUTO FOCUS UNLOCK] returns to normal focus. PTZOptics cameras return to autofocus when zooming in or out unless focus is locked.
- Backlight Compensation: The [BACKLIGHT] button enables or disables backlight compensation.
Maintenance Features:
Care for your PT-SUPERJOY-G1:
- Environment: Keep the joystick away from rain and moist environments.
- Physical Integrity: Do not remove any portions of the case, cover, or interfaces, as this may result in electrical shock and will void the manufacturer's warranty.
- Temperature and Humidity: Operate the product within recommended ranges: 14° ~ 122°F (-10° ~ +50°C) and 10 ~ 90% humidity (non-condensing).
- Power Supply: Only use the power supply originally provided with the joystick.
- Electromagnetic Interference: Keep the joystick and signal cables away from strong electromagnetic sources to prevent abnormal or unreliable control.
- Cleaning: Use a soft dry cloth to clean the surface. For extremely dirty surfaces, a diluted neutral detergent can be used. Avoid all types of solvents, as they may damage the product surface.
- Support: In case of abnormal operation, contact the PTZOptics support team.
Troubleshooting:
- "Control Failure" on LCD: Check network jacks, network cable, and ensure the camera is sending an Acknowledgement and Completion response.
- Joystick not controlling cameras: Verify network jacks are active, cables are not failing, and camera control address matches joystick control address.
- Multiple cameras controlled at once: Ensure each camera has a unique control address. Check WebUI and joystick's device list for duplicate addresses.
- Camera doesn't stop moving when joystick is upright: This can happen in OSD Menu control mode or due to network congestion. Power cycle the joystick or try pressing [OSD OPEN/CLOSE], [OSD ENTER], then [OSD OPEN/CLOSE] twice. Test on an isolated network if congestion is suspected.
- Certain functions not working: This may occur if not using a PTZOptics camera (due to unique manufacturer commands) or if the camera's firmware is outdated. Use the PTZOptics Firmware Finder to update PTZOptics camera firmware.
The PT-SUPERJOY-G1 is a comprehensive controller designed for robust and flexible camera management, offering both intuitive physical controls and detailed configuration options through its OSD and web interface.