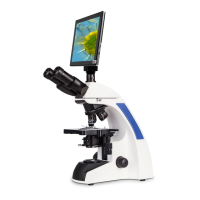
The OPTO-EDU (BEIJING) CO., LTD. A33.1502 is a 9.7" LCD Digital Biological Microscope with a 5.0M Android Pad, designed for observation, measurement, and image analysis in various biological applications. This instruction manual provides comprehensive details on its structure, technical parameters, usage, and maintenance to ensure safe and satisfactory performance.
Function Description
The A33.1502 microscope serves as a precision instrument for biological observation, offering both traditional optical viewing and digital imaging capabilities. It integrates a 9.7" HD IPS touch screen with a 5.0M CMOS digital camera, allowing users to capture images and videos, perform real-time measurements, and conduct basic image processing for particle analysis. The Android 5.1 system, along with the S-Eye software, provides a user-friendly interface for controlling camera parameters, performing various measurements (length, area, angles, circles), and analyzing captured images.
Important Technical Specifications
- Head: Trinocular Head, 30° Inclined, Interpupillary Distance 48-75mm, Both Eyepiece Tube Diopter Adjustable.
- Eyepiece: WF10x/20mm, Diopter Adjustable, Dia. 30mm.
- Objective: High Contrast Chromatic Free, 4x, 10x, 40x(S), 100x(Oil, S).
- Focus Knob: Coaxial Coarse & Fine Focusing, Fine Division 0.002mm, Coarse Stroke 37.7mm/Rotation, Focusing Range 24mm.
- Nosepiece: Quadruple, Backward With Click Stops.
- Stage: Double Layer Mechanical Stage 142x132mm, Graphite Surface, Moving Range 75x50mm.
- Condenser: Abbe Condenser N.A.1.25, Center Adjustable.
- Light Source: 3W LED Brightness Adjustable.
- Adapter: C-Mount 1.0x.
- LCD Pad Digital Camera (A59.3520):
- LCD: 9.7" HD IPS Touch Screen With Backlight.
- Camera: 5.0M 1/2.5" CMOS Digital Camera.
- Resolution: 2048x1536 @15FPS.
- Pixel: 2.2umx2.2um.
- Data Storage: TF Card or Built-in Memory.
- Data Output: USB2.0, HDMI, TF Card.
- Photo: 5.0M .JPEG.
- Video: 1080p Video Record.
- System: Android 5.1 System, 90 Languages, Support Mouse + Keyboard Control, Support WIFI, Support Bluetooth, S-Eye Software & Instruction Manual Installed.
- Measurement Functions: Mark (Point, Crosshair, Coordinate, Text), Length Measure (Straight Line Length, Broken Line Length, Curve Length, Parallel Line Distance, Point To Line Distance), Distance Between 2 Circle Centers (Radius Fixed Circle, Two-point Fixed Circle, Three-point Fixed Circle), Geometric Measure (Line Segment Length, Radius Fixed Circle, Two-point Fixed Circle, Three-point Fixed Circle, Concentric Circle), Geometric Area Measure (Polygon, Square).
- Power: DC 12V/2A Power Adaptor, AC 100~240V.
- Size: Pad 238x182x12mm, Camera 40x39mm.
Usage Features
The microscope is designed for ease of use, with clear instructions for assembly, illumination, specimen placement, focusing, and binocular head adjustment.
- Assembly: The binocular head is attached by loosening a screw, placing the head, and then tightening the screw. Eyepieces are inserted into the observation tube, and objectives are assembled clockwise, increasing magnification in that direction. The condenser is pre-mounted and pre-centered.
- Illumination: Connect the power line, turn on the power supply, and adjust brightness using the knob.
- Iris Diaphragm: The iris diaphragm on the condenser can be adjusted to match the numerical aperture (N.A.) of different objectives. Opening/closing is done via a knob, with fully open indicated when the knob is on the right.
- Specimen Placement: Place the specimen on the stage with a cover glass, securing it with clips. Up to two slides can be placed simultaneously. Adjust X & Y axes to position the specimen under the objective.
- Focusing: Start with the lowest magnification objective. Raise the stage to the top using the coarse focusing knob. Observe through the eyepiece and slowly lower the stage with the coarse focusing knob until an image appears. Use the fine focusing knob for a sharp image.
- Binocular Head Adjustment: Adjust the observation tube to ensure consistent view fields in both eyepieces. Set the eyepiece diopter to "0" initially, then adjust it to achieve a sharp image for the user's vision.
- Oil Immersion: For 100X objective observation, oil immersion is required. Lower the stage, apply immersion oil to the observation area, and rotate the 100X objective into position. Raise the stage until the objective front touches the oil. Swing the nosepiece back and forth to remove air bubbles, ensuring oil fills the space between the objective and specimen.
- Digital Camera (A59.3520) Usage:
- User Interface: The APP features a preview image, a tool panel for controls, parameter adjustments, measurement, image/video playback, and settings.
- Capture and Playback: "Snap" button captures pictures, with size selectable in settings. "Record" button starts/stops video recording. Video size matches preview size if smaller than 1080p, otherwise it scales down. Captured pictures open in the Image Analysis interface, and videos can be played back.
- Image Parameter Adjustment: Adjust image color, exposure (auto or manual), white balance (Once AWB or Manual WB), contrast, saturation, sharpness, and gamma. A reset button restores default parameters.
- Measurement (Calibration): Calibration is essential before measurement. Access the measurement tool pane, click "Add" for new calibration or "Edit" to recalibrate existing ones. Drag a yellow ruler on the screen to match a physical ruler's scale (e.g., 20µm for two big grids of a 0.01mm ruler). Input the magnification (e.g., 40x) and physical length (e.g., 20µm), then click "Calculate" to save the calibration value.
- Measurement Tools: The software offers various tools: point counting, line measurement, rectangle (width, length, area), circle (area), crosshair, angle measurement, two circles (distance), perpendicular (length), concentric (radius), text annotation, option (stroke width, color, text size/color), export (image with rulers), delete selected ruler, and delete all rulers.
- Measure with Line Ruler: Select a calibration from the list (highlighted in white with black text). Choose the line ruler from the right sidebar, and a line ruler will appear on the image for measurement.
- Image Analysis: The YWImage application, based on Open CV, provides functions for grayscale conversion, contrast/brightness adjustment, binarization, and particle analysis.
- Load Image: Click the camera icon to load an image or take a new one.
- Grayscale Conversion: Select "Grayscale" from the left sidebar and click "Apply."
- Contrast and Brightness Adjustment: Adjust sliders to enhance the difference between objects and background.
- Binarization: Adjust minimum and maximum threshold values. Pixels within the range turn red; after applying, red areas become black (0,0,0) and others white (255,255,255). Ensure red areas do not overlap.
- Particle Analysis: Set the area range (Pixel²) to filter noise and improve precision. Click the infinity button to restore the maximum value. Check "Show Outlines" to display borders and particle counts. Click "Analyze Particles" to view results.
- Export Data: Click "CSV" to export data to a report file, saved in
/mnt/sdcard/Image/Reports.
Maintenance Features
Proper maintenance ensures the longevity and optimal performance of the microscope.
- When Not in Use: Handle the microscope with two hands, place it on a stable surface, cover it with a dust cover, and store it in a dry place. It is recommended to store objectives and eyepieces in a separate container.
- Cleaning:
- Keep all optics clean.
- For dust/dirt on lens surfaces, use an air blower first.
- Clean lenses with gauze or lens tissue moistened with methyl alcohol (ethyl alcohol is forbidden).
- For low magnification objectives, use lens tissue or cotton with methyl alcohol. For high magnification objectives, be extra careful, dry methyl alcohol first, and avoid hard cleaning.
- If the microscope body is disassembled, avoid touching objective lenses to prevent image quality reduction.
- Periodical inspection is recommended to maintain performance.
- Changing of Bulb: The A33.1502 series uses LED illumination, so bulb replacement is generally not required unless there is a specific issue.