- The Silicone reservoirs will be installed on the acrylic base later during the assembly process.
- The drive belt should not be installed for this operation.
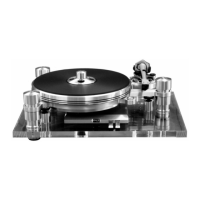
- Handle the platter installation carefully to prevent any damage to the precision screws inside the
spindle holder.
- The tonearm installation and calibration will be easier and safer with the sub-chassis resting on the
foam shipping blocks as shown below.
• Remove the protective bag from around the sub-chassis, remove the styrofoam support blocks then
remove the plastic bag from around the acrylic plinth.
• Remove and set aside the suspension tower modules (i.e. the suspension housing, the spring and all
related parts).
• Level the plinth by turning the adjustable feet below the acrylic base. Since this is only a preliminary
adjustement you can use the 3 foam blocks to establish a parralell plane between the sub-chassis and
the acrylic base … then use the sub-chassis spirit level as a reference to adjust the feet. This operation
is preferable to ensure that you obtain accurate readings when you do the different adjustements that
will follow. A final levelling of the adjustable feet will be necessary when you position your Oracle Delphi
MK VI in its final environment.
• Carefully guide the platter’s spindle vertically in its holder.
• Place the tone arm mounting board loosely in the sub-chassis mounting ring and determine the correct
distance and direction to mount the arm to the arm board.
• First mount the tone arm to the pre-cut aluminum board.
• Properly secure the tone arm mounting hardware.
 Loading...