GB
This quickstart guide is a brief guideline for the basic operation of the recorder. For complete
documentation please refer to the Installation and Operation Manual (IOM) available on our
website https://www.orbcomm.com/eu.
To obtain a print out
Press several times until the desired print out is displayed (’Delivery ticket CURRENT
VALUES’, ’Journey ticket GRAPHICAL’ or ’Journey ticket NUMERICAL’). Printing starts
after a delay of 4 seconds. To stop printing, press any button.
Obtaining a print out for a previous date
- Hold for 4 seconds, press until you get to 1.5 (Historical) and select ‘edit’ by
pressing .
- Select the preferred printing date by using and . Press to accept the selected
date.
- Select the preferred historical period by using and . Press v to start printing.
- Press several times until the desired print out is displayed.
Set JOURNEY START point for print out
Hold for 4 seconds until ’JOURNEY START Print marker set’ is shown in the display. Next
ticket print out (GRAPHICAL or NUMERICAL) will start from that point in time.
Alarm functions
NOTE: These functions can only be used if compartment (menu 7) and alarm (menu 8) have
been activated.
Turn alarm on/off
Press and select alarm ’on’/’off’ by using (compartment 1) and (compartment 2)
Alarm assignment
By pressing again you can select the activated compartments individually. Select the
preferred compartment and press to edit. Select the desired alarm (example: frozen)
or ‘Off’ by using and and press to accept.
Conrm alarm
In case of an alarm situation an acoustic signal can be heard. The acoustic signal will stop af-
ter conrmation of the alarm by pressing . The corresponding input will ash until the alarm
condition is over.
User options:
Press and select the desired menu:
3.1. Set time zone offset
3.4. Summer/winter time correction
3.5. Select language
3.6. Set display contrast
3.7. Set display backlight
3.8. Set buzzer volume
3.9. Set buzzer frequency
3.10. Set buzzer on-time
3.11. Display software version
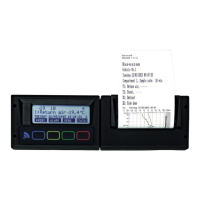
Display (example)
T1-T4 Display temperature
D1 Sidedoor open/closed
D2 Backdoor open/closed
D3 Defrost on/off
D4 Fridge on/off
Status information
The status display will appear after pressing and will show actual temperature
information.
Pressing again will display the temperature information enlarged. Press , or
if you want to return to the main menu.
Communication information
Hold for 4 seconds to view the communication information. Press the button to switch
to the next communication function. Press to print the communication information ticket.
Replace paper roll
1. Pull down the clear plastic lever
2. The printer will slide forward and can be pulled out.The empty roll can now be removed.
3. Put the new paper roll into the printer and make sure that the paper is fed in correctly.
4. After changing the paper please install the printer with the lever down.
5. Close the clear plastic lever only after the printer is fully inserted
6. Test if the paper roll is properly replaced by printing any ticket
Quickstart guide Euroscan TX3/RX3
Please tear paper only when printing has stopped, to avoid damage to the printer mechanism.
 Loading...