Welcome
Thank you for your purchase.
Thermostat
Screws
Installation/programming manual
Wall plate
External senxor(Optional) 1pc
Contents
Your thermostat
Features
Simple installation
Acrylic face plate
Large, backlit display
Sleek, contemporary design
Elegant chrome frame
Feather touch control panel
5+2 six period per day programming
Simple, one-touch temperature control over-ride.
Pre-set temperatures maintained within +/- 1°C
Internal and external sensors allow control of
both air and/or floor temperatures
Suitable for installation in a standard single pattress
box or European 60mm round box
RS485/MODBUS communication optional
ce
Operation/programming
1. Power on/off
Press to turn on/off.
2. Adjusting/setting the temperature
Press to set the desired temperature.
3. Adjusting/Setting the clock
The ORC-HC2 range has been developed to
control electric underfloor or water heating systems.
These units are designed for use in commercial,
industrial, civil and domestic properties.
Technical Data
Sensor:NTC 10K
Accuracy:±1℃
Power Consumption:< 1.5W
Timing Error:<1%
Power Supply:95 ~ 240VAC, 50 ~60Hz
Current Load:Dry Contact (boiler heating)
Shell material:PC+ABS (flame retardant)
Dimension:86x86x13.3mm
Ambient Temp.:0-45℃,5-95%RH
(Non-condensing
)
Storage Temp.:-5-55℃
Installation Hole distance: 60mm
Set Temp. Range:0-50℃
Room Temp. Range:5-99℃
Your new thermostat will provide uniform and
comfortable temperature control throughout
every room in your property. We bring together
technology, craftsmanship and the highest quality
materials to provide you with a safe, reliable
product combined with sleek, contemporary design.
Please read this installation/programming manual
for comprehensive instructions on installing and
operating your thermostat. Please ensure a
suitably qualified person installs your thermostat
and complies with all local regulations.
1pc
1pc
1pc
1pc
Touch the icon to set minute, hour and weekday
(1 = Monday, 2 = Tuesday etc.) by using the
arrows. Press once more to confirm and exit.
5.Adjusting/setting the program schedules
Your thermostat provides four scheduled heating
periods each day – two Comfort periods - 1 & 3
(the temperature required when room is occupied)
and two Economy periods – 2 & 4 (the
temperature required when room is unoccupied).
You can set both the time and temperature for each
of these six daily periods. Adjusting/setting the
schedules can only be carried out when in program
mode;
Touch M (mode) to change between manual mode
and programme mode. In manual mode,
Heating Room Thermostat
User Guide
ORC-HC2-16A-RS485
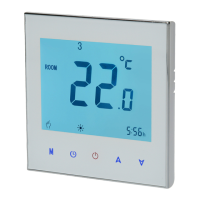
Home screen quick reference:
Power
On/off
Up
Clock
Mode
Clock
Timing On/Off
Room Temp.
Manual
Lock
Period
Down
Set Temp.
Floor sensor
4.Locking your thermostat
Press and hold the and arrows for 5 seconds
to lock/unlock your thermostat.