Do you have a question about the Orico DS Series and is the answer not in the manual?
Details the ORICO DS disk station's positioning, design, USB3.0 interface, and UASP acceleration protocol.
Advises reading the manual and using a blank drive to prevent data loss and ensure safe familiarization.
Covers product functions (speed, cooling, UASP, power, sleep, hot-swap) and structural design (magnetic, cooling).
Lists package contents and specifies manual compatibility for DS products with USB3.0/RAID.
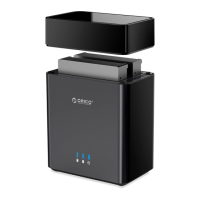
Illustrates and labels the external parts of DS200U3 and DS500U3, including indicators, ports, and switches.
Details technical parameters like interface type, speed, disk compatibility, installation method, texture, and supported operating systems.
Provides step-by-step instructions for installing a hard drive and safely removing it from Windows and macOS systems.
Guides users through initializing new drives in Disk Management, including MBR/GPT partition style selection and notes.
Details the Windows formatting process: setting volume size, drive letter, file system (NTFS/FAT32), and performing a quick format.
Offers solutions for connectivity, drive mounting, power, and formatting problems, with contact information for support.
Includes copyright, trademark, liability disclaimers, and the FCC compliance statement for the device.
This document describes the ORICO DS USB3.0 Interface Series, a line of disk stations designed for desktop users requiring reliable data storage. These devices leverage a unique magnetic structure design and an elegant appearance, making them both functional and aesthetically pleasing. The DS series is equipped with a USB3.0 interface and supports the USB3.0 to SATA3.0 protocol, enabling high-speed data transmission at 5Gbps. Furthermore, it incorporates the UASP Acceleration Protocol to enhance performance. The ORICO disk station aims to provide a distinct user experience through its innovative design and advanced features.
To ensure safe and effective use, it is recommended to read this manual thoroughly. Users are advised to familiarize themselves with the product using a hard drive that does not contain critical saved files to prevent any potential data loss during the initial learning phase.
The ORICO DS series offers a range of product functions designed to optimize performance and user convenience. It supports SATA3.0 speeds of up to 6Gbps, ensuring fast data transfer rates. A built-in cooling fan provides robust cooling capabilities, maintaining optimal operating temperatures for the hard drives. The inclusion of the UASP Acceleration Protocol further boosts data transfer efficiency. To ensure stable operation of the hard drives, the device is powered by an external high-power supply. One of the standout features is its unique magnetic structure design, which allows for tool-free and quick replacement of hard disks, simplifying maintenance and upgrades. The device also incorporates intelligent sleep technology, which contributes to energy saving, environmental protection, and extends the lifespan of the hard disk. Additionally, it supports hot-swappable functionality, allowing users to plug and play without needing to power down the system.
From a structural and appearance perspective, the ORICO DS series is designed with user convenience and aesthetics in mind. The cover features a unique magnetic structure, ensuring that the lid closes accurately and securely with a gentle touch. The rear panel is designed with a large area mesh for efficient cooling, complemented by a built-in bearing fan that ensures stable and effective heat dissipation. The fuselage is crafted through a single molding process, resulting in a simple, stable, and cohesive design.
The package contents typically include the DS Disk Station unit, a power adapter with its corresponding power cable, a data cable, and a user manual. It is important to note that due to ongoing product updates, the appearance of the product, packaging, or accessories may vary. Users are encouraged to refer to the actual items received. For any inquiries or support, customers can contact their dealer.
This manual is compatible with DS products featuring a USB3.0 interface and RAID functionality. Specific models covered include the DS200U3 and DS500U3.
The device's appearance includes several key indicators and interfaces. For both the DS200U3 and DS500U3 models, the front panel features an LED Indicator, providing visual feedback on the device's status. The top of the device is equipped with a Top Cover, which, as mentioned, utilizes a magnetic structure for easy access. On the rear panel, users will find a Power Switch to control the device's power, a USB3.0 Interface for connecting to a computer, a DC Power Interface for the power supply, and a Vent Hole for heat dissipation, supporting the built-in cooling fan.
When it comes to usage, the hard drive installation process is straightforward due to the magnetic design. Step 1: Gently remove the upper cover of the device, which detaches without the need for tools, thanks to its unique magnetic structure. Step 2: Align the SATA interface of the hard disk with the corresponding slot in the device, insert the hard disk, and then close the cover securely. Step 3: Connect the power adapter to the device and then to a power supply. Step 4: Use the provided data cable to connect the device to your computer. Once connected, turn on the power switch, and the device will be ready for use.
For removing devices, specific procedures are recommended for both Windows and Mac systems to ensure data integrity. On Windows systems: First, ensure that all read and write operations to the hard drive have ceased. Then, click the USB icon in the taskbar and select the disk drive that needs to be uninstalled to safely remove it. A notification will confirm that the device can now be safely removed. On Mac systems: Similarly, stop all read and write operations to the hard drive. Then, drag the disk drive icon to the Recycle Bin to complete the uninstall process.
New hard drives require initialization and formatting before they can be used. This process is detailed for Microsoft Windows users. Step 1: Ensure that the drive is properly mounted in the ORICO dock and that the dock is connected to the computer. Step 2: Right-click on "Computer" (or "This PC"), select "Manage," and then open "Disk Management" under "Storage" in the opened window. A pop-up should appear, indicating that a new drive needs to be initialized. Select the disks and click "OK" to initialize them. Important notes for initialization:
For troubleshooting, several steps can be taken:
If issues persist, contact the ORICO customer care center. The ORICO Customer Care Center can be reached via their website (http://www.oirco.cc) or by email (supports@orico.com.cn). The customer service hotline is 400-6696298, and the telephone number is 86-755-25196059.
ORICO Technologies Co., Ltd. holds all rights reserved for this manual and its products. ORICO® is a registered trademark. This manual is for reference only and does not constitute a guarantee. ORICO Technologies Co., Ltd. reserves the right to maintain this manual and is not liable for any loss or damage resulting from its use. Users are encouraged to contact customer care for any concerns. ORICO Technologies Co., Ltd. is not liable for compensation or maintenance under conditions such as special, incidental, indirect, or secondary loss or damage; lost profit or revenue; or lost files, data, drives, or devices. Compensation for lost or damaged items resulting from this manual or ORICO product will not exceed the purchase payment of the product.
The device complies with part 15 of the FCC Rules. Operation is subject to two conditions: (1) the device must not cause harmful interference, and (2) the device must accept any interference received, including interference that may cause undesired operation.
| Model | DS Series |
|---|---|
| Material | Aluminum Alloy |
| Compatibility | Windows, Mac, Linux |
| Interface | USB 3.0 |
| HDD Support | 2.5/3.5 inch |
| RAID | RAID 0/1/JBOD |
| Color | Black |