Forandringer forbeholdes - Ändringar kan förekomma - Subject to changes without notice
Mini RM 5 - montage Mini RM 5 - installation
Valfri placering:
1. Liggande på bänk med fästet vridet på tvären
2. Liggande på medföljande väggfäste. Liggande montage ger
max. varmvatten. Då kv/vv måste monteras pekande uppåt,
kan den inte tömmas vid frostfara utan att först demonteras.
3. Hängande på vägg med fast väggfäste
4. Stående på golv med fästet i väggen
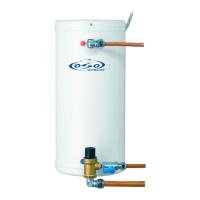
Enkelt rörmontage:
Säkerhetsventilen SV är fabriksmonterad, och kan vridas 360° för
praktisk installation av kv-röret. Dras med kraft 60 Nm.
Kv och vv kopparrör ø10 mm klämringskopplas.
Viktigt: skvallerröret O (ø18mm) dras ner oavstängbart till synligt och
frostfritt avlopp (fritt fall förenklar).
Kort användningsguide: Fyll vatten före elinstallation!
Kv-tillförseln är strypt till ca. 5 l/min. med vattenbegränsar-skiva.
Tömning: Dra ur nätkabelns plugg. Stäng av vattentillförseln S.
Öppna ratten R och vv-kranen på tappstället. Se till att RM är
stående och kolla så att vattnet rinner ut.
OBS: Vid liggande montage ska beredaren kopplas från och
tömmas stående.
Årlig test: Öppna R tills vattnet rinner ut från skvallerröret O. Vrid
R vidare till klick (stängd).
Choose your tting option:
1. Horizontal on bench with factory tted bracket turned 90°
2. Horizontal, hung on wall in supplied cradle. Horizontal tting is
the most efcient. Cw/Hw connections must be pointing straight
up, the unit must be disconnected and turned to be drained.
3. Hanging on wall using factory tted bracket
4. Standing on oor - attached to wall by bracket
Simple pipe tting:
The safety valve SV is factory tted, and can be rotated through 360°
to accomodate the cold water inlet pipe. Tighten by 60 Nm.
Cw and Hw to be tted with ø10 mm copper pipes.
Important: An overow pipe should lead to a suitable outlet or waste
connection.
Simple operating instruction: Fill water before power on!
Departure/thunderstorm/draining: Shut off power supply.
Draining: Close stop valve S. Open knob R and a hot water tap.
Ensure water is draining, tilt water heater if necessary.
Note: If water heater is tted horizontally it must be disconnected
and turned to allow draining.
Annual test: Open R by turning counterclockwise until water ows
from overow pipe O. To close turn R counterclockwise until the
valve snaps shut.
Mini som eftervärmare
Vid lång rörsträckning kan Mini användas som eftervärmare och ger
varmvatten direkt när kranen öppnas.
OBS: Ta bort vatten- begränsarskivan i säkerhetsventilens 3/8” r
kalltvattens-inlopp. Fungerar också vid önskad större vattenöde
vid normal användning.
Mini as a reheater
Where there is a long distance between the water heater and the
basin Mini can be used as a reheater and supplies hot water immedi-
ately when the tap is opened.
Mini under handfat
Kan hängas på vägg direkt under tapp-stället, och ger då varmvatten
direkt.
Medföljande väggbrakett används, se till att fästet sitter ordentligt fast
före installation.
Kv/vv-anslutningar monteras rätt upp.
Om beredaren blir helt tömd av varmvatten vid kontinuerlig använd-
ning, värms hela volymen upp igen på bara 10 minuter.
Mini under the washbasin
Can be tted on the wall directly below the basin, and supplies hot
water immediately.
Use supplied wall bracket, make sure the bracket is securely fastened
to the wall before operating.
Cw/hw connections to be positioned pointing straight up.
If the water heater is drained completely for hot water the unit will
reheat fully within 10 minutes.
Montagedelar - levereras av rörläggare:
KV: Stopp kran 3/8” utv. x ø10 klämringskoppling.
VV: Klämringskoppling ø15.
O : Övergång 3/4” utv. x ø15 klämringskoppling.
Rör: ø10 cu och ø18 cu (inv.) till överlopp.
Fittings - supplied by the installer:
CW : Stop valve 3/8” outside thread and ø10 mm compression ring.
HW : Compression ring connection ø15 mm
O : Adaptor 3/4” outside thread to ø15 mm compression ring conn.
Pipe: Copper ø10 mm for cw/hw and ø15 mm for overow pipe.
Electrical connection
The mains cable is factory tted. All internal wiring is factory tted.
The immersion heater has a working thermostat adjustable between
60°C and 90°C. Preset to 60°C.
Connect to a 13 amp fuse. If only a 10 amp fuse is available the
effect of the element can be halved from 3 to 1,5 kW by cutting the
bridge “L”.
A safety cut-out is also incorporated within the thermostat and will
operate at 85°C ± 3°C. Should this happen, press the reset button.
IMPORTANT: Before resetting the safety cut-out or altering the ther-
mostat setting, isolate electrical supply to the unit prior to removal of
the lid. Ensure the lid is replaced correctly and the retaining screws
are tted. The retaining screws are at the front and back of the cover.
The electrical connection to the immersion heater must conform to current
IEE wiring regulations. The unit must be permanently connected to the elec-
trical supply through a double pole linked switch with a minimum break ca-
pacity of 13 amps.
IMPORTANT
! !
El-monteringen: OBS: Fyll upp med vatten innan ström-
men kopplas på!
Nätkabeln pluggas i närmaste 16A jordad kontakt. Elementet har en
effekt på 2 kW. Alla interna el-kopplingar är fabriksmonterade. Termo-
staten är färdig inställt på ca. 70°C.
Vid kalkhaltigt vatten rekommenderas montage av kalkupplösare på
anläggningen, som ger bättre livslängt på elpatronen.
Felsöking: Bara kallvatten: Kolla strömtillförseln. Om det är OK, ta ut
nätkabeln och öppna el-locket. Tryck på “reset”-knappen. Ställ ev. ner
termostaten med 5°C.
Om fortsatt fel, Byt ut elementet eller termostaten TS2. Kontakta aukt.
installatör.
Max vattentryck: 10 bar/1MPa
Provtryck: 15 bar/1,5MPa
Max vattentemperatur: 85°C
El-effekt: 230V 1-fas
Max water pressure: 10 bar/1MPa
Test pressure: 15 bar/1,5MPa
Max water temperature: 85°C
Current: 230V 1-phase
 Loading...