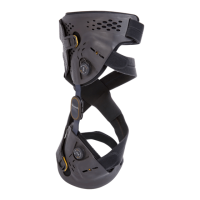
7
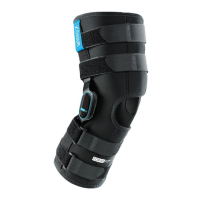
. Turn upper dosing dial clockwise to tighten Dynamic Force Control
System strap to prescribed position (Figure ). Practitioner will need
to determine optimum unloading based on patient‘s pain relief
feedback. The strap tension should be set to provide optimal pain
relief once the dosing dial is set to the setting of “".To increase the
DFS loading force on the calf, turn the lower dosing dial clockwise.
. Fully extend leg in a sitting position and make sure that brace is still
aligned correctly on leg (Figure ).
. Ensure strap pad is positioned under strap crossing on nonratcheted
DFS strap in the popliteal and not wrinkled. Quick Fit Buckles may
have to be opened to relieve strap tension and allow positioning of
strap pad on non-ratcheted DFS strap. Remove Upper DFS strap with
dosing ratchet and feed strap through strap pad (Figure ).
. If patient requires more or less unloading, adjust the tension of upper
DFS strap accordingly with Dynamic Force Control System and/or
lower DFS strap by adjusting length at thigh Quick Fit Buckle.
. If Dynamic Force Control System has been pulled to its maximum
and patient requires more pain relief, DFS straps may require
shortening at the lower Quick Fit Buckle.
. Keyhole locks may be inserted into calf and thigh shells if desired to
ensure straps cannot accidentally be disengaged from shells
(Figure ).
: Have patient wear brace for a few minutes to make sure straps are
at comfortable tension.
REMOVING BRACE
. Sit with the knee flexed to degrees.
. Turn dosing dial counterclockwise to release tension on the upper
DFS strap and adjust back to a setting of “0” (Figure ).
. Open both upper and lower Quick Fit Buckle.
. Remove Quick Fit Buckles from keyholes.
. Remove brace from leg.
ONETIME STRAP LENGTH ADJUSTMENT OPTIONAL
. Remove alligator clip and trim strap to desired length. Alligator clips
should be positioned near the Quick Fit buckles, away from popliteal
region (Figure ).
. Repeat for all straps.
RANGE OF MOTION ADJUSTMENT ROM
The device comes with a ° extension stop installed. Additional extension
stops of °, °, ° and ° have been provided. A flexion stop of ° is
also included.
: Optimal corrective forces are applied at full extension. If patient
requires an extension stop change, make sure to readjust tension in DFS
straps if more unloading is required.
TO CHANGE RANGE OF MOTION
. Peel condyle pad from hinge to expose screw.
. Remove retaining screw.
. Slide ° stop out of hinge.
. Insert desired extension stop.
. Secure with retaining screw. ( )