English 4
BEFORE USING YOUR APPLIANCE
Before using your Oster
®
Grill/ Griddle for the first time, please follow the instructions below:
1. Remove any stickers from the product.
2. DO NOT IMMERSE TEMPERATURE CONTROL PROBE IN WATER.
3. Clean and condition the non-stick surface:
• Makesuretheprobeisnotinsertedintotheunit;otherwiseremoveitfromthe
unit. The cooking plate will only be released from the base once the probe
is removed. Your appliance includes a safety system that prevents that the
cooking plate be removed while the probe is inserted. Wash the cooking plate,
drip pan, lid and base with a soft sponge with hot, soapy water. Rinse and dry
them well.
• Placethedrippan,cookingplateandlidbackinthebase.Setthetemperature
control to the off position “O” and insert the probe into the unit. If temperature
control probe is not completely inserted, abnormal heating may occur, resulting
in accident or damage.
• Toconditionthecookingsurface,plugtheapplianceintotheappropriate
electrical outlet. Turn the temperature control knob clockwise choosing one of
the low temperature settings. The orange indicator light will illuminate. Allow the
unit to pre-heat until the orange ready light goes off indicating that the selected
cooking temperature has been reached.
• Wipeasmallamountofbutterormargarineontothecookingsurface,spread
slightly and wipe away any excess.
NOTE: When using the unit for the first time, you may notice a fine smoke haze
coming out from the unit. This is normal. It is due to the initial heating of internal
components.
Your Oster
®
Grill/ Griddle is now ready to use and it will not be necessary to condition
it again.
USING YOUR APPLIANCE
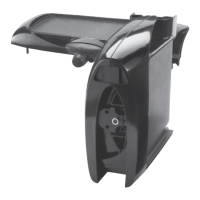
1. Place the drip pan correctly in the base as illustrated below (see Figure 1).
WARNING: To prevent personal injury or property damage, this drip pan must be
in place during cooking.
Figure 1