EasyManua.ls Logo

Outdoor Revolution Ozone - User Manual

Default Icon
5 pages
Print Icon
To Next Page IconTo Next Page
Loading...
1
We highly recommend that you insure your canopy
against storm damage or accidental damage, as the
warranty does not cover such eventualies. The
manufacturer is not liable for any damage caused to the
canopy or its contents because of misuse, incorrect
pitching or extreme weather. (Full warranty details are at
the back of this booklet).
IMPORTANT: PLEASE CHECK YOUR EQUIPMENT
1 x Flysheet (or outer)
1 x Bag of Pegs
1 x Steel Collapsible Pole
2 x Storm Strap Aachment Points
1 x Repair Kit
1 x Holdall
Question and Answer IconNeed help?

Do you have a question about the Outdoor Revolution Ozone and is the answer not in the manual?

Summary

Important: Check Your Equipment

Important Information and Usage

Check Contents Before Use

Ensure all canopy contents are present before departing for your holiday.

Condensation Management

Understand condensation is normal for manmade fabrics and how to manage it with ventilation.

Weathering and Seam Sealing

Advise on 'weathering' new canopies to improve performance and sealing persistent weeps.

Site Preparation and Zips

Ensure the pitching site is clear and level, and that all zips are closed before erection.

Trial Pitching and Support

Recommend a trial pitch to become familiar with setup and to seek dealer assistance for any issues.

Drying, Cleaning, and Maintenance

Advise on proper drying, airing, and cleaning to prevent mildew and protect waterproofing.

Safety Precautions

Prohibit cooking and smoking inside the canopy due to fire risk, even with flame-retardant fabric.

Damage Reporting and Assistance

Instructions on how to report damage and contact customer service for assistance.

Optional Accessories

Endurance Storm Straps

Details on optional storm straps for enhanced canopy stability and support.

Chairs and Furniture

Suggests considering chairs and furniture for use with the canopy.

Further Information

Directs users to the website for additional product information and details.

Critical Safety Warning

AirFrame Tube Zip Warning

Critical warning against unzipping AirFrame tube protective sleeves when inflated to avoid bursting or damage.

Erection Instructions

Spread the Flysheet

Lay out the flysheet on the ground with the long zip positioned correctly near the front of the tent.

Zip the Canopy

Attach the canopy to the front of the tent by using the pre-sewn zip connection.

Assemble Steel Pole

Find the steel pole and connect all its individual sections together securely.

Insert Pole into Sleeve

Guide the assembled pole through the designated sleeve and secure it at the bottom using the ring and pin mechanism.

Clip Pole to Canopy

Attach the black plastic 'c' clips on the pole to the corresponding points on the canopy.

Peg Out and Tension Canopy

Peg out the canopy and use adjustable straps to tension the fabric, avoiding over-tensioning.

Peg Remaining Points

Secure all remaining pegging points and guy lines, working systematically around the canopy.

Secure Storm Straps

Finally, peg out the reflective Endurance Storm Straps for maximum stability in adverse weather.

Packing Away Your Canopy

Initial Unpegging and Pole Removal

Unzip doors, unpeg lines/straps, remove pole pins, and unzip canopy from tent.

Folding and Rolling

Measure bag width, fold canopy lengthways into a thin sausage, and roll tightly towards the bag.

Bagging the Canopy

Place rolled canopy into the bag, pull sides up, and zip the bag closed.

Outdoor Revolution Guarantee and Warranty

Product Quality Standards

Products are designed to high standards, using quality fabrics and components, checked for defects.

Care and Product Longevity

Emphasizes correct care during opening, erecting, using, and packing for product longevity.

Warranty Duration and Coverage

Warranty lasts 12 months, covering workmanship and fabric/components, with specific fault investigation periods.

Warranty Registration

Product warranty must be registered BEFORE use via www.outdoor-revolution.com.

Warranty Exclusions

General Wear and Tear

Excludes general wear and tear from extended use or seasonal pitching.

Damage and Degradation

Excludes accidental damage, fabric flaws from use, UV degradation, and seam abrasion.

Component Failures

Excludes broken zips, stretched seams, buckles, eyelets, holdalls, and pole damage.

Environmental Factors

Excludes UV degradation, condensation from poor ventilation, and consequential loss.

Warranty Claims and Contact

Contacting Retailer for Issues

Contact your retailer immediately for any warranty repairs/issues, even if purchased online.

Product Condition for Claims

Ensure the product is clean and dry before sending back for checking; wet/dirty products are not accepted.

Statutory Rights

The sales contract with the retailer and statutory rights remain valid throughout any warranty claim.

Overview

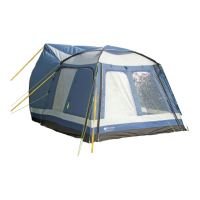
The provided document is a user manual for the "Ozone Enclosed Canopy" by Outdoor Revolution.

Function Description

The Ozone Enclosed Canopy is an accessory designed to attach to the front of an existing tent, providing additional enclosed space. It serves to extend the living area of a tent, offering shelter from the elements and potentially increasing storage or relaxation space. The canopy is designed for ease of erection and durability, aiming to provide years of satisfactory service when basic instructions are followed.

Important Technical Specifications

The canopy includes several key components:

  • Flysheet (or outer): The main fabric structure of the canopy.
  • Bag of Pegs: Used to secure the canopy to the ground.
  • Steel Collapsible Pole: Provides structural support for the canopy.
  • Storm Strap Attachment Points (2): Designed for attaching additional storm straps for enhanced stability in adverse weather.
  • Repair Kit: Included for minor repairs.
  • Holdall: For packing and transporting the canopy.

The outer fabric is flame retardant treated, though it will still melt if exposed to heat sources like cooking or smoking. The product is designed with high-quality fabrics and components, undergoing rigorous checking during manufacturing.

Usage Features

Erection:

  1. Spread out the flysheet: Lay it on the ground with the long zip near the front of the pitched tent.
  2. Attach to tent: Zip the canopy onto the front of the tent using the pre-sewn zip.
  3. Assemble pole: Locate and attach all pieces of the steel collapsible pole.
  4. Thread pole: Insert the pole through the sleeve and secure it with the metal pin from the ring and pin at the bottom on both sides.
  5. Clip plastic clips: Attach all black plastic 'c' clips to the pole on either side.
  6. Peg out and tension: Secure the canopy with pegs and use adjustable pegging straps to tension it. Avoid over-tensioning the fabric, and release tension if a door zip is too tight.
  7. Peg remaining points: Peg out all remaining pegging points and guy lines, starting from one corner.
  8. Storm Straps (optional but recommended): Peg out the Reflective Endurance Storm Straps for extra stability, especially in heavier weather.

Important Usage Notes:

  • Pre-holiday check: Always fully erect and check the canopy for all contents before a trip. Contact the retailer immediately if anything is missing.
  • Condensation: Man-made fabrics are prone to condensation. Ensure Vortex Vents are open to combat this. This is a natural occurrence and not a leak.
  • Weathering: It is recommended to erect the canopy for some period before use to allow it to "weather." Full effectiveness may take a few uses. Seam sealant can be used for persistent weeps.
  • Site selection: Erect the canopy on clear, level ground free of sharp objects. Keep all zips fully closed. Laying a groundsheet is recommended to keep the canopy dry and clean.
  • Trial run: Conduct a trial run to familiarise yourself with the setup. Contact the dealer for help with pitching issues before a holiday.
  • AirFrame Tubes (if applicable to specific models): A critical warning states: "Never unzip the zips on the protective sleeves whilst the AirFrame Tubes are inflated. This will result in the tube bursting or ballooning out of the sleeve causing damage to the tube and the sleeve. This is not covered under the warranty." While this specific canopy is described with a steel pole, this warning suggests other Outdoor Revolution products may use AirFrame Tubes, and this general caution is provided in the manual.

Maintenance Features

Packing Away:

  1. Zip all doors: Ensure all doors are zipped up.
  2. Unpeg: Remove guy lines, storm straps, and most pegs, leaving the four corners pegged.
  3. Remove pole: Detach the metal pin from the bottom of the pole and slide the pole out of the sleeve.
  4. Unzip from tent: Detach the canopy from the front of the tent.
  5. Remove final pegs: Take out the remaining pegs.
  6. Fold lengthways: Fold the canopy lengthways into a long, thin sausage shape.
  7. Measure against bag: Ensure the folded canopy width matches the bag width.
  8. Roll tightly: Begin rolling the canopy as tightly as possible towards the bag.
  9. Place in bag: Place the rolled canopy onto the bag, pull the sides up, and zip it closed.

Cleaning and Storage:

  • Drying: Always dry and air the canopy after use before packing away to prevent mildew or mould.
  • Cleaning: Remove dirt or stains by brushing or gently washing with warm water.
  • Detergents: DO NOT use detergents, as they will destroy the waterproofing on the fabrics.
  • Cooking/Smoking: DO NOT cook or smoke inside the canopy, as the fabric will melt despite being flame retardant treated.

Warranty and Repairs:

  • Warranty Period: The Outdoor Revolution Warranty lasts for 12 months from the original date of purchase. Keep all receipts.
  • Coverage: Covers workmanship and fabric/components. Faults within 6 months are investigated by Outdoor Revolution. Faults found after six months require the purchaser to prove the fault.
  • Registration: Product warranty must be registered BEFORE use via www.outdoor-revolution.com.
  • Exclusions: The warranty does not cover:
    • General wear and tear or seasonal pitching.
    • Accidental damage (human, animal, weather).
    • Flaws from excessive use.
    • Water ingress due to UV degradation or excessive abrasion of seams/taped seams.
    • Broken zips from over-tensioning, forcing, or snagging.
    • Over-tensioned/stretched seams.
    • Buckles subjected to undue force or abrasion.
    • Lost/popped out eyelets.
    • Broken holdalls.
    • Pole breakages or tube punctures (if applicable).
    • Collateral damage from pole breakage.
    • UV degradation.
    • Condensation (natural occurrence, exacerbated by insufficient ventilation).
    • Consequential damage/loss to property/belongings or shortening of holidays.
  • Damage claims: Contact your retailer immediately for warranty issues. The product must be clean and dry and in its original condition for checking. Wet or dirty products will not be accepted for checking/warranty claims.
  • Repair Kit: A repair kit is included for minor issues.

Outdoor Revolution Ozone Specifications

General IconGeneral
BrandOutdoor Revolution
ModelOzone
CategoryTent
LanguageEnglish

Related product manuals