This document describes the "Recreation Series" Outdoor Theater System, an entertainment system designed for outdoor use, featuring a 15-foot screen and 8-inch speakers.
Function Description
The Outdoor Theater System allows users to set up a large-screen projection system outdoors for entertainment purposes, such as watching movies or sports. It includes a projector, a large screen, and a sound system, enabling a complete cinematic experience in an outdoor setting. The system is designed for ease of assembly and use in various outdoor environments.
Important Technical Specifications
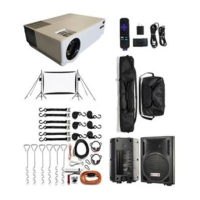
System Components:
- Projector: 1 unit
- Streaming Stick: 1 unit (for media playback)
- Screens:
- White Stretch Screen: 1 unit (15-foot)
- Black Non-Stretch Screen: 1 unit (for backdrop)
- Speakers:
- Active Speaker: 1 unit (with built-in amplifier)
- Passive Speaker: 1 unit
- Speaker Cord: 1 unit
- Tripod Stands: 4 units (for screen and speakers)
- Cables:
- Audio Cable (2x2 RCA): 1 unit
- 3.5mm RCA Adapter: 1 unit
- Outlet Strip: 1 unit
- Extension Cord: 1 unit
- Mounting & Securing Hardware:
- Tie Down Straps with Hooks: 6 units
- Ground Twist Stakes: 6 units
- Bungee Cords: 2 units
- Carrying & Accessories:
- Carry Bag for Screen and Tripods: 1 unit
- Carry Bag for Electronics: 1 unit
- Flashlight: 1 unit
- Parts Bag (2 Eye Bolts, 2 Wing Nuts, 2 Spring Clips): 1 unit
Screen Specifications:
- Size: 15 Foot
- Aspect Ratio: The projection screen has a 16:9 ratio format. The projector can display in either 16:9 or 4:3 ratio formats. The aspect ratio can be changed via the projector manual.
Audio Specifications:
- Speakers: 8-inch speakers (Active and Passive).
- Speaker Mode: Must be set to "NO DISK" when hard-wired for audio with the projector.
- Bluetooth Compatibility: Speakers are Bluetooth compatible for other audio applications. They are listed as "Savi" for pairing.
- FM Radio: Speakers include an FM Radio function, accessible by selecting "RADIO" mode and scanning channels using buttons on the speaker or remote control.
Power Requirements:
- Indoors: The system must be grounded while in use to prevent electrical shock. In the event of a malfunction, this grounding will provide a path of least resistance for the electrical current.
- Outdoors: Use only a GFCI protected outlet. GFCI stands for Ground Fault Circuit Interrupter. If unsure if the outlet is GFCI protected, consult a professional electrician.
- Extension Cords: Use only 3-wire extension cords that have a 3-prong grounding type plug. Always use a GFCI protected outlet.
Usage Features
General Safety Information:
- Water Safety: Never use near water, rain, or any wet conditions.
- Anchoring: Never use without the anchor system.
- Personnel: Always have two people to raise and lower the screen.
- Speaker Height: Always remove the speakers from the stands when adjusting their height.
- Grounding: Use only 3-wire extension cords with a 3-prong grounding type plug and a GFCI protected outlet.
System Assembly:
- Tripod Stand Setup: Open tripod stands, loosen lower knob, separate legs until fully extended, tighten lower knob. Repeat for all stands.
- Eyebolt Insertion: Insert eyebolts into the top hole of the stands and tighten with wingnuts.
- Ground Stake Placement: From the center of the stand, take one large step out and twist one stake into the ground 3 feet to your left and another 3 feet to your right. Repeat for other stands.
- Height Adjustment: Loosen height adjustment knob, raise top tube to the height of the sixth hole, insert pin, tighten knob. Repeat for other stands.
- Tie-Down Strap Hookup: Hook the first tie-down strap into the eyebolt at the top of the stand, connect its other end to the center twist stake. Connect the second tie-down strap to the hook of the first strap and connect the bottom end to the back tie-down stake. Connect the third tie-down strap to the hook of the first strap and connect the bottom end to the front tie-down stake. Ensure a little slack in straps for tightening. Repeat for other stands.
- Black Screen Unfolding: Unfold the black screen. Using Spring Clips, attach the black screen's D-Rings, Velcro side forward, to the eyebolt at the top of the stand. Repeat for the other stand.
- White Screen Attachment: Take the white screen and with the Velcro facing inward, secure it to the black screen using the Spring Clips and Velcro along the top.
- Middle Pole Insertion: Raise the middle pole of the tripod stand to the fourth hole and insert the pin. Repeat for the other stand.
- Tie-Down Straps Tightening: Tighten all 6 tie-down straps to ensure a secure and smooth viewing surface.
- Bungee Cord Attachment: Take a bungee cord and hook one end onto the lower adjustment knob of the tripod stand. Wrap the bungee under and around the base of the stand. Attach the other end of the bungee cord to the bottom corner of the black and white screens. Repeat for the other stand.
- Speaker Stand Setup: Open the tripod stands for the speakers. Tighten the lower knob to secure the legs in place. Set the stands on level ground at each side of the screen.
- Active Speaker Placement: Plug the power cord into the back of the active speaker. Attach the active speaker to a tripod stand, ensuring the hole in the bottom of the speaker is placed on top of the tripod. Secure it in place by tightening the knob on the back of the tripod.
- Passive Speaker Placement: Repeat for the passive speaker. On the back of the active speaker, plug the metal connector of the speaker cable into the output labeled "Speaker Out". Run the other end of the cable to the passive speaker and push and twist the plastic connector to lock into place.
- Projector and Blu-ray Player Setup: Set up a small table for the projector and Blu-ray player approximately 20 feet in front of the screen. Ensure a grounded extension cord and a GFCI electrical outlet are used.
- Power Connection: Plug the power strip into the provided extension cord and power source. Plug in the power cords for the projector, Streaming Stick, and the provided extension cord into the power strip.
- Streaming Stick Connection: Connect the Streaming Stick to the projector using the HDMI cable. Plug one end into the HDMI output of the Streaming Stick and the other end into the HMDI input of the projector.
- RCA Cable Connection: Plug the end of the RCA Cable into the red and white audio outputs on the projector. Run the other end of the RCA audio cable to the active speaker and plug it into the red and white inputs on the back of the speaker. Set the speaker mode to "NO DISK".
- Extension Cord Connection: Run the extension cord to the active speaker and plug the speaker power cord into the extension cord.
Wiring Schematic:
- Component cables are shown in blue.
- Power cords are shown in red.
- The Active Speaker connects to the Passive Speaker via a Speaker Wire.
- The Active Speaker connects to the Projector via an RCA Cord.
- The Projector and Streaming Stick are powered by Power Cords connected to an Outlet Strip.
- The Active Speaker is powered by a Speaker Power Cord with Extension Cord, also connected to the Outlet Strip.
Trouble Shooting:
- Projector Placement: If the image is too close or far, move the projector closer or farther away from the screen and adjust the feet to appropriately size the picture.
- Power Check: Ensure power is on to the Outlet Power Strip, Projector, Streaming Stick, and Speakers.
- Video Reference: A video of the assembly is available on YouTube.com by searching "Backyard Theater Systems Setup Video".
Alternate Rear Projection Assembly:
- Use only the white stretch screen without the black backdrop.
- Assemble the projector and Streaming Stick behind the screen, projecting the image through the white screen.
- Flip the image on the projector so that the picture is not reversed on the viewing surface. This can be done directly from the projector remote control by pressing the button shown in the manual (an icon with a left and right arrow pointing to a circle).
Maintenance Features
Warranty Information:
- Coverage: Outdoor Theater Systems warrants manufacturing defects in original material, including original parts and workmanship, under normal use and conditions for a period of one year from the date of purchase in the U.S.A.
- Service: With dated proof of purchase, the company will provide repair service for labor and parts or replace the product at its discretion.
- Contact: For repair or replacement, email info@outdoortheatersystem.com for instructions on shipping products for repair or replacement.
- Projector and Streaming Stick: These components are covered under their own respective warranties.
- Exclusions: The warranty does not cover damages from negligence, misuse, abuse, accident, failure to follow operating instructions, commercial use, rental, repairs by an unauthorized facility, or products purchased, used, serviced, or damaged outside of the U.S.A.
Packing for Storage or Transportation:
- Oblong Carry Bag Contains:
- 2-Tripod Stands
- 6-Twist Stakes
- 6-Tie Down Straps
- 1-White Stretch Screen
- 1-Black Screen
- 2-Spring Clips
- 2-Bungee Cords
- Rectangular Carry Bag Contains:
- Projector
- Streaming Stick
- Speakers
- Multiple Outlet Strip
- Extension Cords
- Flashlight
- RCA Cable