This document is an assembly and instruction manual for an Outsunny greenhouse, model number 845-243 (INbfc010V01_US). It provides comprehensive guidance for setting up and maintaining the greenhouse, emphasizing safety and proper construction techniques.
Function Description
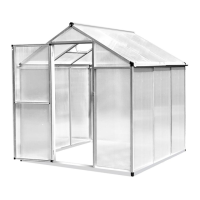
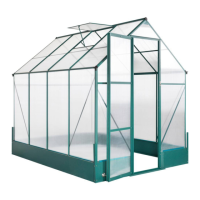
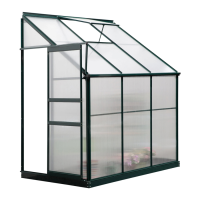
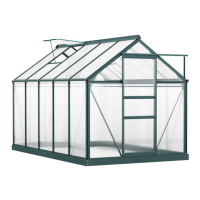
The Outsunny greenhouse is designed to provide a controlled environment for growing plants, protecting them from adverse weather conditions and extending the growing season. It features a sturdy frame structure and transparent panels that allow sunlight to penetrate while retaining warmth. The design incorporates elements for ventilation and drainage, crucial for plant health. The assembly process involves connecting various frame parts, sliding in PC panels, and securing components with screws and plastic connectors. The completed structure offers a dedicated space for gardening, suitable for various types of plants that benefit from a sheltered environment.
Usage Features
The manual outlines a step-by-step assembly process, starting with the base and progressing to the roof and panels. Key usage features include:
- Modular Assembly: The greenhouse is constructed from numerous individual parts, including various profiles, connectors, and panels, allowing for a systematic and manageable assembly. Parts are categorized into different boxes (BOX-1/2 and BOX-2/2) and listed with quantities and sizes for easy identification.
- Base Construction: The initial steps involve connecting base parts (e.g., part 3) with plastic connectors (part 32) and securing them with screws to enhance stability. This forms the foundation upon which the rest of the structure is built.
- Vertical Supports and Grooves: Parts like 5, 12, and 13 are connected to form vertical supports and grooves into which the PC panels are slid. This design ensures that the panels are securely held within the frame.
- Panel Installation: PC panels, such as G, H, I, A, B, and J, are designed to slide into specific grooves of the frame components (e.g., parts 5, 12, 13, 8, 9, 17, 18). This method simplifies panel installation and ensures a snug fit.
- Roof Structure: The roof is formed by connecting parts like 8 and 9 with plastic connector 34, and then attaching these to the main frame using connectors 33-1/33-2. Sunlight panels (H) are then slid into the roof grooves.
- Door Assembly: A dedicated section details the assembly of the door, involving parts 25, 27, 28, 29, and PC panels K. This ensures a functional and secure entry point to the greenhouse.
- Window Integration: The manual describes how to integrate a window (part 30) into the groove of part 23, allowing for ventilation.
- Dewatering Profile: The inclusion of a dewatering profile (part 31) connected with parts 6 and 7 by screw 38 indicates a design consideration for managing rainwater runoff.
- Plastic Covers: Plastic covers (part 37) are pushed onto top plastic connectors, likely for aesthetic purposes and to protect the connectors from the elements.
- Ground Anchoring: The final step involves placing base corners (part 44) and fixing the structure to the floor using screws (parts 46 and 45), providing stability and preventing the greenhouse from being moved by wind.
- Tools Recommended: The manual illustrates a range of common tools required for assembly, including pliers, a tape measure, a level, a hammer, a shovel, safety glasses, a drill, screwdrivers, a wrench, a utility knife, and gloves, indicating that standard household tools are sufficient.
- Teamwork: The instructions recommend "Team works (Two or more people)" for assembly, highlighting the need for assistance due to the size and complexity of the structure.
Maintenance Features
The manual provides clear guidelines for maintaining the greenhouse to ensure its longevity and optimal performance:
- Regular Cleaning: "Keep the shed clean with soft cloth, use water if necessary." This simple step prevents dirt and debris buildup that could affect light transmission or material integrity.
- Door Track Maintenance: "Keep the door tracks clear of dirt and other stuff that prevent them from sliding easily." This ensures smooth operation of the sliding doors, preventing wear and tear.
- Snow Removal: "Clean the snow with necessary tools to make sure it is safe to enter into; Heavy snow may cause collapse, please make sure safety before entering into." This is a critical safety and structural integrity measure, especially in regions with heavy snowfall.
- Lubrication: "Please add some oil on the top and bottom door sliding channel to make door slides smoothly." Lubrication reduces friction and extends the life of the sliding door mechanism.
- Safety Precautions: The manual emphasizes safety during assembly, including wearing safety gloves, eye protection, and long sleeves to prevent injury, and paying attention to sharp edges. It also warns against children and pets entering the construction site and advises against concentrating total weight on the roof. When using a step ladder, ensuring its safety is paramount.
- Local Building Codes: Users are advised to "check local building codes regarding footings, location and other requirements before beginning construction," ensuring compliance and structural safety.
- Part Verification: Before starting, users should "separate and identify all the parts and hardware" and notify the seller within one week if any parts are missing. This prevents issues during assembly and ensures the structural integrity of the partially assembled building.
- Protective Layer Removal: Users are instructed to "tear off the safety protection layer before the assembly," which protects parts during shipping and handling.