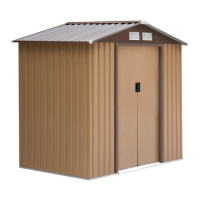
This document provides comprehensive instructions for the assembly, use, and maintenance of an Outsunny shed, model IN230900344V01_GL, with dimensions 845-953V00. The shed is designed for storage purposes and is not intended for living.
Function Description:
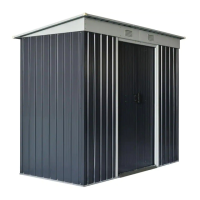
The Outsunny shed is a standalone outdoor storage unit designed to protect various items from the elements. Its primary function is to provide a secure and weather-resistant space for tools, garden equipment, and other belongings. The assembly process involves constructing a floor base, erecting walls with a window, and installing a gabled roof, followed by the attachment of double doors with a locking mechanism. The design emphasizes ease of assembly with clear, step-by-step visual instructions.
Important Technical Specifications:
- Model: IN230900344V01_GL
- Dimensions: 845-953V00 (specific external floor measurements are 1705mm in width and 1235mm in depth).
- Construction Materials: The manual implies the use of panels and profiles, likely made of metal or durable plastic, given the need for pre-drilling and screwing. The floor base can be constructed from treated timber or concrete.
- Assembly Requirements: Requires two or more people for assembly.
- Tools Recommended: Drill, screwdriver, safety gloves, eye protection, and a step ladder. A spatula (part "SG8") is specifically recommended for easier panel insertion into profiles.
- Fasteners: Various screws are used, including Z410, Z420, and ZW413, with quantities specified for each step.
- Door Type: Double doors with a latch and padlock (LOCK part).
- Window: Includes a window panel for natural light.
- Ventilation: Features a ventilation panel (BY part) on the roof.
Usage Features:
- Storage: The shed is explicitly stated to be for storing stuff, not for living.
- Accessibility: Double doors provide wide access for moving items in and out.
- Security: Equipped with a latch and a padlock for securing stored items.
- Weather Resistance: Designed to protect contents from moisture, with recommendations for a sloped concrete base to prevent water ingress.
- Foundation Options: Can be built on a treated timber base, a concrete pad (sloped towards edges), or cemented bricks/blocks. It is not designed to be built directly on a lawn.
Maintenance Features:
- Cleaning: Keep the shed clean with a soft cloth and water if necessary.
- Door Tracks: Ensure door tracks are clear of dirt and obstructions to allow for easy sliding.
- Snow Removal: Clean heavy snow from the roof with necessary tools to prevent collapse and ensure safe entry.
- Structural Integrity: Regularly check for any loose screws or damaged parts and address them promptly to maintain the shed's stability and safety.
Assembly Process Overview:
The assembly is divided into 66 steps, starting with site preparation and floor assembly, moving to wall and roof construction, and concluding with door installation and final security measures.
- Site Preparation (Step 1): The ground surface must be level. Options for a foundation include a wooden or concrete base. External floor measurements are 1705mm x 1235mm.
- Floor Assembly (Steps 1-11): Involves fitting floor panels (CF1-1, CF1-2) into profiles (CP1, CP2, CP3, CP4, CP5, SG6, SG7-1, SG7-2, SG8) and securing them with screws (Z410, Z420). The crease line of the floor panels must be underneath. Pre-drilling a 1mm deep hole is recommended before screwing.
- Wall Assembly (Steps 12-28): Vertical profiles (CP5) are attached to the floor base. Wall panels (CW1-1, CW1-2, CW1-3, CW1-4, CW2-1, CW2-2, CW3-1, CW3L, CW3R, CW4-1, CW4-3, CPA1, CPA2, SG10, SG101, SG102, SG103, SG12, SG13, SG14, SG15) are inserted into the profiles, ensuring they are fully fitted and aligned before screwing. The window panel (SG10) is installed in step 36, followed by its press plates (SG101, SG102, SG103) in step 38, which should be pressed tightly to avoid falling down.
- Roof Assembly (Steps 29-49): Roof panels (CR1-1, CR1-2, CR1-3, CP6, CP7, SG2, SG8) are assembled, ensuring the stripes are upwards and fully fitted into the profiles. The roof boards are then turned over and secured with screws (Z420). The distance from the profile edge to the first screw should be about 40mm.
- Door Assembly (Steps 51-63): The left and right door panels (CD1-1, CD1-2, CD1-3, CD1-4, CD1-5, CD1-6) are assembled with profiles (CA1, CA1L, CA1R, CA2, CA2L, CA2R, CA3, CA4, CS1, SG9) and secured with screws (ZW413, Z410). Hinges (M01) and latches (M03-6L, M03-7) are installed. It is crucial not to fasten the screws completely until the doors are adjusted to their correct positions. The joints of both left and right doors should be in line.
- Final Touches (Steps 64-66): The door stopper (M04) is installed, and the shed is reinforced with additional screws (Z410, ZW413) and corner pieces (SG13, SG14, SG15). Finally, the padlock (LOCK) is attached for security.
Safety Guidelines:
- Choose a dry and calm day for assembly.
- Teamwork (two or more people) is required.
- Wear safety gloves, eye protection, and long sleeves to prevent injury, paying attention to sharp edges.
- Keep children and pets away from the construction site.
- Never concentrate total weight on the roof.
- Ensure a step ladder is stable when in use.
Customer Support:
Contact details for customer service are provided for various countries (US, CA, UK, DE, FR, ES, PT, IT) including phone numbers and email addresses.