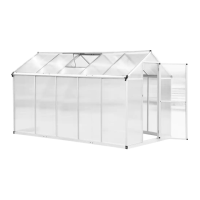
This document provides an assembly and instruction manual for an Outsunny greenhouse, model number 845-243V02 (INbfc012V01_UK). The manual outlines the steps for constructing the greenhouse and offers important safety, usage, and maintenance guidelines.
Function Description:
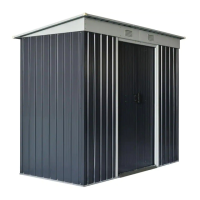
The Outsunny greenhouse is designed to provide a controlled environment for growing plants. It features a structure composed of various aluminum profiles and PC (polycarbonate) panels, which allow sunlight to penetrate while protecting plants from adverse weather conditions. The greenhouse includes a door for access and ventilation, as well as provisions for securing it to the ground. The assembly process involves connecting a base structure, vertical supports, roof components, and then inserting the PC panels to form the walls and roof.
Important Technical Specifications:
The greenhouse structure is built using a combination of numbered parts, including aluminum profiles of various lengths and shapes, plastic connectors, screws, and PC panels. The parts list details the quantity and size of each component. For instance, the manual lists:
- Part 1: 2 units, 147.7 units long
- Part 5: 4 units, 130.3 units long
- Part 16: 8 units, 130 units long
- Part 30: 1 unit, 57x57 units (likely a base frame component)
- PC panels (A, B, D, E, F, G, H, I, J, K) with specific dimensions:
- A (wall panels): 10 units, 3.8133.558.8 units
- B (roof panels): 9 units, 3.89958.8 units
- G (PC panel): 2 units, 3.8129.653.1 units
- H (sunlight panels): 2 units, 3.834.553.3 units
- I (PC panel): 1 unit, 3.819.763 units
- J (roof panels): 1 unit, 3.837.558.3 units
- K (PC panel): 2 units, 3.877.657.6 units
- Connectors: Plastic connectors (e.g., part 32, 33-1, 33-2, 34) are crucial for joining structural elements.
- Fasteners: Various screws (e.g., part 39, 40, 42, 46) are used to secure connections. Part 38 represents a screw and nut combination, and part 43 is a wrench.
- Other components: Part 37 is a "0" shaped component (2 units), part 44 is a "。" shaped component (4 units), and part 45 is a "4" shaped component (4 units). These are likely related to anchoring or finishing.
The manual emphasizes the importance of checking local building codes for footings, location, and other requirements before construction.
Usage Features:
The greenhouse is designed for ease of use once assembled. Key usage features include:
- Access: A door mechanism (involving parts 25, 26, 27, 28, 29, and PC panel K) allows entry and exit. The door slides, and smooth operation is maintained through regular cleaning and lubrication.
- Sunlight Exposure: PC panels (A, B, D, E, F, G, H, I, J, K) are designed to allow optimal sunlight penetration, essential for plant growth.
- Ventilation: While not explicitly detailed in the assembly steps, greenhouses typically require ventilation. The presence of specific PC panels and the overall structure suggest a design that can be adapted for airflow.
- Stability: The assembly process includes steps to connect the structure securely, and the final step emphasizes adjusting screws to enhance the fastness (stability) of the greenhouse. Anchoring to the floor using parts 44, 45, and 46 is also part of the setup.
Maintenance Features:
Proper maintenance is crucial for the longevity and functionality of the greenhouse. The manual provides clear instructions:
- Cleaning: The shed should be kept clean using a soft cloth and water if necessary.
- Door Track Maintenance: The door tracks must be kept clear of dirt and other obstructions to ensure the door slides easily. Lubrication with oil on the top and bottom door sliding channels is recommended for smooth operation.
- Snow Removal: In areas with snow, it is essential to clean snow from the roof to prevent collapse. Heavy snow can cause serious damage, so safety must be ensured before entering the greenhouse after snowfall.
- Structural Integrity: Regular checks and adjustments of screws are recommended to maintain the fastness and stability of the greenhouse structure.
Assembly Preparation and Safety:
The manual stresses the importance of preparation and safety during assembly:
- Part Verification: Before starting, all parts and hardware should be separated and identified against the parts list to ensure nothing is missing. If parts are missing, assembly should be delayed, and the seller notified within one week of receiving the product, as a partially assembled building can be damaged by light winds.
- Teamwork: Assembly requires at least two people.
- Safety Gear: Wearing safety gloves, eye protection, and long sleeves is mandatory to prevent injury, especially due to sharp edges on some parts.
- Site Safety: Children and pets are not allowed in the construction area.
- Roof Weight: Never concentrate total weight on the roof. When using a step ladder, ensure its stability.
- Weather Conditions: Assembly should be performed on a dry and calm day.
- Protective Layer: The safety protection layer on parts should be torn off before assembly, but the part number label should be kept if needed.