ProVap 110
Instruction Guide
This sublimator (a more accurate term than vaporizer, but we’ll use the term vaporizer as most know it
by this name) is strictly for use in a grounded 110 volt (3 prong) socket.
Operation:
This vaporizer is most easily used from the back of the hive, where a small (¼”) hole is drilled in the back
center of the ¾” rim of the bottom board that supports the bottom brood box. This hole is needed to
accommodate the vaporizer stem. You want the vapors to rise up through the frames throughout the
hive. Using a hole in the back of the hive and at this place (we believe) is easiest as it eliminates the
nuisance of flying bees. The friction between the stem and drilled hole also holds the vaporizer in place
during vaporization, which allows you time to prepare the next dose. The bees will readily propolize this
small hole. Should you wish to close the hole after vaporizing, a plastic golf tee works great and is easily
removed for next time. Make sure the hole is not clogged prior to inserting the stem!
You can use the ProVap in the front entrances as well if you wish. Rather than closing the entrance with
rags or whatever you choose and inserting the vaporizer in an open area, simply take a paint stick, cut it
to the desired length and drill a ¼” hole in the center of the paint stick. Slide the stick over the stem and
you have an effective vapor block. With a number of these pre-drilled sticks, you can easily “march right
down the line” vaporizing.
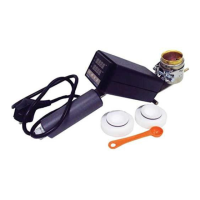
Connect the vaporizer to your 110 volt power source. It will take approximately 2 minutes to reach
operating temperature. The red sequence readout will display 230 when ready. In the white Teflon lids
(recess side up) place the appropriate amount of OA. Do NOT pack the OA in the lid; rather place it
loosely. Since one gram is almost a ¼ teaspoon, we’ll use teaspoon as our measuring tool as it is the
common term. Use ¼ teaspoon per brood chamber no matter the size be it mediums or deeps, eight or
ten frame. Use a 1/8
th
teaspoon on a nuc. On a two brood chamber hive; you would use ½ a teaspoon.
Invert the vaporizer. Invert the ProVap and push it on the white Teflon lid containing the OA (be careful
the vaporizer bowl is very HOT!)