EasyManua.ls Logo

Ozone OZ100 - User Manual

Ozone OZ100
4 pages
Print Icon
To Next Page IconTo Next Page
Loading...
USER MANUAL EN
USER MANUAL
Ozone generator
OZ100 / OZ200 / OZ400
The OZ series is a compact, robust ozone generator for odor removal in
houses, apartments, garbage rooms, wardrobes, basements, cabins, cars,
boats, caravans, trucks, motorhomes, workwear, hunting clothes, odors in
textiles, odors from animals etc.
Examples of odors that can be removed with ozone:
Smoke odor, waste odor, diesel odor, sewage odor, food odor, mold odor,
dog odor, fish odor, barn odor, basement odor, refrigerator odor, trapped
odor, paint odor, solvent odor and more.
Page 1
Ozone treatment:
Important! The ozone generator should only be used in confined spaces,
where no humans or animals are present.
1. When ozonating confined spaces, it is important to keep all windows,
doors and vents closed. If necessary, you can tape around doors,
windows and vents to avoid gas leakage to other parts of the building.
2. For best results, it is recommended that the room in question is cleaned
thoroughly before the ozone treatment starts.
3. The ozone generator is placed on a stable surface, or can be mounted
on a wall, preferably a little high up from the floor. By placing the
generator above floor level (e.g. 1/2 of the room height - or higher) you
get a better distribution of the ozone gas in the room (ozone is a little
heavier than air). Make sure that textiles do not overlap (curtains,
pillows), as the ozone gas must be able to penetrate to get the full
effect.
4. Turn on the machine and check that it produces ozone (without inhaling
directly from the air stream flowing out of the machine) - chlorine-like
odor and a blue, faint glow from the ceramic element. You will hear that
the fan starts and that there is a faint "dure sound" coming from the
generator.
5. Leave the room and lock.
6. When the ozone treatment ends, turn off the ozone generator and open
windows (or doors) to let in fresh air. Air well. Avoid breathing the
ozone gas in the room. Tip: Use an extra-long (earthed) extension cord
to connect the generator to a socket near the door you use to enter /
exit, to avoid exposure time in the room during ozonation.
7. Leave the room locked and air out for a minimum of 30 minutes. When
ozonating, for example, a basement or boat with limited ventilation
options, a longer ventilation time is required: 60-90 min. Make sure that
no people can enter the room during ventilation.
8. Repeat ozone treatment, if necessary.
Page 2
Question and Answer IconNeed help?

Do you have a question about the Ozone OZ100 and is the answer not in the manual?

Summary

Ozone Treatment Process

Safety First: Confined Spaces Only

Ensure the ozone generator is used exclusively in confined spaces devoid of humans and animals.

Room Preparation for Ozonation

Seal the room, clean it thoroughly, and position the generator high for effective ozone distribution.

Operating the Ozone Generator

Turn on the machine, confirm ozone production via scent/glow, then vacate and lock the room.

Post-Treatment Ventilation

After treatment, turn off the generator and ventilate the room for at least 30-90 minutes.

Important Usage and Safety Information

General Safety Precautions

Handle the ozone generator with care, avoid damaged parts, and keep it dry to prevent electrical hazards.

Recommended Room Sizes and Ventilation

Ensure adequate room volume and ventilation to avoid exceeding safe ozone concentration limits.

Odor Removal Approach

Place the generator about 1.5m high in a dry area, ensuring airflow is unobstructed.

Generator Operation and Components

Starting and Monitoring Operation

Connect to power, start via the main switch, and observe the green LED for high voltage production.

Service and Maintenance

Regularly clean the filter and ceramic element, and ensure the generator is disconnected before servicing.

Ceramic Element Care

Clean the ceramic element with window cleaner or rubbing alcohol and ensure it's dry before reuse.

Replacing the Ceramic Element

Disconnect power, loosen screws and connectors, replace the element, and reattach wiring carefully.

Technical Specifications

Model Comparison

Details ozone technology, production, fan capacity, dimensions, weight, and consumption for OZ models.

Operating Conditions

Specifies voltage, power cable length, top cover material, ambient temperature, and humidity limits.

Overview

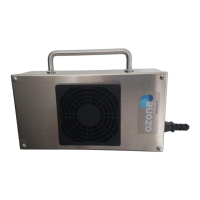
The device described is an ozone generator from the OZ series (OZ100, OZ200, OZ400 models), manufactured by Ozone Scandinavia AS. It is designed for odor removal in various confined spaces.

Function Description

The ozone generator produces ozone gas, which is effective in removing a wide range of odors. These include smoke odor, waste odor, diesel odor, sewage odor, food odor, mold odor, dog odor, fish odor, barn odor, basement odor, refrigerator odor, trapped odor, paint odor, solvent odor, and odors in textiles. The device utilizes CD - Ceramic ozone technology.

Important Technical Specifications

Model OZ 100 OZ 200 OZ 400
Ozone technology CD - Ceramic CD - Ceramic CD - Ceramic
Ozone production 100 mg/h 200 mg/h 400 mg/h
Fan capacity 50 m³/h 50 m³/h 50 m³/h
Dimensions (WxDxH) 235x90x160 mm 235x90x160 mm 235x90x160 mm
Weight 1.4 kg 1.4 kg 1.5 kg
Consumption 15W 15W 20W
Voltage 230V 230V 230V
Power cable 2.0m 2.0m 2.0m
Top Cover Stainless steel Stainless steel Stainless steel
Ambient temp. 0°C to +35°C 0°C to +35°C 0°C to +35°C
Humidity <60% rH <60% rH <60% rH
CE-approved Yes Yes Yes

Note: Ozone production decreases at higher temperatures; the best operating temperature is +15°C.

Usage Features

The ozone generator is designed for use in confined spaces such as houses, apartments, garbage rooms, wardrobes, basements, cabins, cars, boats, caravans, trucks, and motorhomes. It is crucial that no humans or animals are present in the space during operation, as ozone gas is toxic and hazardous at concentrations exceeding OSHA exposure limits.

Before treatment, the room should be thoroughly cleaned. All windows, doors, and vents must be closed, and sealed if necessary, to prevent gas leakage. The generator should be placed on a stable surface or mounted on a wall, preferably about 1.5 meters (or 1/2 of the room height) above the floor to ensure better distribution of ozone gas, which is slightly heavier than air. Textiles should not overlap to allow full penetration of the ozone gas.

To operate, connect the generator to power and turn on the red main switch. A green LED indicates high voltage production, and a faint blue glow from the ceramic element confirms ozone production. A fan will start, and a faint "dure sound" will be audible. The room must be vacated and locked during treatment.

The odor remediation effect is time-dependent. The generator can run continuously for up to a week without issues. For longer operations, using a simple timer for shorter intervals is recommended, which also reduces future maintenance needs.

After treatment, turn off the generator and open windows or doors to air out the room. Avoid breathing the ozone gas. An extra-long (earthed) extension cord can be used to connect the generator to a socket near the door, minimizing exposure during setup. The room should be aired out for a minimum of 30 minutes. For spaces with limited ventilation, such as basements or boats, a longer ventilation time of 60-90 minutes is required. Ensure no people can enter during ventilation. The treatment can be repeated if necessary.

Maintenance Features

Regular maintenance is essential for optimal performance. A Service-Kit can be ordered from the dealer or manufacturer. Always disconnect the generator from power before performing any maintenance.

Filter Cleaning: The thin particle filter in front of the fan should be cleaned regularly. The filter cover is clamped and can be gently loosened with nails or a small screwdriver. The filter should be vacuumed and/or washed with mild soap and thoroughly dried before reinstallation.

Ceramic Element: This is a consumable part with an estimated service life of >3500 hours, depending on air quality and humidity. It produces ozone gas as long as it emits a blue glare. For best effect, regular cleaning is recommended.

  • Cleaning: Wipe the ceramic element with a q-tip or fine cloth dampened with window cleaner or rubbing alcohol, then wipe with a dry cloth. The appliance must be completely dry before restarting.
  • Replacing: To replace the ceramic element, loosen the four screws holding it. Disconnect the two red wires' quick connectors. Release the red wire from the green LED, which is attached with two cable strips to one of the element's red wires. Fit the new element, ensuring the four spacer sleeves are under the element when carefully fastening the four screws. Reconnect the two quick connectors, then carefully fasten one wire from the green LED lamp along one of the element's red wires with two new cable strips.

Other Components: All other service must be performed by the manufacturer.

Ozone OZ100 Specifications

General IconGeneral
BrandOzone
ModelOZ100
CategoryInverter
LanguageEnglish