Do you have a question about the PAC RPK5-GM4102 and is the answer not in the manual?
Step-by-step guide to removing the front floor console front cover.
Steps to remove the radio control assembly from the dash.
Steps to remove the radio from the dash and disconnect electrical connections.
Remove retention clips from factory radio control assembly.
Attach removed clips to the PAC HVAC control assembly.
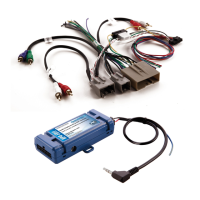
Wiring chart for connecting aftermarket radio components.
Details for Steering Wheel Control (SWC) connector.
Wiring for antenna adapter.
Wiring for main RCA connectors.
Wiring for grey RCA connector.
Wiring for black 3.5mm connector.
Schematic of the wiring connections.
Illustration of SWC connection.
Instructions for setting the rotary switch for radio compatibility.
Connect wires as per the wiring chart.
Interface is pre-programmed; no programming needed unless reassigning functions.
Explanation of dual command functionality for SWC buttons.
Table detailing the order for programming SWC functions.
Start programming by turning the ignition key.
Press the interface's programming button to start.
Learn SWC buttons by pressing them on the steering wheel.
Verify SWC functionality after programming.
Safety warning about cutting wiring.
Verify all SWC are functioning properly for aftermarket radio and OnStar.
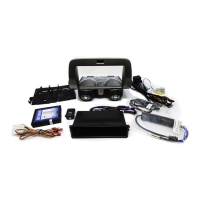
The RPK5-GM4102 is a comprehensive radio replacement kit designed for 2010-2015 Chevrolet Camaro vehicles, integrating climate control retention for a seamless aftermarket radio installation. This kit aims to provide a factory-like look and feel, ensuring that essential vehicle features are maintained and enhanced.
At its core, the RPK5-GM4102 facilitates the installation of an aftermarket radio while preserving critical factory functionalities. It includes a PAC HVAC Control Panel equipped with factory-style HVAC control knobs, offering a familiar tactile experience. A small OLED display at the top of the kit retains the exterior temperature display, a valuable feature for the driver.
The kit is engineered to retain a wide array of factory features, ensuring that the vehicle's original capabilities are not lost with the radio upgrade. These retained features include OnStar functionality, factory warning chimes, and factory Bluetooth connectivity. Steering wheel mounted radio controls are also preserved, allowing drivers to maintain convenient access to audio functions without taking their hands off the wheel. For vehicles equipped with them, the kit retains the factory reverse camera, factory amplifier, factory AUX jack, and the factory USB port.
Beyond retention, the RPK5-GM4102 provides several data bus driven outputs that are crucial for aftermarket radio integration. These outputs include retained accessory power (RAP), which keeps the radio on for a short period after the ignition is turned off, vehicle speed sensor (VSS) output for navigation systems, illumination output for synchronized lighting, a reverse trigger for backup cameras, and a parking brake output for safety features.
A notable feature of this interface is its dual command functionality for steering wheel controls (SWC). Users can program two radio functions to each SWC button using a combination of short press and long press actions. This allows for greater customization and control over the aftermarket radio.
The kit also includes specific components for various vehicle configurations. For instance, it comes with a Camaro-specific antenna adapter (BAA-DIN22), a reverse camera retention harness for MyLink systems, a USB retention cable compatible with both MyLink and standard non-touchscreen radios, and an AUX retention cable for 2010-2012 vehicles with standard non-touchscreen radios and a USB port.
Installation involves several steps, starting with the removal of the factory radio and control assembly. The kit emphasizes careful handling, particularly when dealing with delicate components like the center inserts on the control knobs, which are designed for a single installation. For vehicles with heated seats, specific light pipes must be correctly oriented during the installation of the center caps to ensure proper lighting.
The interface's radio select rotary switch must be adjusted to the correct radio setting before plugging the interface into the vehicle, ensuring compatibility with the aftermarket head unit. The kit supports various radio brands, including Alpine, JVC, Kenwood, Clarion/Nakamichi, Pioneer/Other, Sony, and Fusion, among others.
Steering wheel control programming is a key usage feature. The interface comes pre-programmed with default SWC functions, but users have the option to re-assign these functions or utilize the short press long press dual command functionality. The programming process is guided by a sequence of steps, allowing users to customize their controls. If a steering wheel button does not exist or a function is not desired, the programming step can be skipped. The Mute/End button, by default, offers dual functionality: a short press for mute and a long press for end.
The temperature display at the top of the kit is a multifunction display. It shows the external temperature, firmware version number, and allows users to switch between Fahrenheit and Celsius by pressing and holding the A/C (snowflake) button. The firmware version of the PAC HVAC control panel can be displayed by holding the recirculation button. Additionally, the kit offers customizable splash screens that appear when the unit powers up, which can be cycled through by holding the rear defrost button.
The RPK5-GM4102 is designed with maintainability in mind, particularly through its firmware update capabilities. The interface can be updated with new firmware as it becomes available, using the PAC-UP interface updater (sold separately). This ensures that the device remains compatible with future vehicle updates or new aftermarket radio technologies, and allows for bug fixes or feature enhancements. The PAC-UP program, along with the PAC Vehicle Settings program, can be downloaded from the PAC-audio website.
For the HVAC board, firmware updates are also possible using the RadioPRO application, accessible from the same website. This modular approach to updates helps prolong the life and functionality of the kit.
Troubleshooting guidance is provided for common issues, such as removing or swapping the center inserts in the knob assemblies. This involves carefully disassembling the knob to access and replace the light pipes and inserts, ensuring that the correct insert for heated or non-heated seats is used.
The kit also includes testing and verification steps to ensure proper functionality after installation. This includes checking the ignition, accessory power, radio balance and fade, SWC functionality (including OnStar volume adjustment), RAP (retained accessory power) operation, and the HVAC control panel's display and button functionality. These checks help confirm that all integrated features are working as intended, providing a robust and reliable aftermarket solution.
| Touchscreen | Yes |
|---|---|
| Steering Wheel Control Retention | Yes |
| OnStar Retention | Yes |
| Backup Camera Retention | Yes |
| Bluetooth | Yes |
| Apple CarPlay | Yes |
| Android Auto | Yes |
| Rear Camera Input | Yes |
| Operating System | Android |
| GPS | Yes |
| Wi-Fi | Yes |
| Amplifier Retention | Yes |
| Supported Audio Formats | MP3, WMA, AAC |
| Supported Video Formats | MP4, AVI |